Black Backgrounds and Strobe Techniques
The intent of this article is to provide a strobe positioning technique to allow you to shoot black background images in more shooting situations (a lot more). If you are not familiar with shooting black background images using traditional forward-facing strobe positioning, then check out this black background tutorial first. If you want to learn about basic strobe positioning, check out this strobe position tutorial.
When shooting macro with forward-facing strobes, it can be quite hard to find subjects with lots of clear water behind them, making it difficult to shoot black background images. Any subject which has some sort of substrate behind it will typically have that substrate lit by your strobe light, which can reduce the quality of your image.
Inward-Facing Strobes
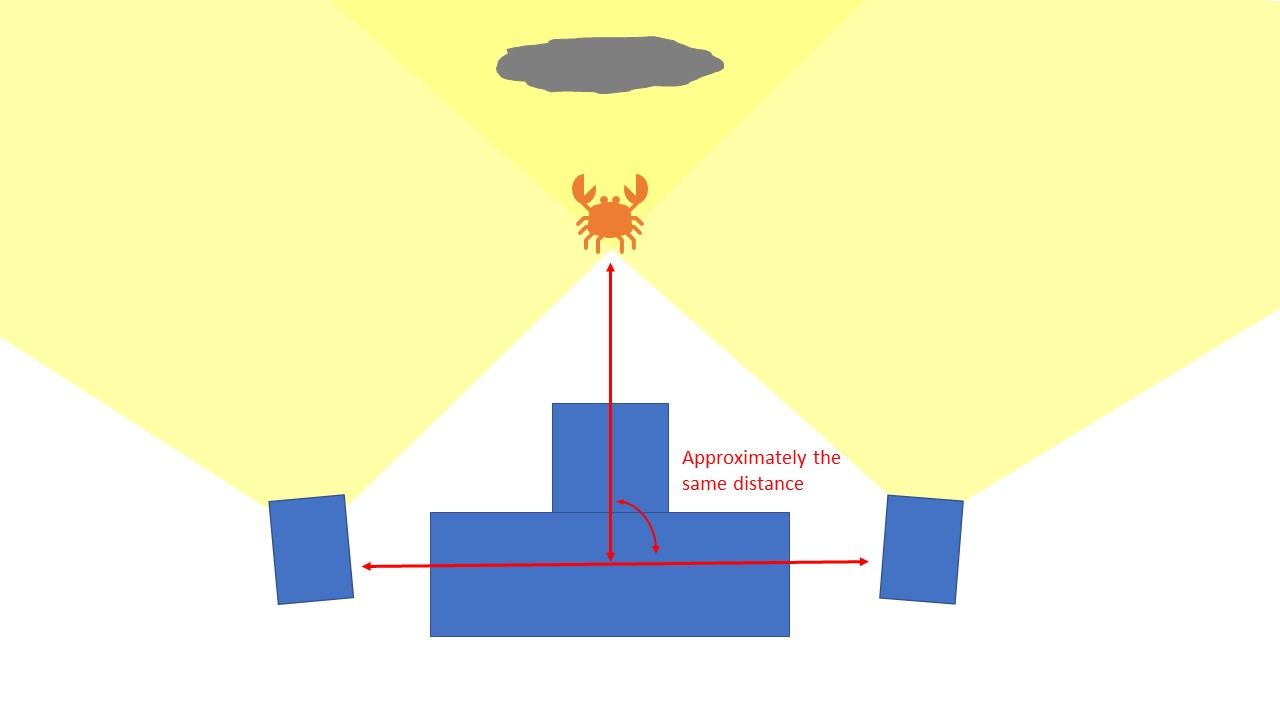
If a subject is right in front of the substrate, then no amount of strobe position monkeying will create a black background. However, if you can find an angle which provides about 6″ to 12″ (or more) of open water between the subject and the substrate behind it, then you can shoot this with a black background (without using a snoot). You just have to angle your strobes inwards, as per the below diagram.

Note that this strobe positioning will create more backscatter than “traditional” strobe positioning. However, as long as you get very close to your subject, you should not have any issues, unless the visibility is particularly terrible.
The other issue you will typically run into is the strobe light hitting your macro port too directly, causing reflections on your lens and port and leading to very washed-out, unusable photos. If you are getting washed out photos with large light patches in them, then you have to bring your strobes back towards the housing, and then either angle them out more or pull them a bit more out to the sides.
On the plus side, this strobe positioning also provides some benefits in terms of light quality. Strobe light is the softest and nicest at the edge of the cone, while light in the middle of the cone is sharper and harsher. Using this technique ensures you light your subject with that nice soft, beautiful edge lighting, which can really make you photos pop.
If you are shooting with one strobe, then position it above the camera, angled in towards the housing as shown below.

Note you can also use this positioning for video lights. It will be easier to position the video lights, as you can easily see where they are shining, but as video lights are much less powerful than strobes, it is much harder to shoot black backgrounds with them. However, it can be done and is still worth a try!

Settings
Even without any strobe light hitting the background, you still need to block out the ambient light. Depending on how bright the ambient light is, I like to use the following settings with my OM-D E-M1:
- 1/320 sec
- ISO 100
- f/11 to f/16 (depending on composition, light levels, etc)
With a slower flash sync speed you will need to use a higher aperture, and with a compact that does not allow you to stop down that much, you will need to increase the shutter speed up to the 1/320 sec range. Learn more about underwater settings in this tutorial.
Learning the Technique
Understanding the theory is the easy part, but the hard part is actually learning the technique. This took me a whole dive to start getting it, and another few dives to really dial it in. So, make sure you dedicate some time to learning this, and don’t just give up after having one frustrating dive. If you stick with it, you’ll figure it out, and next thing you know it will be second nature.
The main thing you have to keep in mind is this involves a lot of trial and error, so take it slowly and adjust one thing at a time. The best way to approach it is through a series of test shots, each getting progressively more difficult.

Topside Test Shot
As with many underwater photography techniques, the best way to start learning this one is to do it on land. Yes, it may seem a bit silly, but it will save you a ton of time and headaches underwater.
.")
You can start with your standard black background settings and no strobes, to get your baseline non-lit image. Put your test object close to the lens.
.")
Then turn on your strobes at a normal power (full power minus 2 clicks is a good starting point), and move them around until you light up your subject well. You may notice that you get a bit of a washed-out photo, like below:

This means that your strobes are pointing too much into your port, and you need to adjust them, most likely by pulling them back towards the housing, and then either moving them out more to the sides, or twisting them so they shoot more forward.

Once you get a nice clean shot like this, with a dark or black background, then you are all set!
Yes, strobe positioning above water will not be exactly the same as that underwater, since the optics are different, but it will give you a good idea of where to start (and more importantly, what the process feels like).
First Underwater Test Shot
Now comes the fun part – doing your first underwater test shot. It needs to be something stationary, which is easy to see if it is lit up or not. Crinoids worked great for me, and rocks are always a nice test shot subject as well. Get close to your subject, set up your strobes, and then fire away. Often the first shots will look really dark. What that means is that the edge of your strobe lights are crossing in front of the subject, and the only light that may be reaching it is light reflected off the housing (or the very, very edge of the strobe light beams).

I probably spent close to 10 minutes getting dark and poorly lit shots until I finally moved in to the right distance. Then I got washed out photos, so I had to adjust further (as per the above land test shot section). Here is what to do if your subject is too dark:
1. Get Closer to the Subject
There is no point shooting anything too far away (we are talking more than 10-12″ or further) as the strobe power will drop off too quickly, and you will also get all kinds of backscatter. As you get closer, the beams of light will get closer, and the subject will light up nicely.
2. Turn Up Your Strobes
Don’t turn your strobes up too high, but I find that I typically have to shoot one (or sometimes two) clicks higher strobe power than I normally would when shooting with forward-facing strobes, for the same settings.
3. Adjust Your Strobe Positioning
Bringing your strobes out, and angling them more towards the subject will extend the beams of light further. This will light your subject better, but if you go too far, you will end up spilling light into the background and losing the black background.

4. Try to Watch from Above or Get Help
If things really aren’t working, try to look down from above and see if you can physically observe where exactly your strobe light beams fall. If you cannot do this alone, get a buddy to either observe for you, or pull the trigger for you.
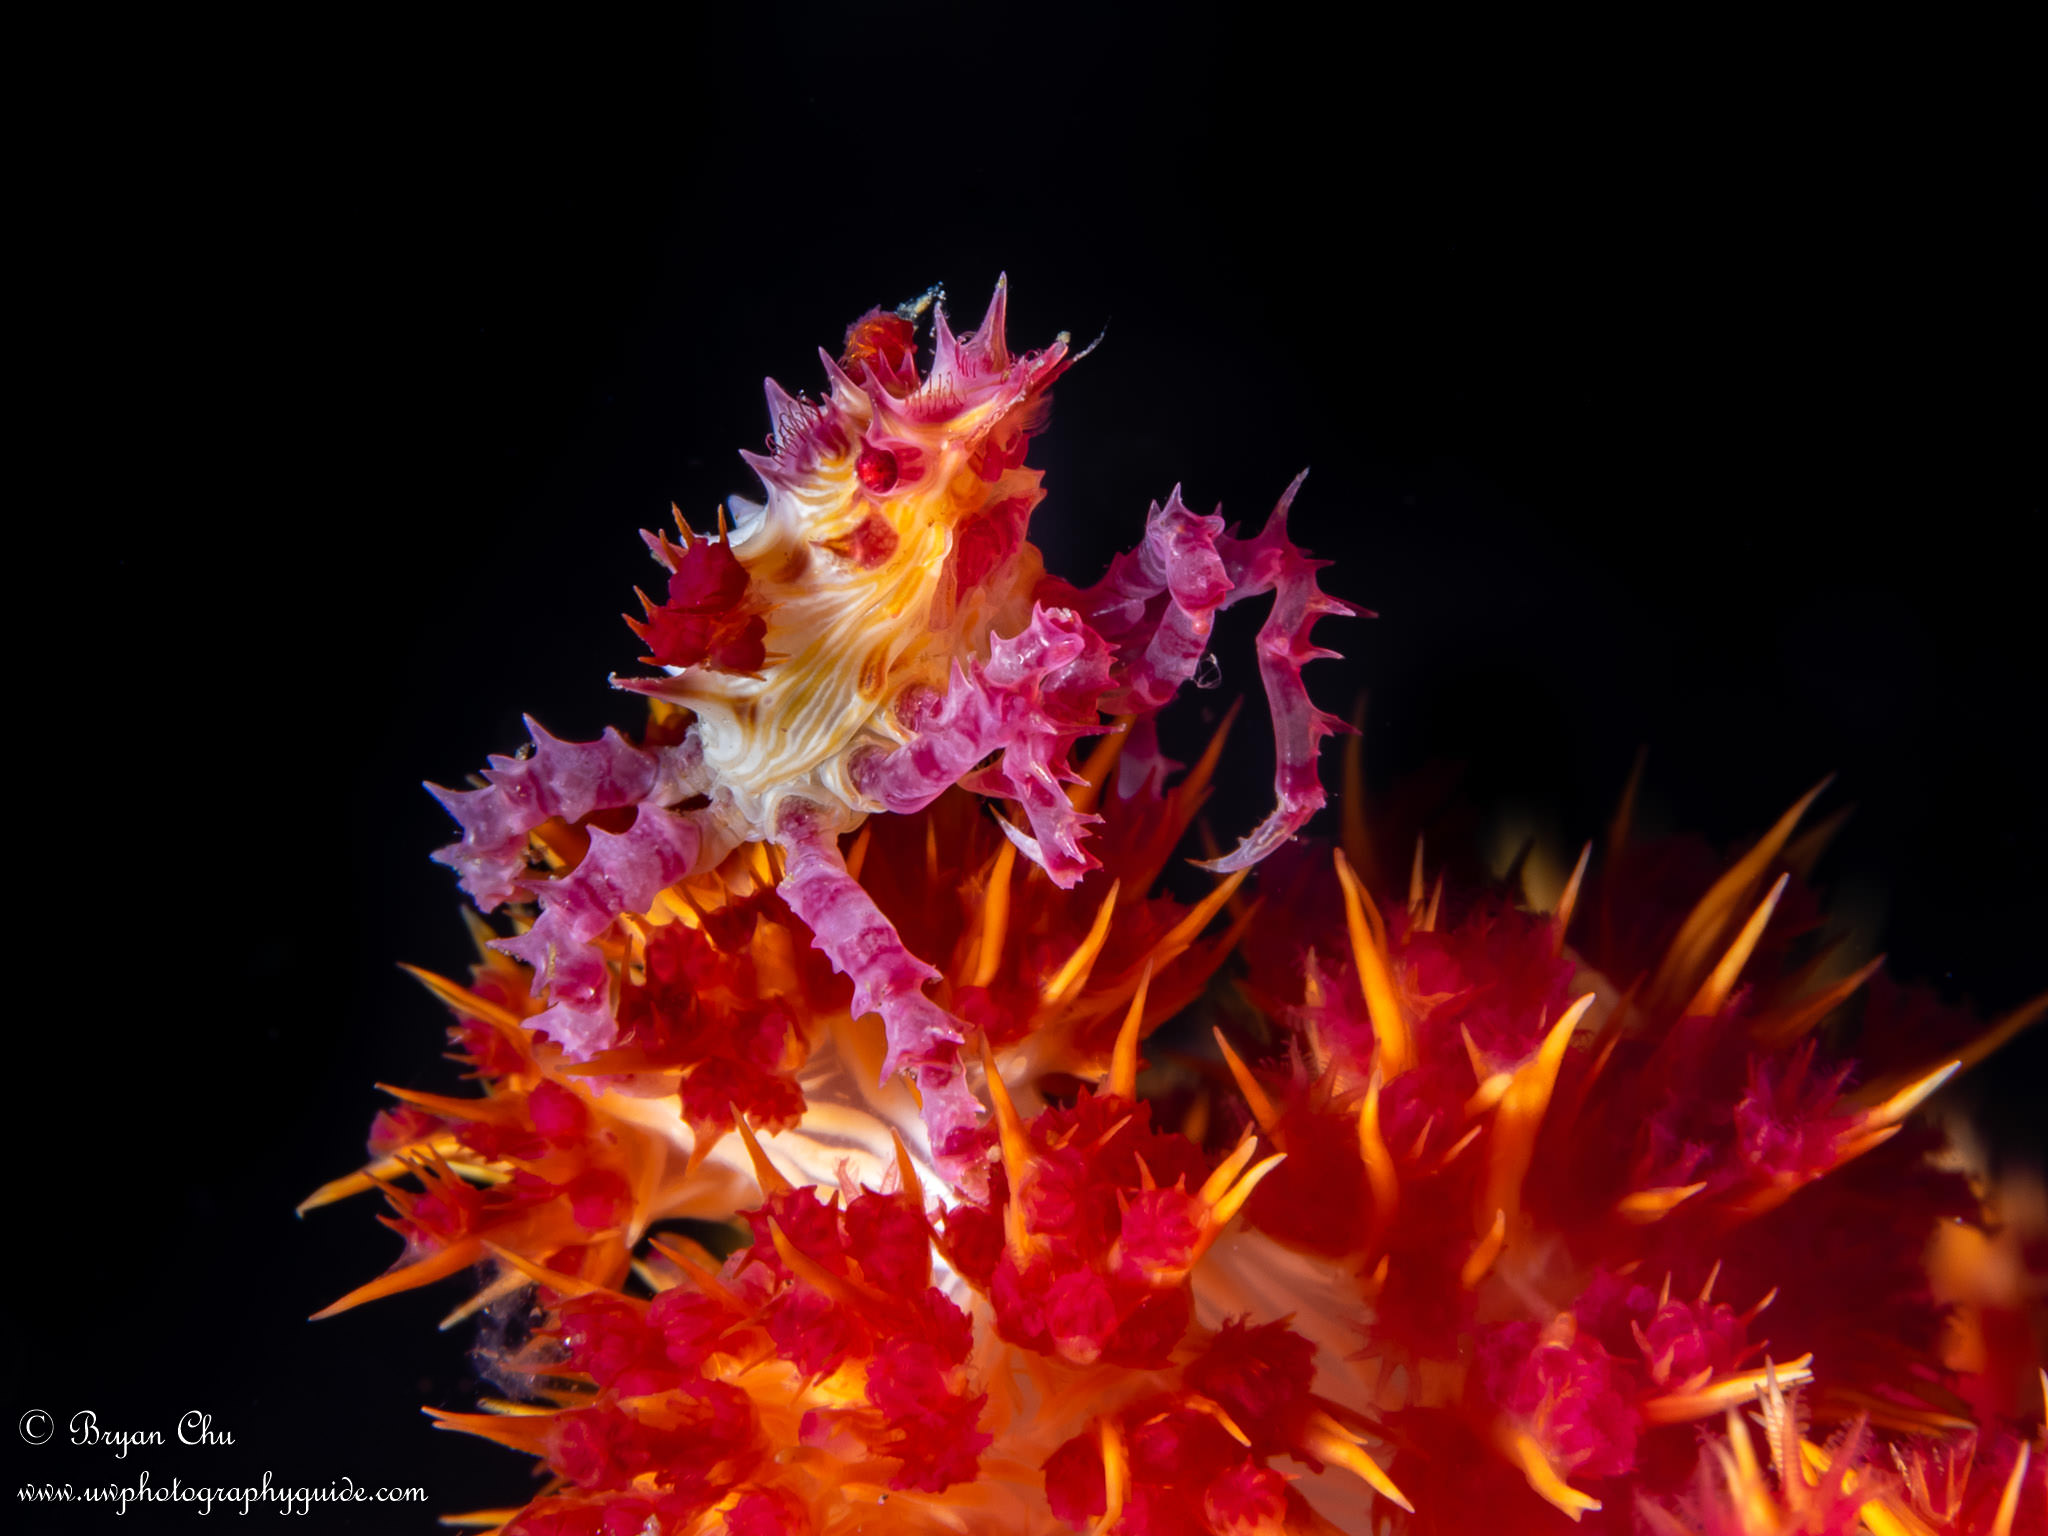
, and it was easy to shoot down at them and have less than 12\" of water between them and the sand. Olympus OM-D E-M1, Olympus 60mm macro lens, Nauticam housing.")
If you are having issues with your background being too brightly lit, then do the opposite of the third step above: bring the strobes in closer and angle them more towards the housing.
Once you get everything dialed in for this shot, remember that your setup is only calibrated for the lens-to-subject distance you just used. Other distances will usually require some additional adjustments.
Second Test Shot
Find another test subject, and practice getting the same lens-to-subject distance as you had for the first test shot. Move the camera back and forth until the lighting comes out nicely; you shouldn’t really have to make other adjustments.

Find Some Serious Subjects and Have Fun!
After these two successful test shots, you are ready to rock and roll. Find a fun subject perched or planted somewhere nicely. Frogfish or other stationary subjects are great, as they give you lots of time to fiddle around and make adjustments. Nudibranchs also work pretty well, and are often in positions to benefit from this strobe positioning technique. And once you’re comfortable with those subjects, you can start working on more challenging ones, like eels.

Embedding the Technique
Once you’ve taken some successful shots, you need to keep up the momentum! This means, however annoying and painful it may be, doing at least one test shot on every macro dive you take. I like to do it at the start. Then, over the course of a few dives, you will find everything coming to you a lot easier. But if you don’t make a habit of it, you will not be able to make these adjustments on the fly, and that is guaranteed to cost you many a missed black background photo opportunity!
As you can imagine, this is best done on a relatively intensive, macro-focused dive trip. I learned while doing 4 dives a day in Anilao, which allowed me to really hone my technique quickly. Our sister companies Bluewater Travel and Bluewater Photo happen to run some excellent annual macro photography workshops in Anilao. As I was a trip co-leader for one a few months ago, I can directly attest that this is the perfect place to learn more advanced techniques like this, which are taught at the workshop (along with lots of other great things to learn). And if you are trying things out but getting stuck, then the instructors will all be able to help you break through your roadblocks.
- Anilao Dive Travel Guide
- Anilao December 2019 Workshop
- Anilao April/May 2020 Workshops
- Anilao December 2020 Workshop
- Anilao April/May 2021 Workshops
Thanks for reading, and I hope you found this useful! If you have any questions, feel free to email me at [email protected]!
Gear Links
Here are the latest versions of the gear I am shooting.
- Olympus OM-D E-M1 Mark II
- Nauticam OM-D E-M1 Mark II Housing
- Sea & Sea YS-D2J Strobes
- Olympus 60mm f/2.8 Macro Lens
- Olympus 8mm f/1.8 PRO Fisheye Lens
- Light & Motion Sola Photo 1200 Focus Light
![]()


