How to Set Up and Maintain Your Underwater Camera

Setting up your new underwater camera can be a daunting task. Between all the new extensions, dome ports, zoom gears, arms, clamps and strobes, it can be difficult to keep everything straight…not to mention clean and functioning! This underwater camera set up guide is designed to give you our top tips for underwater camera maintenance and show you how to put your camera system together.
The following video runs through a full set up of a Nauticam underwater housing system. Stay tuned for more videos as we update this article with Marelux, Ikelite, Isotta, Aquatica, & Sea & Sea housings. Even if you don’t see your housing or brand here, this article has some excellent tips. Many housings are also set up through a similar manner as the ones listed.
Tips for Underwater Housing Maintenance
We wouldn’t be doing our job if we didn’t start this guide out with our top tips for underwater housings maintenance. While maintenance might not be the most enjoyable aspect of underwater photography, it is the most important. Afterall, the primary job of an underwater housing is to keep water away from your camera, and you want to make sure it keeps doing that!
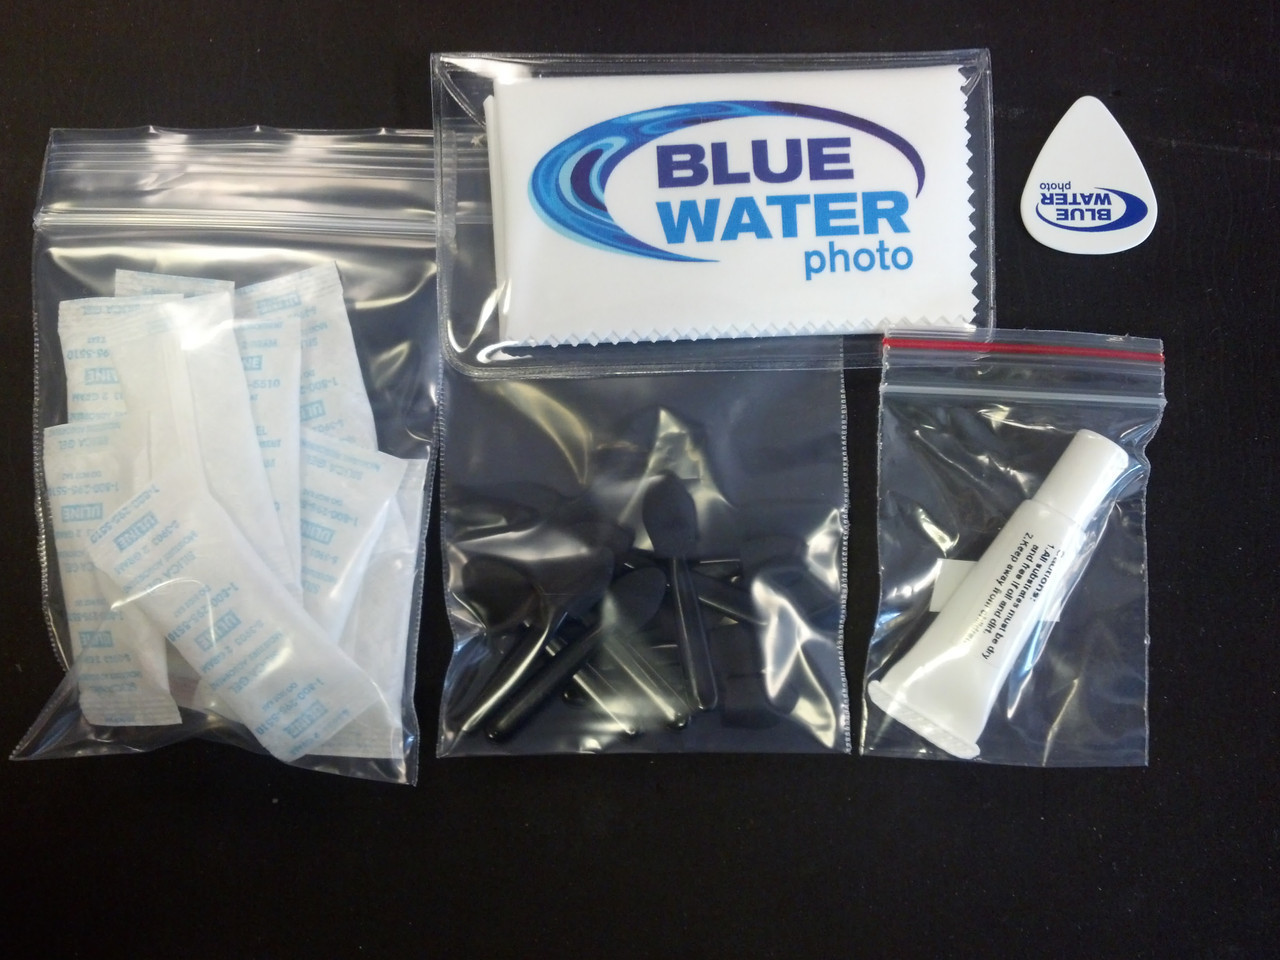
Get a quick start to maintenance – click here for our favorite maintenance kit
1. Rinse Your Housing and Soak It!
After every dive, we recommend getting your underwater housing into fresh water as soon as possible. Rinse buckets on boats are a great place to start, but the water can be saltier than you would think. So if you are able, try to find a freshwater hose to rinse off the dome as well. After a full day of diving, we recommend taking your camera out of the housing (the worst kind of flood is in the camera tank!) and place the housing in a bath or bucket of fresh water to let it soak for at least a half hour. Soaking your housing is the best way to let the salt dissolve out of every crack and crevice. When you soak your housing, “work” the buttons with your fingers to help remove sand and dirt.

2. Cover Your Dome Ports But Be Careful of Glass Domes
Between dives, you should always cover your dome ports. This keeps your housing cool and protects the camera from melting (literally!) if the glass acts like a magnifying glass in the sun. However, if you have a glass port, make sure that you never attach a neoprene cover while the glass is wet with salt water. This can damage the port and create permanent burns on the glass. Make sure the dome is rinsed with fresh water and dried thoroughly before applying a port cover.

3. Lubricate Your Orings
How often should you lubricate your orings? I always say, before each day of diving. On longer trips, you can get away with once every two or three days.
Steps to Lubricate Your Orings:
Step 1: Remove the oring by gently pushing an oring pick into the oring groove, push up to pop it out, and gently remove it by rolling it with your thumb. Click here for a recommended oring pick.
Step 2: Use a microfiber cloth, clean room swab, or make up remover eraser to remove grease, dirt, and sand from the oring groove. Click here for a recommended microfiber cloth-towel.
Step 3: Run the oring through your fingers to remove excess grease, dirt, and sand. If you have a really dirty oring, rinse it with water and let it dry
Step 4: Apply a pea-sized dab of oring grease to the oring and run it through your fingers until the oring appears wet, but not greasy. Too much grease is bad for the housing. ALWAYS USE MANUFACTURER GREASE WITH THE SAME MANUFACTURE’S ORING. Failure to do so can result in a swollen oring and flooded or stuck housing.
Step 5: Reapply the oring to the oring groove. Try not to stretch the oring. Some orings can be difficult to hold in place, so run your fingers along the groove from both sides until they meet to place the oring.
Step 6: If your oring appears stretched, nicked, or brittle, it’s time for a new one. We recommend replacing your orings every 1-2 years.

Click Here to Get Your Ikelite Oring Grease
Click Here to Get Your Sea & Sea Oring Grease
Click Here to Get Your Nauticam Oring Grease
Click Here to Get Your Aquatica Oring Grease
Click Here to Get Your Marelux Oring Grease
4. Store Your Camera with the Orings Removed
If you don’t have a dive planned for a few weeks or months, it’s a good idea to store your housing with the port, main housing, and extension orings removed. I place them in a zip lock bag. This will increase their lifespan as they are not being compressed into the oring groove.

5. Service Your Camera Every Two Years
We recommend sending your housing to the manufacturer for routine servicing every two years or so. During this servicing, the manufacturer will replace the orings on the the buttons and other inaccessible areas of the housing as well as fine tune controls.
Setting Up Your Underwater Housing
Every underwater camera system is different so we’re going to cover the basic steps to setting up your housing. For more specific details, stay tuned for a full selection of set up videos from the Underwater Photography Guide and Bluewater Photo. If you’re a Nauticam shooter, we already have you covered! Check out the video above.
Step 1: Open Your Housing
To open your housing, undo the latch(s) on the back panel of the housing. Lift the back panel of the housing up and off the housing, unless you have a compact camera (in which case you only need to open the housing door).

Step 2: Attach the Camera Tray
If you have a housing larger than a compact housing, you will need to slide the camera tray out of the housing and screw it into your camera’s 1/4-20 screw mount. Make sure the camera tray is tight and lines up properly with the camera with no gap between the camera and camera tray. Some trays will require you to move your LCD up and angle it out to apply the tray.
Step 3: Insert Your Camera
If you have a compact camera, all you need to do is place your camera in the housing and close the latch. If you have a larger camera, you will need to insert your camera into the housing. Pull out any controls that are on rods and may get in the way of inserting your camera. This can include the autofocus on lever. Then, slide the camera into the housing making sure the camera tray lines up on the bottom of the housing. Some housings will require you to lock the tray in place. If you are using a large lens, it may not fit into the port opening. You may need to slide the camera into the housing without the port attached.

Step 4: Put Your Port Together
A port is the interface between your len and the water – it’s the window that your camera views the ocean through. Each port is sized differently based on the size of the lens. We recommend putting your port together before attaching it to the housing. This means that if you have extensions, you should attach them to the port first. Many brands of housing require you to press the extension onto the port and turn it so that the “dots” align together. Ikelite requires you to push your extensions onto your ports and screw the in until the screws are flush. Please consult your manual for specifics or our specific set up videos. Many extensions have locking mechanisms in the form of levers and switches. If you are wondering what extension to use with which port, please check out these port charts, or email sales@bluewaterphotostore.com for help.
Step 5: Attach Your Zoom/Focus Gear Onto Your Lens and Attach Your Lens
If your have a lens that zooms or uses a manual focus ring, you will need to attach a zoom gear or focus gear to it in order to use it underwater. Each zoom and focus mechanism is entirely different so it is important you read your individual manual to apply it. Generally, you will have an internal sleeve that attaches to the lens and an external sleeve gear teeth that interface with the zoom knob in the housing or extension. With some housings, you may need to attach the lens to your camera in the housing first before attaching the zoom sleave. With others, you may need to install the zoom gear onto the lens and then attach it to the camera in the housing. Make sure that the teeth on the zoom knob interface with the teeth on the zoom gear.
Step 6: Attach Your Port To Your Housing
Attaching a port to your housing is different for each brand. Some ports push down into the housing and lock with a locking mechanism. Others rotate into the housing with no lock or lock down using screws. Please see your housing manual to learn how to attach your port (which should already have adapters and extensions attached).
Step 7: Plug in Your Sync Cord Hotshoe, Flash Trigger Hotshoe, or Lift Your Flash
If you have a camera with a built in flash, you need to lift your flash up so that when you take a photo, the flash travels through the fiber optic cable port. If you have a flash trigger or hotshoe for a sync cord, remove your hotshoe cover and plug in the flash trigger or sync cord. If you have a flash trigger, make sure you turn it on before closing the housing, otherwise you won’t be able to use your strobes!

Step 8: Attach Your Vacuum Valve (and Turn It On If Needed)
You only need to do this once, but most housings will require you to attach a vacuum valve to your housing if you want to be able to use a vacuum system to test the seal of the housing. Many of these valves screw directly into an M16 or M14 bulkhead. All you have to do is make sure the oring on the bottom of the valve stays in place. Some, like the Ikelite DLM vacuums, may require reading the manual. Our favorite vacuum that can be universally used on most housings is the Ikelite M16 and M14 vacuum valves. These options do not have electronics built in so you just need to measure the pressure with the vacuum pump when you first pump the housing and 15 minutes later, when you get in the water. If you do have a vacuum system with electronics, you will need to turn them on in your housing before closing the housing.
Step 9: Close the Housing and Vacuum
After turning on your vacuum (if you need to), close the housing by latching the back of the housing back on. If you do have a vacuum system, you will need to pump up your housing to the appropriate level specified by the manufacturer. You’ll want to do this about 15 minutes before you dive. A vacuum check is only helpful if you know that your seal is good before you get in the water. It does not give you additional protection underwater. I usually pump up my vacuum, wait 15 minutes, check the indicator light or pump pressure befor the dive, and then keep it sealed for the rest of the day until I’m done diving.

Step 10: Attach Your Strobes or Video Lights
In order to get more color in your underwater photos and videos, you might need to set up some artificial lights (strobes or video lights). Attach your strobe arms to the handles on the housing with clamps and then the strobes to the arms. After that you need to attach your fiber optic cable/sync cord from the fiber optic port or sync cord bulkhead to the bulkhead or optical port on your strobe. Video lights don’t usually need to be connected with a fiber optic cable unless you are using the burst mode on the light.
Bonus Step: Take a Test Shot!
It’s really important that once you are all set up that you take a test shot before you get underwater to make sure everything is firing properly, including your strobes. You’ll be thankful that you did.