Underwater Photoshop Lesson – Gaussian Blur
Underwater Photoshop Lesson – Gaussian Blur
Editing underwater photos in photoshop is very much a matter of taste. Some people may like the results of a change in photoshop, while another may not. In this series of lessons, I will simply share the tools that I’ve used to manipulate various underwater photographs.
Original Underwater Photo before photoshop
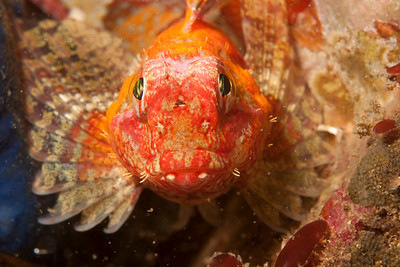
Underwater Photo before post-processing, jpeg generated from RAW file.
This photo was taken by a friend of mine with a Canon Xti, Canon 60mm lens, F16, 1/160th. He was concerned the photo wasn’t sharp and didn’t "pop".
After looking at the photo at 100% magnification, I told him I though his focus was correct, and given the water clarity, subject and lens it was as sharp as the front of a sculpin could be. But perceived sharpness and "pop" is a different matter, so I took 2 minutes and tried to edit the photo.
First, I used Adobe Camera Raw (ACR – same as using Lightroom). The color temperature of the photo was 6600K, a little warm, and the red color channel was overexposed in the histogram. so I brought the temperature down to 4800K using the white-balance slider, which reduced the saturation of the reds and oranges, bringing in more blue. I also adjusted the blacks, contrast and levels slightly. Last, I cropped the photo to give more of a fill-the-frame composition.
Then, I used Adobe Photoshop to touch up the photo. I used the healing tool and clone stamp tool to clean up some backscatter and to remove a small bright area to the right of the fish that was a small hot spot. Finally, to make the photo pop more and blur the background, I used the selection tool followed by the gaussian blur several times.
Three times in a row, I would select an area around the fish’s head using the selection tool, feather it at 30-60 pixels, invert the selection, and apply a gaussian blur (under filters, blur) of 10-25 pixels. Doing this 3 times at different distances from the head of the fish allowed me to blur the background more, the further away I was from the head. This way there was less of a distinct line between the sharp area and the blurred area.
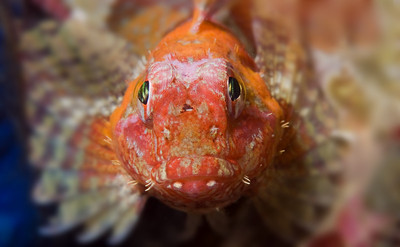
Underwater photo after processing. Some people saw this photo and asked, how did you change the depth of field? I had to smile, since you really can’t change the depth of field, but you can try.
I should mention that while most people preferred the 2nd photo, some also preferred the color of the 1st photo, and maybe I should not have cooled down the color temp so much.
Achieving these results in-camera
This effect can also be achieved in your underwater photography by using a longer lens like a 100mm lens, and a smaller f-stop such as F10. You can try it with a 60mm lens, but you must use an even smaller f-stop like F6, and the results may not look as nice.
Further Reading
Macro lens section – 60mm vs 100mm
Post-processing using Photoshop


