Ambient Light & Manual White Balance
Shooting ambient light means you are using the sun as your light source. Shooting with ambient light means less camera drag, as strobes can be left on the surface. The lighting of the photo will be more even, which is ideal for large subjects such as large reefs or schools of fish, silhouettes, or large wrecks.
When shooting an Ambient light shot, you will want to do a manual or custom white balance, either underwater or in photoshop. Please the custom white balance section below.
Shooting reefs in ambient light can produce even lighting and color, although getting great color can be difficult unless you are in 10ft of water or less. Filters can help a little, see the page on magic filters. Schools of fish are sometimes better lit with a touch of strobe light, unless they are silhouetted. There are exceptions, however, I have seen some good shots of schooling fish with filters that are shallow and well-lit from natural light.
Remember, shooting ambient light UW is considered low-light shooting, since you lose a couple f-stops from above water. In low-light photography, you must always compromise between your shutter speed, ISO, & aperture. After taking a shot, check for and beware of blurriness or underexposure.
Ambient light shots will work best on sunny days. Focus on shooting in RAW in 5-15ft of water. Carry around a white dive slate and every so often take a photo of the dive slate, this will assist you in your white balance in the raw editor.
Shooting with ambient light can be easier than using strobes – no strobes to worry about, less drag in the water, no backscatter. However, color and contrast will not be as good, and shadows will not be filled in.
Tips For Ambient Light Underwater Photos:
-
Have good contrast in the photo. Shooting up will help this.
-
Get good separation between the subject and the background. Choose your background carefully.
-
Get close as possible for a sharp foreground
-
Shoot in shutter priority mode if you are concerned about freezing motion, otherwise shoot in aperture-priority mode
-
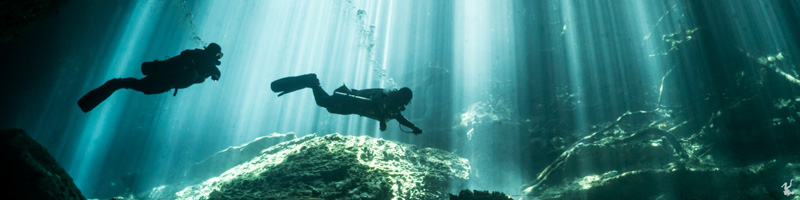
Shoot with the sun directly behind you for the best, most even lighting on schools of fish
-
Go for silhouettes when shooting into the sun, see the silhouettes section.


More Ambient Light Articles on UWPG
Understanding White Balance
When you set your camera’s white balance, you are telling it what you expect the color temperature of your photo will be. You can review color temperature now if you need to.
When creating a jpeg file, your camera always has to set a white balance. Either you can set it, or in “auto white balance” mode your camera will try to pick it for you, the best it can.
Your strobe or flash emits light at a certain color temp, usually 5500K, similar to sunlight, but it depends on the strobe. Most strobes are between 4800K and 5600K. The color temp of the light will change as it passes through water, and reds are filtered out.
If you are lighting up a close subject with your strobe or internal flash, your color temp should be set to Auto. If you are not happy with the color you are getting, which may happen in low-end compact cameras, you can try setting it to sunny or flash, which are both around 5500K. Setting the white balance to cloudy (6000-6500K) when using strobes will usually result in photos that are a little too orange, unless the subject is a few feet away.
If you are not using your flash, you are shooting ambient light, and you want to set your white balance manually, like I explain in the following section. If your camera doesn’t have an option for manual white balance, then you can try cloudy or the underwater mode. If you are reading this guide, you will most likely want a camera that has manual white balance.
Manual White Balancing (custom white balance)
When shooting ambient light in JPEG mode, with or without filters, you should manually white balance your camera every five or ten feet. When you do a manual white balance, you are basically letting your camera figure out what a neutral color is. Your camera will let you take a shot of a neutral object, a white dive slate is perfect, but a white or silver scuba tank will do. This will result in much more accurate colors than trying to correct the color later on, because JPEG format looses a lot of the color information. Unless you are very shallow, reds will not be recoverable, but most other colors will be. Manual white balance works fairly well shallower than 30 or 40ft, deeper than that it has a smaller noticeable effect. It can not bring back colors that have completely been absorbed by the water.
When shooting in RAW, you do not need to custom white balance underwater, but it is helpful to shoot a white or neutral object at different depths to aid in the white balancing in your raw post-processing program.
Setting Custom White Balance Underwater
To set a custom white balance underwater, follow the directions in your camera manual. Usually, you will put your camera in manual white balance mode, and press a button. Then, the camera will wait until you point at a white, gray, or neutrally colored object. Press the shutter, and the camera will record the white balance at this depth. Redo this process every 5-10ft for best results. I have used my buddy’s silver or white tank in a pinch, and it worked well. Some people suggest using the sand or a neutral part of the reef, but will give less accurate results. For best results, bring a small white dive slate with you.
Remember to switch your white-balance back to auto when using the flash, otherwise your photo will look very red.
Some people will tell you to use the cloudy or underwater setting when taking ambient light shots underwater, but doing a manual white balance gives much better results. Of course, if your camera doesn’t have a manual white balance feature, then you have no choice. The underwater mode will give better results, especially when shallow, and cloudy can be used as a last resort if there is no underwater mode, or if you are very deep.
White Balance Mistakes
-
Any white balance mistakes can be easily corrected if you are shooting in RAW
-
Setting a manual white balance, and then forgetting to switch to auto white-balance and using your flash or strobes will result in a nice red photo, oops!
-
Taking an ambient light shot underwater , and leaving the white balance on auto, sunny, or flash will result in a mostly blue photo void of color, especially if you are deeper than 10-15ft deep.
-
Make sure you increase the contrast of your ambient-light photo afterwards in photoshop.


