Shooter’s Toolbox: Balanced Light

Balanced Light Underwater Photography
Shooter's Toolbox Volume 3
Text and Photos by Todd Winner
In Volume 1 and 2 of Shooter's Toolbox we learned about taking images with ambient light and strobe light. Please review Volume 1 – Ambient Light and Volume 2 – strobe light if you have any questions in regards to metering for ambient light and strobe exposures. In this volume we will be putting the two together to create balanced light images. This is what the majority of my wide-angle images are, and it is a great technique to add to your macro images as well. The controls we have to work with are ISO, shutter speed, aperture, strobe power and distance from our subject.
Balanced Light Underwater Settings
For most images, I usually start out with a base ISO. Base ISO is 100 or 200 on most cameras. I then take a spot meter reading for a blue water exposure and set my aperture and shutter speed accordingly. With our strobes turned on this is going to limit our fastest shutter speed on most DSLR cameras at around 1/250 sec. Next I adjust my strobe power setting according to the f-stop and the distance I am from the subject.
After reviewing the image, you can fine-tune your exposure depending on what you see. If your water is not the shade you were trying to achieve, adjust your shutter speed up or down to make it darker or lighter. If your foreground subject is under or overexposed, adjust your strobe power up or down or move closer or further from your subject. If your overall exposure is too dark or light you can adjust your aperture and this will affect both your blue water background and your strobe exposure. As you can see it's a simple balancing act between the four controls and distance from our subject. If you are new or having difficulty with these types of images, just find a nice stationary subject and practice.
Getting a strong background
Some things you can try to improve your balanced light photography images are to look for structures or formations that will make strong and interesting silhouettes in your background. If none are available, adding a diver with a light is a nice alternative. If possible, separate your foreground subject from the reef by aiming at an upward angle and use wide-angle lenses to get close to your foreground subject. For macro images, since we are so close to our subjects, you need to use strobes that you can power way down so you don't over expose the foreground.
The real payoff is that once you can balance between a couple of light sources, you are ready for just about any shooting situation. Take split images for instance: I typically take an ambient light reading for the topside exposure and adjust my strobe power based on the f-stop and distance from the underwater subject. I use this technique a lot in topside shooting as well when I want to add a bit of fill light to a subject and it works great when lighting a subject against a sunset background.
Balanced light wide-angle images have always been my favorite style of photography. Although it may sound a lot to remember, especially to new photographers, just remember there are only five items to think about: ISO, shutter speed, aperture, strobe power and distance from our subject. If you keep your ISO at base ISO, now you have only 4 things to think about. Of course we still need to compose a pleasing image, but at least now you will be ready to expose it correctly when you find it.
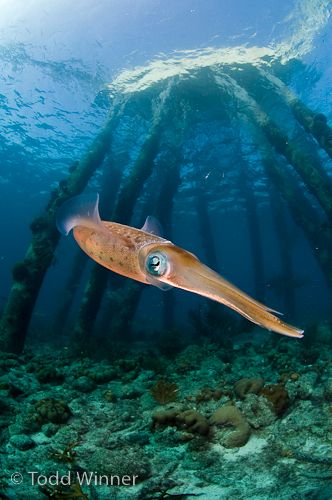
For the reef squid image from Bonaire, I exposed for the light blue water near the surface and set my strobes at ¼ power to expose for the reef squid, which was just inches from my port. 1/60th sec at f/11, ISO 200, Nikon 10.5mm fisheye lens
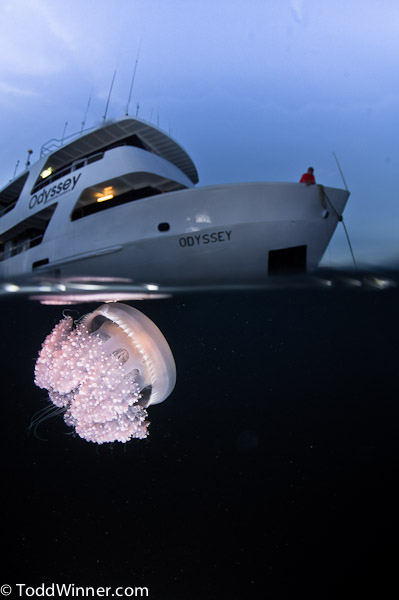
For the jelly and Odyssey split shot from Truk Lagoon, I had my strobes at the lowest power setting 1/8th. In order to keep from overexposing the jelly, I set my f-stop to f/10 and opened my shutter to 1/60th sec to expose the topside portion of the image. 1/60th sec at f/10, ISO 100, 10mm lens
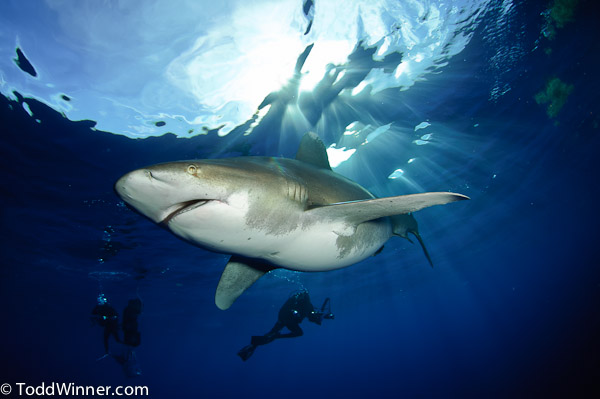
For the oceanic white-tip from a Bahamas shark dive, I metered on the blue water and underexposed it by a couple of stops to get that nice dark blue. This still allowed me to capture the divers in silhouette and a shutter speed of 1/60th sec captured the light rays off the surface. 1/60th sec at f/8, ISO 100, 10mm

Eureka Oil Rig, California. Canon 7D, 1/30th sec, f6.3, ISO 160, 10mm, strobes at 1/4 power. This photo shows the advantages of getting a silhouetted structure in the background.
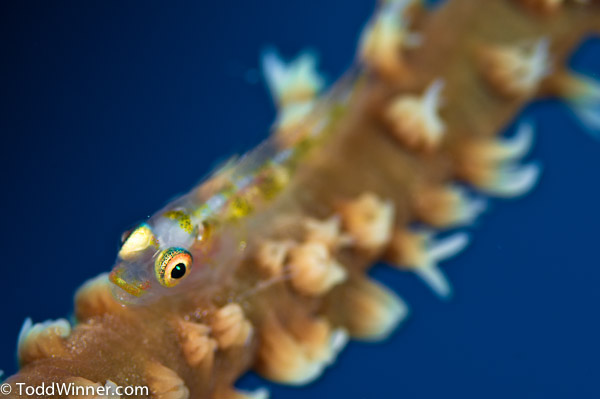
For this selective focus shot of the goby, I had my strobes set to minimum power. 1/60th sec at f/11, ISO 100, Nikon 105mm lens. Shooting upwards with a slightly slower shutter speed gave me the blue background.
Further Reading:
Underwater Photography Composition
Shooter's Toolbox Vol 1 – Ambient Light
Shooter's Toolbox Vol 2 – Strobe Light
Silhouettes in your underwater photography


