Wide-Angle Shots Underwater with Canon G12

Underwater photography can be generally classified under two categories: wide-angle and macro. The primary difference between the two is the field of view (FOV) of the image, namely the extent of the observable environment at a given moment. In macro photography the subject tends to be small, so a relatively small FOV is desirable to concentrate on your subject. However, if the photographer intends to shoot the reef scape or larger animals like a whale shark or a manta ray, a wider FOV is essential to frame the subject, entering into the realm of wide-angle photography.
Compact cameras like the Canon G12 have very big shoes to fill when taking photos underwater. Not only do they need to offer enough magnification and close focus distance to take good macro photos, they still have to provide a wide enough field of view at their widest setting for great wide-angle images. dSLRs have specialized lenses for this, but compacts have to do all this with just one fixed lens!
The Canon G12, as we’ve seen in my previous article, has proven to be a very competent compact camera for taking macro images, but what about wide-angle?
G12 for Wide-Angle Out of the Box
The G12 offers one of the widest views available to the photographer among compact cameras. To get the widest FOV on the G12 we have to set the lens to it’s widest setting, which according to the manufacturer gives a focal length of 28mm “equivalent.” This means that the G12 at it’s widest setting gives the same FOV as would a 28mm lens that was fitted to a 35mm film camera, or “full frame” sensor. Focal lengths 35mm and below are considered wide-angle, so that means the G12 is able to take wide-angle photos with no trouble.
However, here are a few things to consider:
-
Remember how your scuba instructor told you that everything looks 25% bigger underwater? That is due to the refractive index of water, which is a thicker medium than air. The same applies to the camera lens, so effectively the widest FOV for the G12 underwater decreases to a FOV of 35mm, which is right at the limit for wide-angle focal lengths.
-
Having a more narrow FOV almost always requires the photographer to back away from the subject to frame it properly. This means there is more water between the camera and the subject. Water is a good absorber of light, which will likely result in a loss of color and detail in the image.
Despite having these ‘handicaps,’ it is still possible to take great wide-angle shots with the G12. It is essential to have the correct camera settings for the various shooting scenarios that will be encountered.
Ambient Light Wide Angle
Entering the water with just the G12 and it’s underwater housing, the best option is to take photos using the available light around. This is because the built-in flash unit on the G12 is too weak to adequately light up the subject in most cases, and using the built-in flash also greatly increases the possibility of backscatter showing on the image. This means we want to be able to capture as much ambient light as possible for the shot.
-
Set camera to normal mode.
-
To keep things simple set the G12 to Av mode with aperture set at f2.8. Let the camera do the thinking and focus on getting the subject in frame.
If you elect to set the camera settings manually:
-
Set aperture to f2.8. With wide-angle the depth of field, which is the distance between the nearest and farthest objects in an image that appear in focus, is much deeper than in macro mode. Thus we can leave the aperture at it’s widest setting to capture as much light possible.
-
Set shutter to 1/60s. Keep in mind that we want to maximize light collection, so having a slow shutter speed helps immensely. According to the reciprocal rule, the slowest shutter speed that can be used while still achieving sharp images is 1/35s (not 1/28s!). Also remember that while diving it’s hard to keep still, which adds to the camera shake, so a safe shutter speed would be 1/60s.
-
Set ISO to 80. Increasing the light sensitivity of the sensor would greatly assist in getting good exposure for the image. However, at this juncture let’s leave the ISO dial alone.
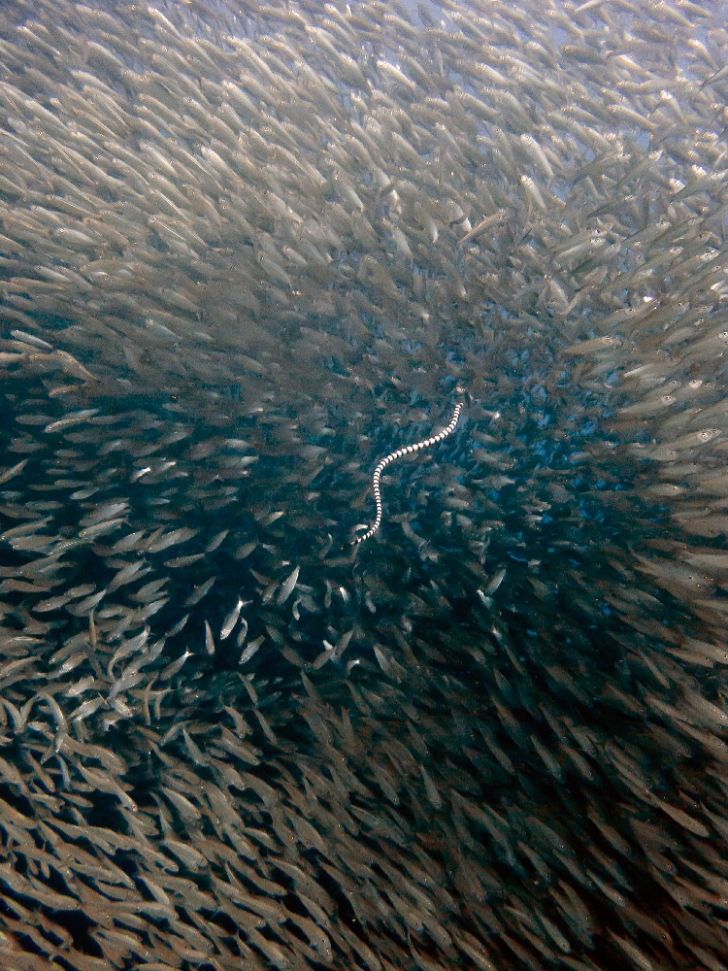
Banded sea krait entering sardine school. Ambient light. Shot with manual mode at f3.2 and 1/320s. ISO at 400.
During the dive, start off by selecting a stationary subject like a sea fan. Snap a shot and see if the resulting image is too bright or too dark. If the exposure is not to your satisfaction here is what you can do:
-
If the image is too bright and almost everything in the image is more or less stationary, choose a smaller aperture setting to restrict the amount of light hitting the image sensor.
-
If there are moving objects like fish in the image, increasing shutter speed will be more suitable. A faster shutter speed decreases the amount of light received by the image sensor and helps to freeze motion so that moving objects can be captured in focus.
-
If the picture is still too dark, then its time to increase the ISO. A setting of up to ISO400 will produce acceptable images relatively free of noise in your image.
A major drawback of using ambient light for wide-angle photography is that it works best at shallow depths. At deeper depths there is less ambient light available and increasing the ISO past a certain setting will result in images that are too grainy. In this case we need to consider adding external flash units, or underwater strobes, to our setup.
Using Strobes for Wide-Angle Photography
Strobes help provide light where it is not available to get a perfect exposure underwater. When shooting macro, the light is focused on the subject and due to the narrow FOV light is concentrated in a small space. In wide-angle photography the FOV is much wider, so the strobes need to light up as much space in front of the lens as possible. In this case employing more than one strobe in your underwater setup is desirable, but it still possible to get great shots with a single strobe.
Single Strobe Setup
-
Place the strobe as high as possible, directly above the camera housing but behind the lens, as seen here.
-
Set strobe power to full.
-
Set camera to Av mode with aperture set at f5.6. Now that you have a reliable light source, a smaller aperture can be used so more of the image can be in focus.
-
If in full manual mode, leave aperture at f5.6 and set shutter speed to 1/60s.
-
Set ISO to 80.
Double Strobe Setup
Having two strobes at your disposal affords you the most flexibility in terms of lighting. A double strobe setup allows the photographer to get a good exposure in all areas of the image. In contrast, a single strobe setup may see the image experiencing light falloff towards the edges of the image, especially if the subject is particularly large.
-
Position the strobes as far out to both sides of the lens port of the camera housing, care being taken to position the strobes face behind the lens port. A safe method is to place both strobe faces flush with the shutter button on the camera housing.
-
Set strobe power to full.
-
Set aperture to f5.6. You can choose a smaller aperture like f8 to get better depth of field.
-
Shutter speed can be set at 1/125s.
-
Set ISO to 80.
During the Dive
-
Find a relatively flat spot on the reef and take a test shot with the camera lens parallel to the reef. Take the shot at a distance of approximately two to three meters from the reef.
-
Check the image on the LCD screen to see if parts of the shot are too dark or bright. If one side of the image is too bright, angle the strobe of the corresponding side slightly away from the reef. Conversely, angle the strobe slightly inwards if the area of the image is too dark.
-
Check for signs of backscatter on the test images. In wide-angle images they tend to be at the edges of the image. Pull the strobes slightly backwards towards you if backscatter is spotted.
-
If blue-water diving where there are no surfaces for test images, adjust the strobes for backscatter first. Traces of backscatter can also be a good indicator of an area that is too bright and the strobes can be adjusted accordingly.

Notice that the strobe settings are always fixed at full power. This is because water absorbs light very efficiently, and with wide-angle photography covering a much larger area than macro shooting its imperative that as much light as possible is provided for a good exposure. In this case it is easier to control exposure with camera settings than reaching out to adjust strobe power. Strobe power can be adjusted if camera controls cannot give you the exposure you desire.
The ISO settings can be a useful ally in getting good exposure, especially in shots that require a deep depth of field with subjects moving rapidly. For example, a camera setting of aperture f8 and shutter speed of 1/250 to shoot a fast moving school of fish might be too underexposed, even with the best efforts of the strobes. Dialing up the light sensitivity of the image sensor will help immensely to get a good exposure. Increasing ISO will increase noise, meaning the image quality will suffer as it becomes “grainy”. However, the G12 can produce acceptable images up to ISO 800, so the limit is set at ISO400. At ISO400 the noise level is so slight it is only apparent when the image is viewed at high magnifications.
Wide Angle Conversion Lenses
A focal length of 35mm is adequate for wide-angle photography in most situations. However, the name of the game when shooting wide-angle is to get as close to the subject as possible, so there is always a desire to go wider. There are several advantages to this:
-
A wider FOV means you can “get more in,” which expands your creative options when composing the image.
-
It allows the photographer to get closer to the subject and still be able to keep the subject in frame.
-
Getting closer means there is less water between the lens and the subject. The lens will be able to capture more detail and colors will be more vivid.
“Traditional” compacts like the G12 have fixed lenses, so the only way we can achieve a wider FOV is by adding wide-angle conversion lenses in front of the lens. There are a plethora of wide-angle options for compact cameras for various housings at different price points. The main categories are introduced below:
“Wet” Wide-Angle Lenses
-
Wet lenses require a film of water between it and the camera lens to function properly. This means the lens can be mounted during the dive.
-
A lens adaptor may be needed to mount the conversion lens onto your housing.
-
They offer great versatility as the photographer can switch between shooting wide angle and macro during a dive.
-
They are the most economical among wide-angle options.
-
Due to the design of the lens port of some G12 camera housings, adding on a wide angle conversion lens may result in the image being vignetted, which means black areas appearing in the resulting image. This is due to the lens port having to accommodate the full zoom of the lens and so when a wide-angle lens is mounted, part of the increase in “wideness” is obscured by the lens port. There are solutions to this problem like being able to change to a shorter lens port. Such options, however, are available to high-end underwater housings like Recsea, where a customized port for the G12 housing to fit wide angle lenses without vignette is manufactured by Dyron.
“Dry” Wide Angle Lenses
-
They have to be mounted onto the camera housing before the dive and cannot be removed until after the dive.
-
These lenses tend to be more expensive and are available mainly to more high-end third party camera housings.
-
Most housing manufacturers have their own proprietary methods to mount dry lenses onto their housings so the choice of brand to house your camera becomes more important.
-
Dry lenses also tend to give better image quality, and will most likely give you less blurring at the edges of your image.
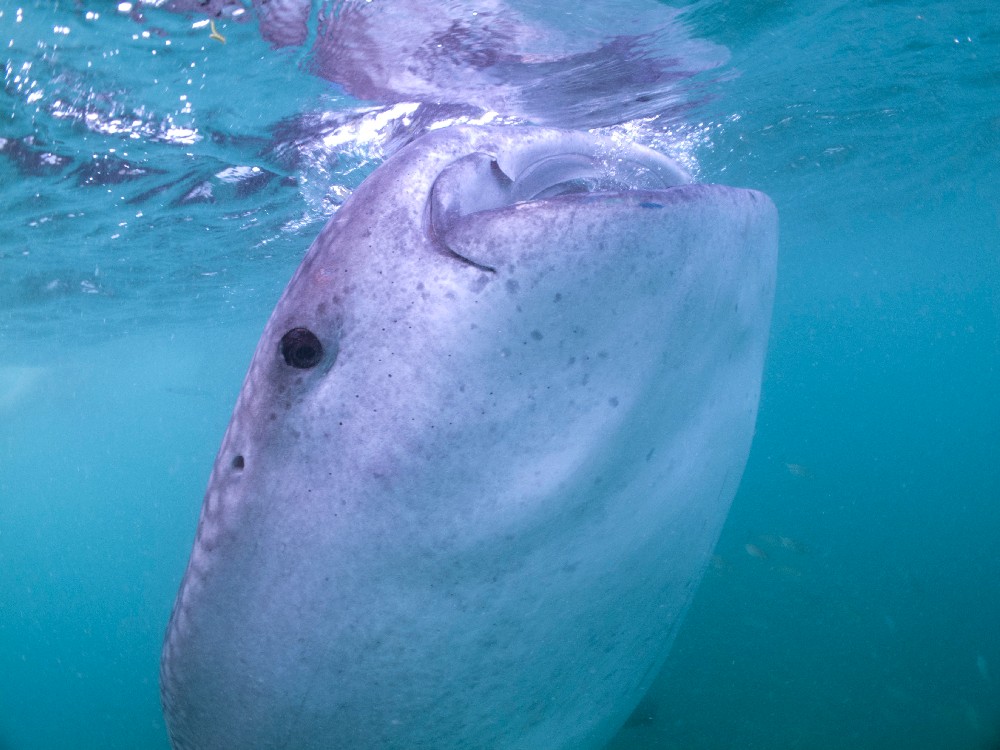
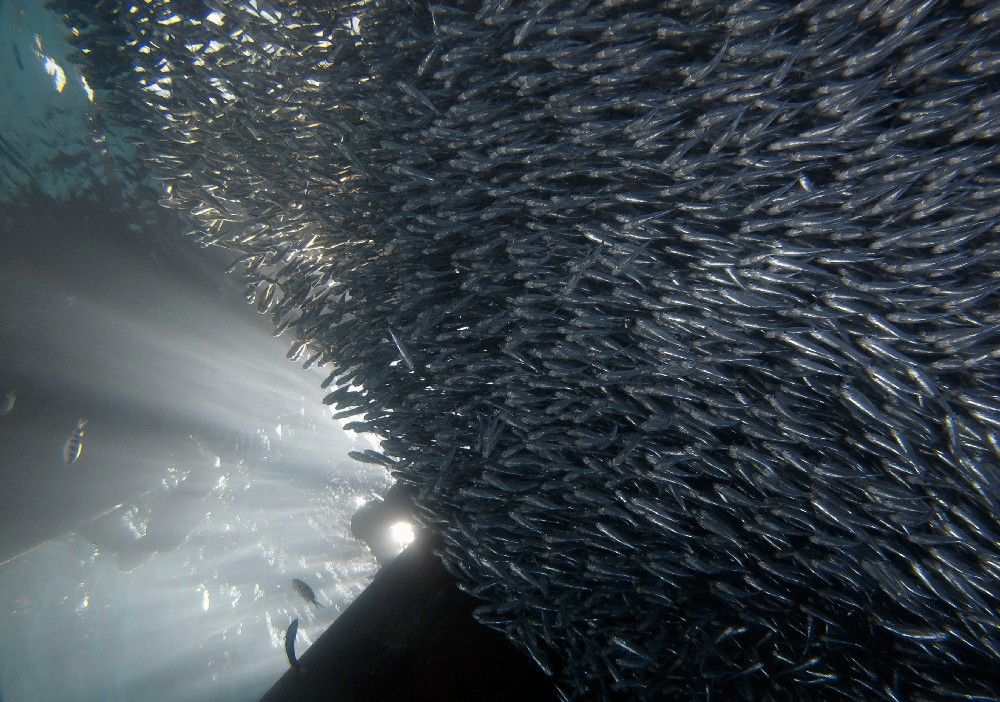
Whale shark. Taken with ambient light. Shot with manual mode at f3.5 and 1/160s.
Dome Ports
-
Dome ports can be mounted over the camera lens or over an already mounted “dry” wide angle conversion lens to help retain their “wideness” underwater.
-
Domes are made of acrylic or glass. Glass is more resistant to scratches but also more expensive.
-
Some dome ports allow you to achieve a circular image, which can be artistically pleasing if done right.
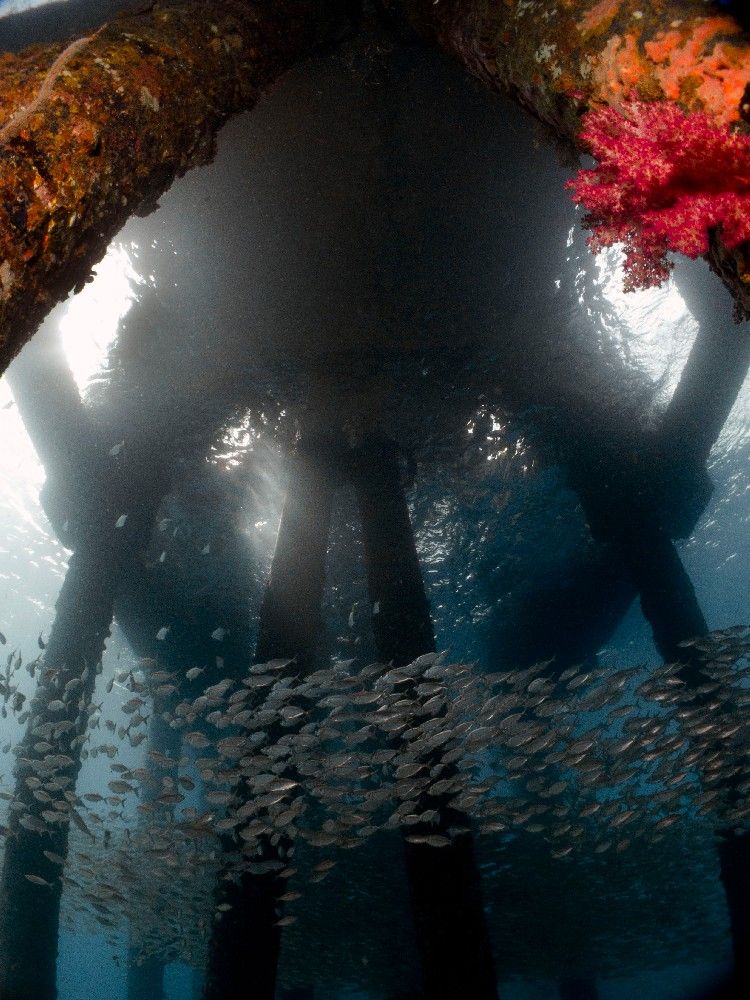
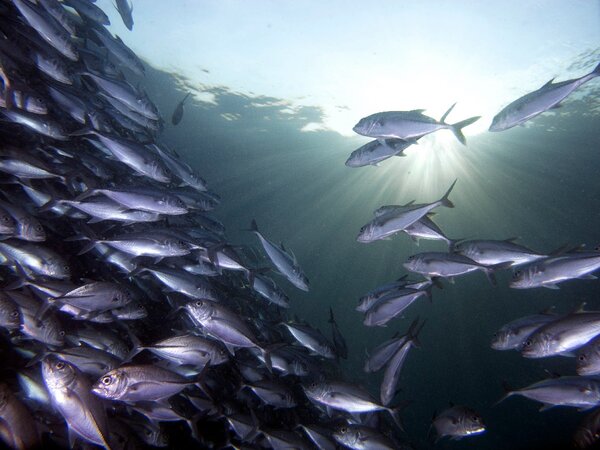
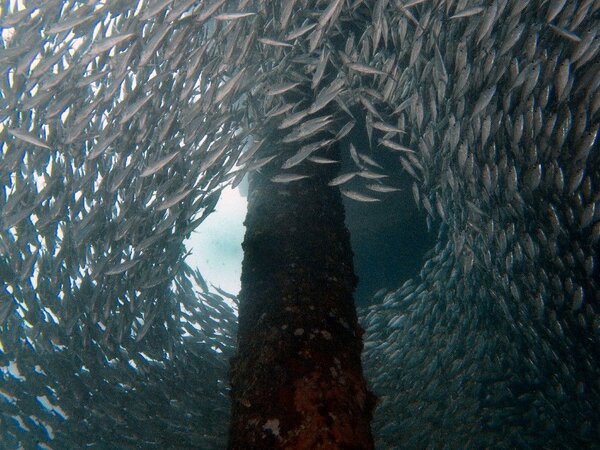
Fusiliers under a jetty. Taken with twin Sea and Sea ys-110a at ISO 200. Shot on manual mode at f7.1 and 1/160s. Dyron 8mm fisheye port.
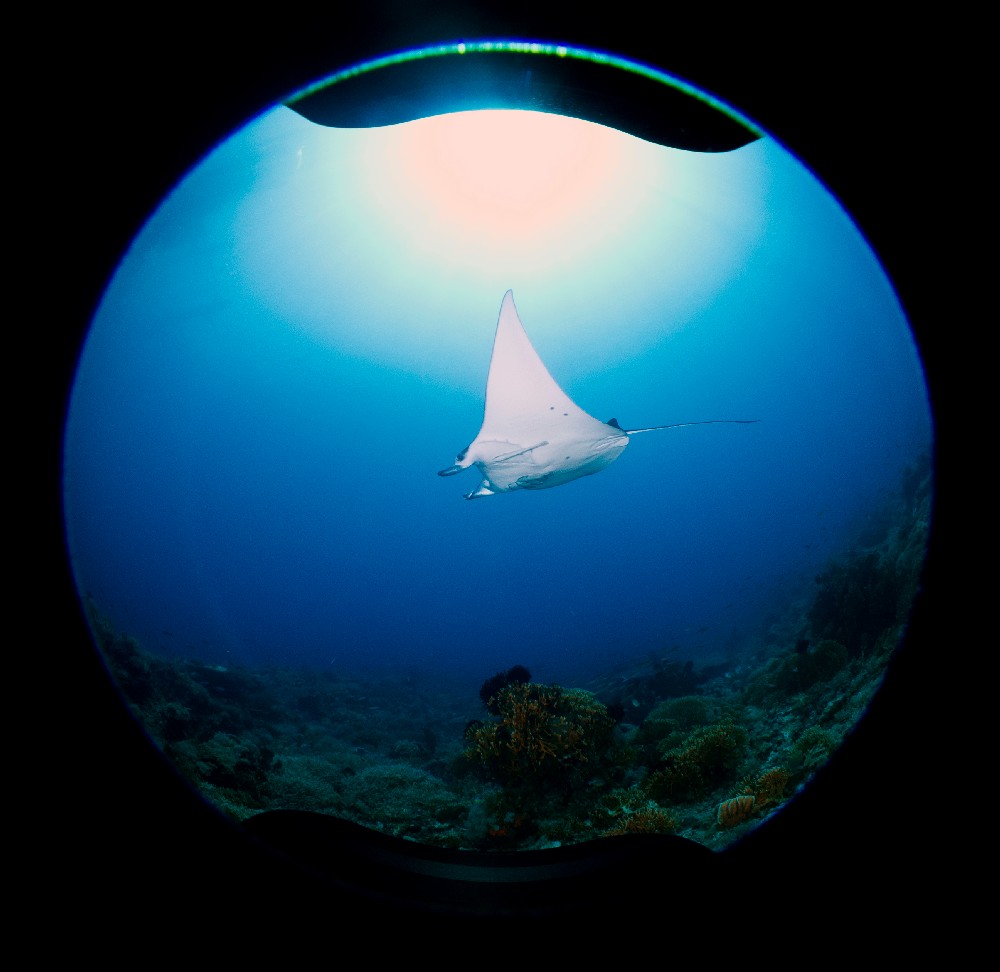
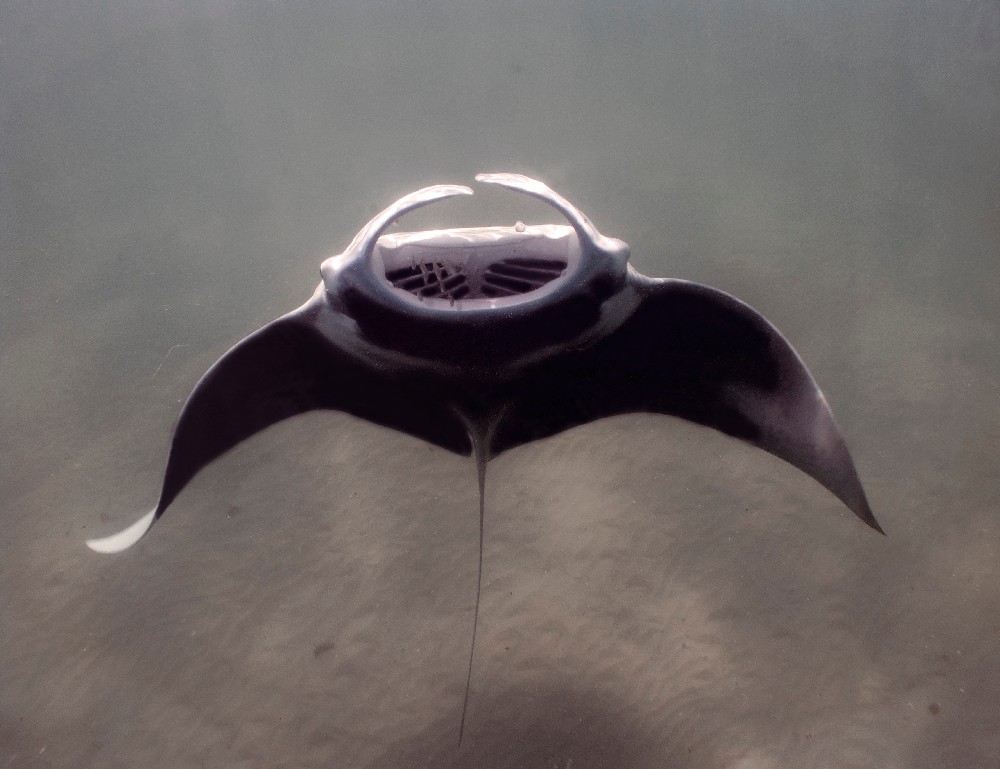
Manta ray. Taken with Single Inon d2000 and Single Sea and Sea ys-17 at ISO 80. Shot with manual mode at f6.3 and 1/200s. Dyron 8mm fisheye port.
There are some points to note when using wide-angle conversion lenses:
-
Achieving a wider FOV means you will have to adjust your strobes to light up the wider area received by your image sensor. This is especially important for divers using wet lenses in their setup, as you may mount them during the dive.
-
Using wide-angle lenses will “stretch” your depth of field, but this also expands the areas in your image that are out of focus, in other words blurred. This means that more of the area around the edges of the photo may be blurred. To avoid this it is necessary to set your aperture to a higher f-stop. Depending on what wide-angle lens is used on the G12, an aperture setting of f6.3 and above should be enough to counter this.
Common Wide-Angle Opportunities
The range of subjects that are suitable for wide-angle photography is very broad, ranging from beautiful reefs to schooling pelagic fish to enormous subjects like whales, and we have only touched on the living creatures! There are also interesting wrecks and other subjects like cave systems that are just waiting for a photographer to document them. All these different scenarios may require different settings and techniques but some themes are common throughout:
-
Only in a few cases does the photographer shoot images at a downward angle. One of the features of wide angle photography is the deep depth of field that can be achieved, which means the background chosen can enhance the aesthetics of image. Shooting towards the depths usually makes for a dull image, so photographers tend to angle the shot from at least an eye level and up towards the water surface. The image can then incorporate backgrounds lit up by the ambient light and make the photo more “3D.”
-
Composition of an image in wide-angle situations usually involves a prominent background. The subject is still the most important aspect of the image, but having a nice background like a nice sunburst or a wreck will make the resulting image more dramatic and pleasing to the eye. If a strong background is not available to the photographer the next best alternative is to use the water as the background and achieve a nice “blue.”
Let us now look at some wide angle scenarios and explore how to achieve that perfect shot!
Reef -Scape Shots
-
Take note of prominent features on the reef like large barrel sponges or huge sea fans, they can make great subjects to focus on.
-
Without going into specifics about composition, try to place your subject off center and slightly upwards to either side, if possible pointing the camera towards the surface of the water.
-
If there are reef fishes in sufficient quantities around, frame the subject and be patient until they start to make unique forms, like fmost of them swimming in one direction. This helps to make the image more interesting and dramatic.
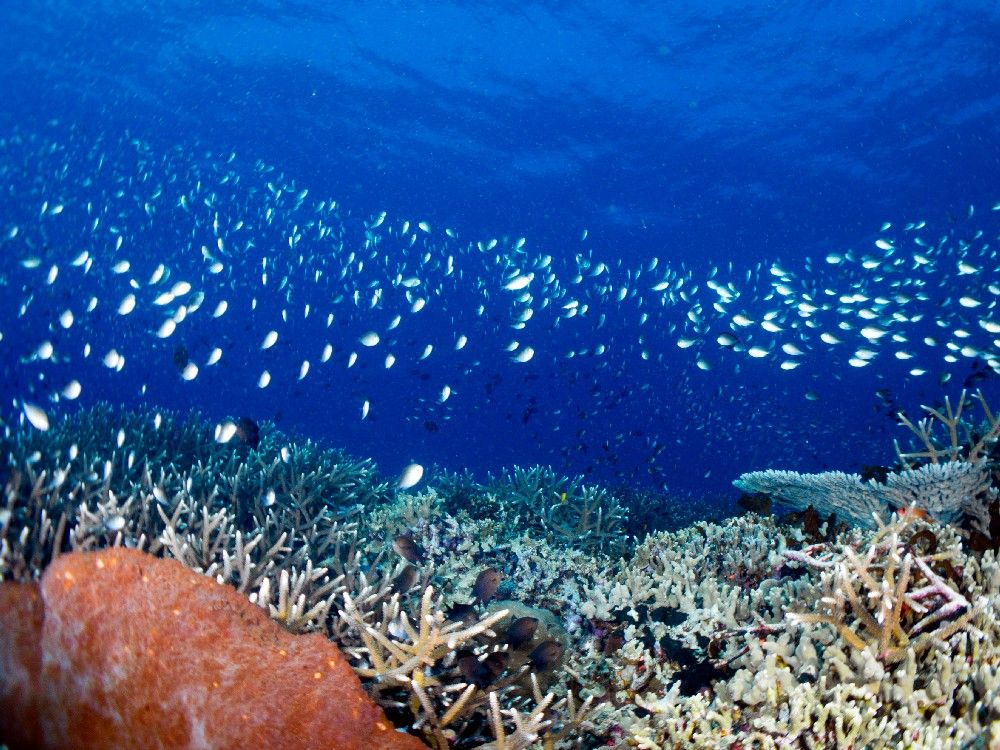
Reef scape. Taken with Single Inon d2000 and Single Sea and Sea ys-17 at ISO 80. Shot with manual mode at f4 and 1/200s. Dyron 8mm fisheye port.
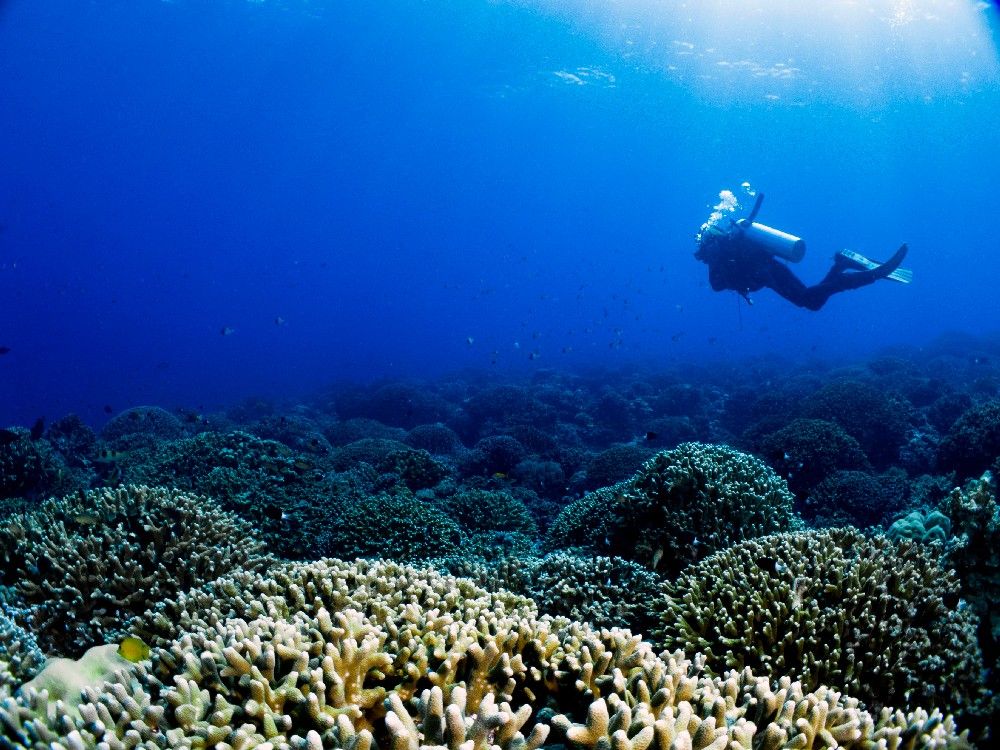
Reef scape with diver. Taken with Single Inon d2000 and Single Sea and Sea ys-17 at ISO 80. Shot with manual mode at f7.1 and 1/160s. Dyron 8mm fisheye port.
Shooting Schooling Fishes
-
Patience is the key in such situations. Refrain from rushing towards the subjects when you have spotted them. Hover around and observe their behavior while they get used to your presence and realize you are not a threat. If they move away and disappear into the blue do not go after them. There will be other opportunities.
-
Be on the look-out for photo opportunities. Schools of fish can form unique forms from any perspective at a moment’s notice.
-
Predict as best you can their movements so you can position yourself in front of the school. Head-on shots definitely trump “tail” shots.
-
Be mindful of shutter lag. Unlike dSLRs, with compact cameras there is an appreciable delay from when the shutter button is depressed to when the picture is actually taken. This means we have to anticipate to some degree how the subject is going to behave. Learning to account for this will take some time, but it will help you get better shots.
Reef Sharks
-
Upon encountering a reef shark, stop and hover for a few minutes. Chances are the shark will return to check you out.
-
Reef sharks may shelter in caves during the day and hunt at night, so local knowledge of where these caves are will help you ensure a shark shooting opportunity.
-
Sharks are inquisitive but tend not to get too close, so again patience and some luck is needed. Have your camera ready at all times and be mindful of shutter lag!
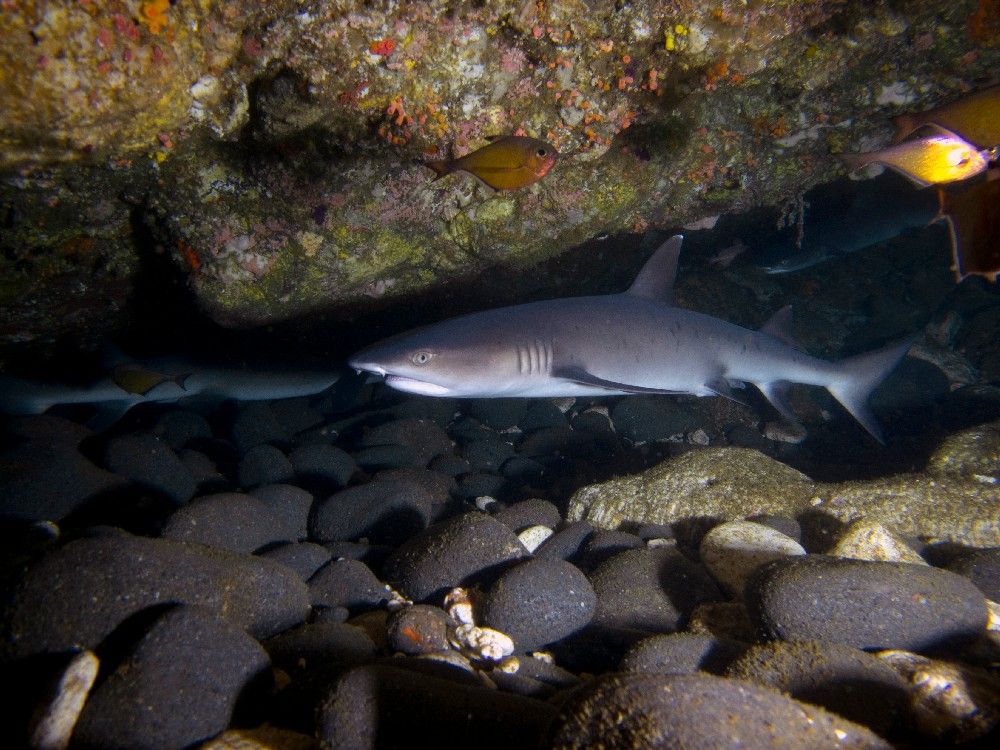
White-tip reef shark. Taken with twin Sea and Sea ys-110a at ISO 200. Shot on manual mode at f3.5 and 1/100s.
Turtles, Squids and Cuttlefish
-
When any of these subjects are spotted it is prudent to halt your advance and wait for awhile. They have already noted your presence and may just be a flutter kick away from taking flight.
-
Slowly creep up to them and control your breathing, all the while having your camera ready to shoot. The aim is to let the subject know that the photographer and more importantly the camera pointed at them is not hostile.
-
While using dome ports, turtles may mistake the reflection of themselves on the dome port as another turtle and “attack’ the dome. Stay calm and at the same time snap off as many shots possible. Some of the shots may be nice enough to count as a good close-focus wide-angle shot!
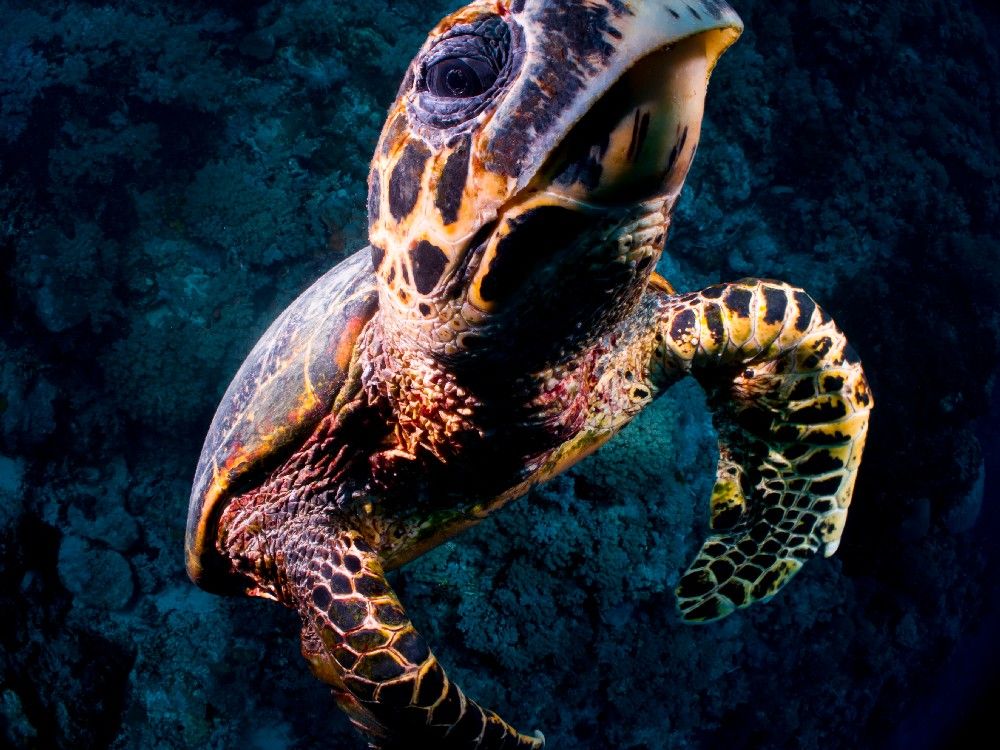
Hawksbill turtle. Taken with Single Inon d2000 and Single Sea and Sea ys-17 at ISO 80. Shot with manual mode at f8 and 1/250s. Dyron 8mm fisheye port.
Other Divers
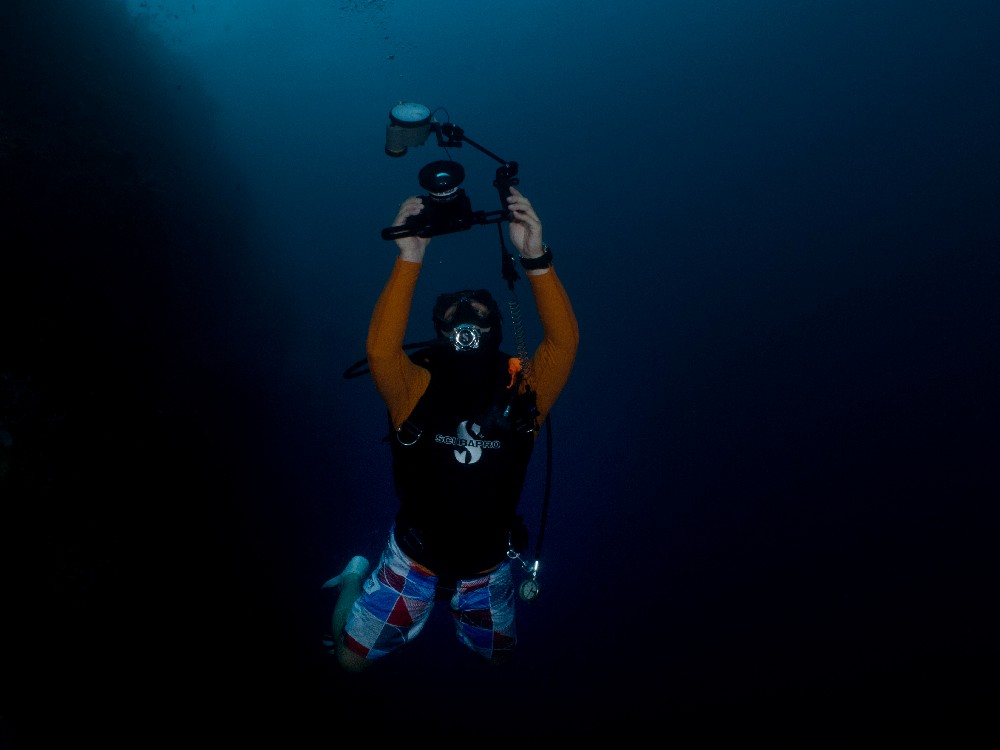
Let’s not forget our dive buddies! Scuba diving is definitely more enjoyable when other divers are around to share experiences. Photos of your dive buddies definitely form an integral part of your underwater memories. Diver portraits can be categorized into candid and posed shots:
-
Candid shots usually have the diver being the subject unknowingly during the course of his or her dive.
-
The best time to take candid shots is while the diver is observing the reef or during safety stops. That is usually when their movements are relatively slow and so easier to capture.
-
The biggest challenge is to shoot the image when the subject is in a beautiful form. Most divers are not models trained in posing for underwater photos, so this may get frustrating at times.
-
For posed shots, sunbursts are a great background to frame divers in. Other suitable backgrounds include schooling fish and wrecks.
-
If a good background is not available, I find it better to have a dark background to keep the diver in focus.
-
Good communication is needed between the subject and the photographer. Since this can be limited while underwater, most of the time it’s up to the subject to decide how he or she wants to be taken.
Diver posing. Taken with twin Sea and Sea ys-110a at ISO 80. Shot on manual mode at f8 and 1/160s. Dyron 8mm fisheye port.
The Canon G12, like every compact on the market, has certain limitations when shooting wide-angle images. However, with the sharpest lens ever mounted on a compact, coupled with the right 3rd party wide-angle conversion lenses, it becomes a force to be reckoned with. In addition, the G12 has a dedicated dial for all three parameters of aperture, shutter speed and ISO, making adjustments a breeze compared to it’s competitors. Along with superb image quality, the Canon G12 makes a compelling case as one of the most versatile underwater compacts around.


