Best Photoshop Tips for Underwater Photography
Photoshop is Adobe’s powerhouse for editing underwater photos. Layering images together for split view composites or designing a new logo from scratch are just a couple of examples of what Photoshop can do. But it’s also a breeze to do popular adjustments on your underwater photos from contrast to correcting underwater white balance. Whatever your vision is, the ideas are endless and so are the capabilities of Photoshop!
Photoshop: From Underwater Camera to Photoshop
There are many tutorials out there that teach a variety of workflow basics. The following has been my go-to for over a decade, but workflows can be altered according to what works for your final vision.
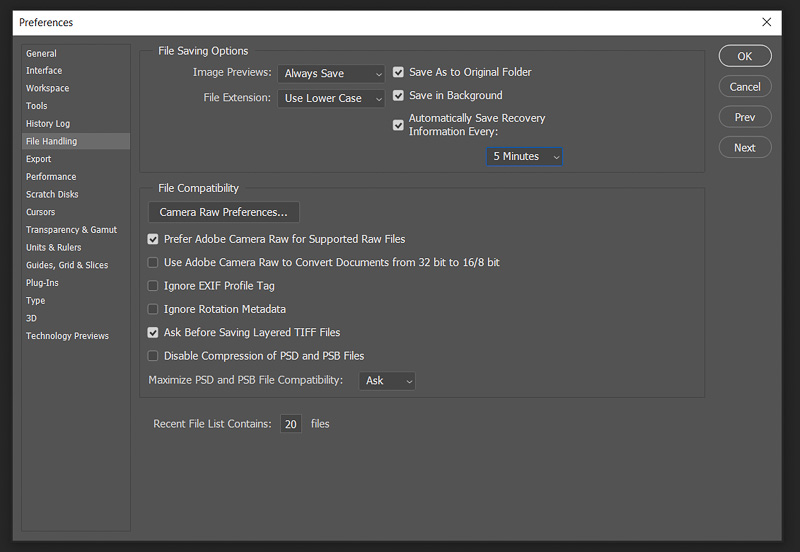
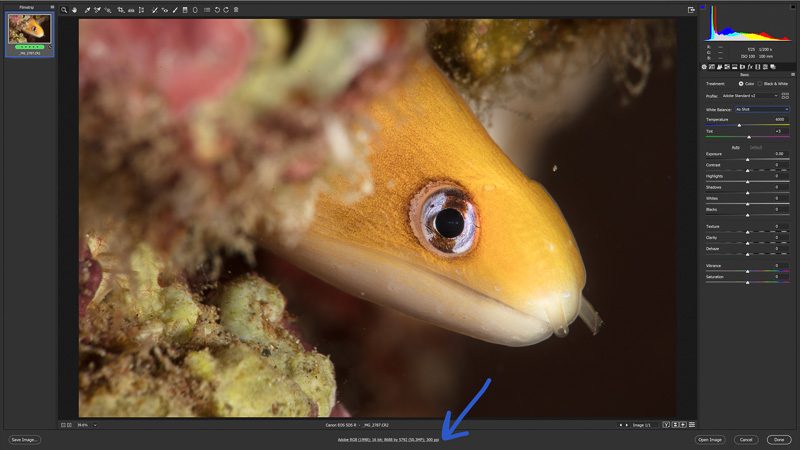
To begin, let’s take a RAW image of a dwarf moray eel from the camera into Photoshop. Since it is a raw file, it will need to run through other software first such as Lightroom or Camera Raw before opening in Photoshop. Camera Raw can be downloaded directly through Adobe’s website and works in junction with PS, initiating automatically when a raw file is opened. It is a simplified version of Lightroom, in the respect that it offers the same editing functions but lacks the organizing tools. To set CR as the default launch for opening raw images in Photoshop CC, go to Photoshop > Edit > Preferences > File Handling > Camera Raw.
This will not affect the ability to open images through Lightroom. Unlike raw, jpegs can be opened directly into PS.
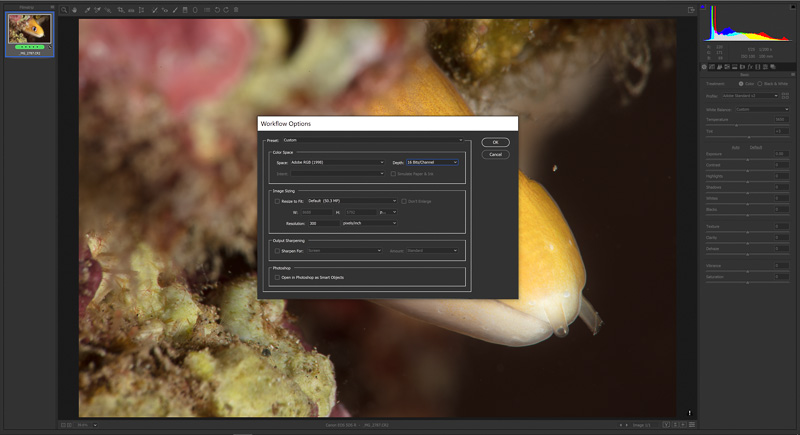
It is important to check the file specs in Camera Raw which are located at the bottom of the screen.You’ll want to check the format and color space that the image will be working in when moving it into PS. To change the settings, click on the specs and a dialog box will open. I recommend working in a larger color space such as Adobe RGB with a 16bit format (sRGB is sufficient especially if you’ll be sharing online). 16bit allows for advanced editing. A smaller, 8 bit format is not capable of stretching adjustments and has the potential to form unwanted banding in the images. I go more in depth on this subject in my article on Color Management.
Keep in mind that all adjustments made in CR are reversible. If you want to get creative, it has fun adjustments just like in Lightroom such as texture and clarity and all functions to adjust color channels independently, remove noise with a simple slider and paint with brushes.
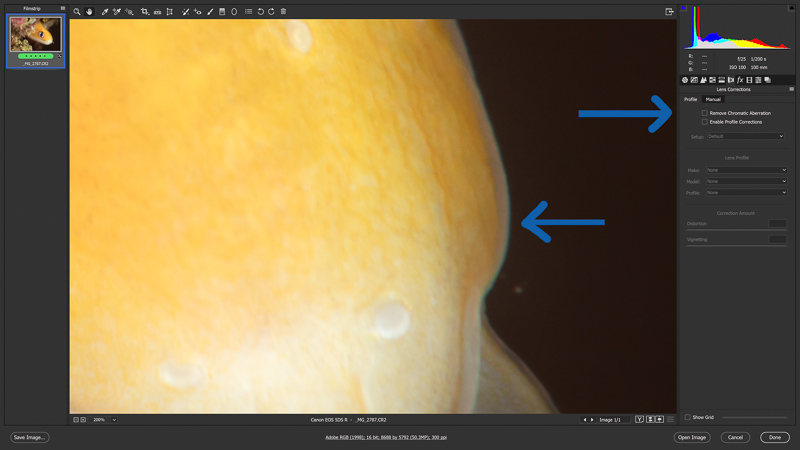
One key edit that I recommend applying in CR as you’re importing into Photoshop (it can be done in LR as well) is correcting the chromatic aberration. Check to see if color fringing exists on your photo by zooming in to around 200%. Chromatic aberration can make an image look a little blurry and often gives off strange hues around high contrast areas. In my Prep for Print article I go into why this is an important step. Simply check the chromatic aberration box located under the lens corrections tab in either Lightroom or Camera Raw. It is usually taken care of at this point but you can strengthen the effect with the sliders if needed.
Photoshop Workflow Tips for Editing Underwater Photos
Applying edits in a certain order during post process can help save time and can often make a difference in the quality of your final image. Because adding contrast to your image can bring out backscatter-like effects, it is important to eliminate unwanted particle in the water first. Reducing noise and smoothing out grain prior to adding contrast can also impact how well the other adjustments affect the final outcome.
- Work in 16-bit format
- Remove backscatter first
- Remove noise, if necessary
- Adjust color balance
- Add contrast last
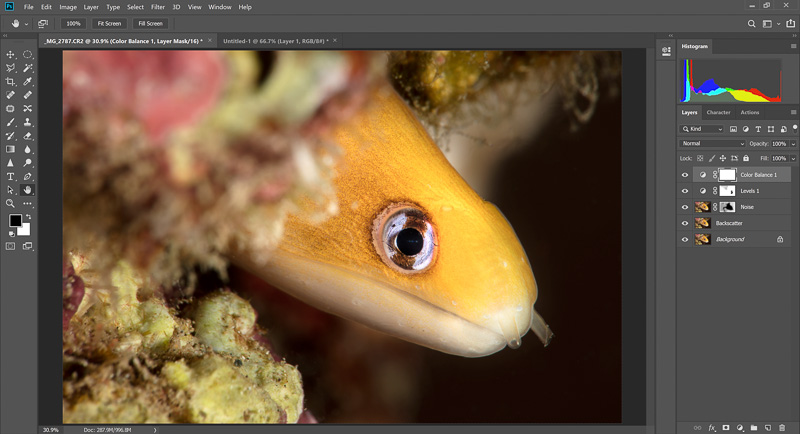
Photoshop works in layers that can be tweaked, blended, erased or stacked for visual effects. ‘Adjustment Layers’ automatically create their own working layer. Adding a new adjustment layer is simple via the menu bar located at the top of the screen or in the layers window, pictured below, marked with the red arrow.
A new duplicate layer must be created for Filters. To manually create a duplicate layer for a filter, either right click on the background layer to find “duplicate layer” or drag the background layer to the square symbol in the layers window before applying a filter. This is pictured below with the blue arrows. I recommended making a new background layer for all filters. It is not necessary but without the layer, blending the filter will be limited.

Backscatter Removal Step by Step
Photoshop is the best resource for removing particle in the image. Lightroom and Camera Raw’s spot removal, clone and heal tools lack precision and control. Applying one touch filters like dust and scratches use a blurring method that takes away focus and therefore sometimes the impact of the image. Photoshop’s Content Aware is precise. It can easily be perceived as a time consuming method but by creating a shortcut in Photoshop it takes less than a minute from start to finish.
TIP: The more zoomed in you are on the image, the more precise Photoshop is with its edits.
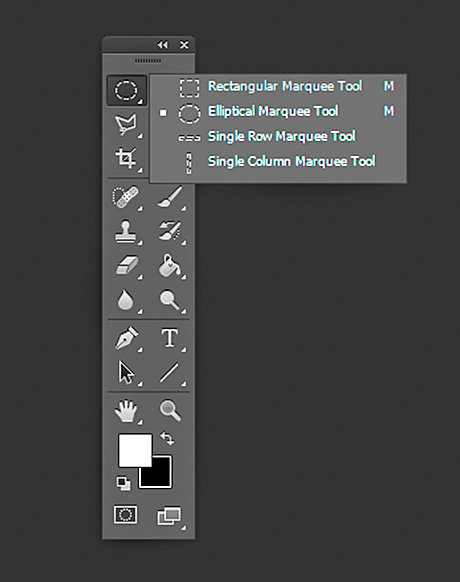
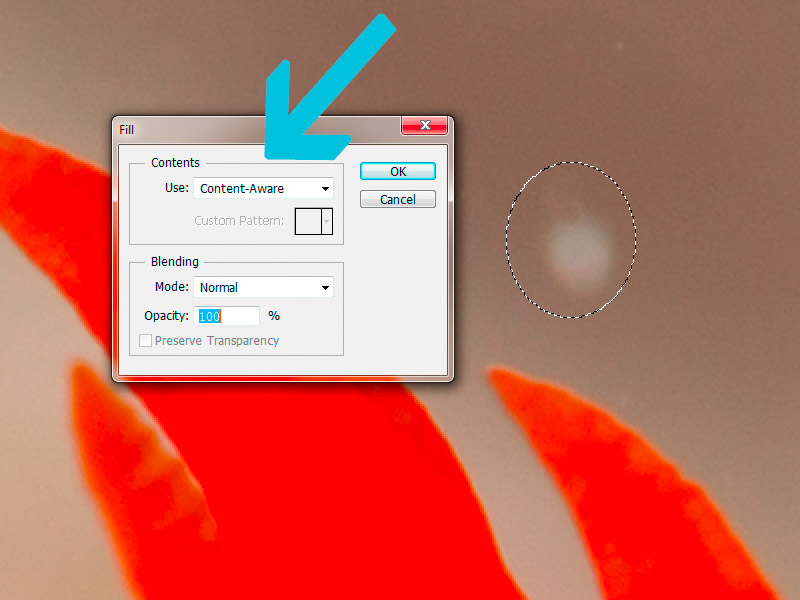
Create a duplicate background layer and name it as you wish. Zoom in on your image to at least 100%. Navigate to the selction tools and choose the elliptical marquee tool. Drag the circle over the spot you would like to remove. Right click and select Fill. A dialog box will pop up. Select Content-Aware and the spot will magically disappear. To see this method step by step in depth and learn how to make shortcuts in Photoshop, read my article specifically geared to backscatter removal with Photoshop.
- Create a duplicate background layer and name in backscatter
- Zoom in to at least 100%
- Use Elliptical Marquee tool to select spot(s)
- Right Click > Fill
- Choose Content Aware > OK
TIP: Depending on the speed of your system, you can hold down the shift key as you make multiple selections. This speeds up the process by only having to navigate to Fill > Content Aware one time. It can be as fast as you can make selections on your screen. The key here is to remove the larger particles in the water first. You’ll find that just by taking a minute to remove the majority of the prominent spots first, that a secondary method of removing the backscatter will have more success.
Reducing Noise
Noise can be created automatically from the camera’s sensor, using a high ISO or in post process with extreme editing such as lightening shadows too much. Depending on how noisy or grainy your image is you may want to consider removing it within certain areas of the image or the entire image itself.
Noise reduction not only takes care of the grain in the image but it also helps by reducing the smaller, finer particles in the water. By layering in a noise filter after removing the larger particles, the two layers will work together, simultaneously blending noise and backscatter away.
- Create duplicate background layer and name it Noise
- Filters tab > Noise > Reduce Noise
- Adjust Noise Reduction in dialog box
- Layers Tab > Layer Mask > Hide All
- Paint noise layer into desired areas with the brush opacity set to 25-50%
Create another duplicate background layer and rename it to Noise. Under the Filters Tab select Noise > Reduce Noise. Here you will be able to see a close up preview and use the sliders to remove as much noise as you’d like. When you are satisfied, click ok. The removal of noise has now been applied to your entire image. More than likely, this has created a bit of a blur in areas that you wish to remain sharp. With the Noise layer selected, navigate to the Layers tab > Layer Mask > Hide All. You’ll see a black box appear within the Noise layer indicating that layer has now been “deactivated”. This is the fun part where we can paint the Noise layer back onto the photo at different levels of opacity in just the areas where it is needed!
Select the brush tool and adjust its size, edge hardness and opacity to your liking. I prefer to keep the edges soft for blending unless working in a critical area. I also prefer to have the opacity somewhere around 25-50% to allow for a smooth, manual fade of application.
Tip: Foreground and background colors must be set to black and white. To start painting, be sure white is on top.
Color Balance
Adjusting the white balance post process in Adobe Photoshop is easy with the Color Balance adjustment layer. Go to the adjustment layer circular symbol (pictured above with the red arrow) and select Color Balance. You can also find this under the Layer tab > New Adjustment Layer. Photoshop is powerful and usually can correct the blue hue in underwater photos with just a few tweaks here and there. Every image is different depending if it is a wide angle shot or a super close up like the eel, which has a lot of warmth from the strobes. Carefully adjust each slider one by one and watch the color pop!
- Select Color Balance under New Adjustment Layer
- Use sliders to slightly adjust the tones
Adding Contrast
The final step is to add contrast. Contrast will make your image stand out by adding depth and luminance on your subject. The best tool for this is Levels. Adding contrast creates saturation as well so it is important to not add Vibrance or Saturation until final step, after adding contrast only if necessary. Only minimal adjustments with the blacks and whites are needed. Be especially aware of the highlights to make sure the detail doesn’t get completely blown out.
- Select Levels under New Adjustment Layer
- Use the sliders to darken blacks and brighten the light areas
TIP: As with any adjustment layer, you can always Invert or change the layer mask to ‘Hide All’ like we did with noise and paint in the contrast where needed.
Example Before and After


Saving
A working file with layers should be saved as a Photoshop .psd file which allows for future editing. “Flattening” the file and saving as a tiff or jpeg finalizes it for printing and sharing. Note that BOTH files will need to be saved to your hard drive in a folder of your choice, unlike Lightroom’s file handling where it is saved automatically. I recommend saving the .psd as an Adobe RGB 16bit Master File and saving another copy as a smaller jpeg file, preferably sRGB 8bit to share online for the best representation of colors and contrast on social media.