Over-Under Photography

Over-unders, also known as split-shots or splits, are underwater photos where half of the photo (the top half) is above water. They are often taken with very wide fisheye lens, in a large dome port, using a small aperture for good depth of field. These shots work best in shallow water, calm water, for example during the early morning. The brightness in the top half of the photo will be greater than the underwater portion. Because of this, strobes are usually used underwater to brighten up that area.
Graduated density filter and split filters are also used to help reduce the difference in contrast between the sky and the underwater scene. Because underwater the virtual dome image is close to the dome, but above water the focus point is very far away, you must either use a small aperture, or use a split diopter.
View all of our Split-Shot Tutorial articles.

Over-Under Underwater Photo Tips
-
Use a small aperture to get the background and underwater parts in focus, preferable F16. Bump up your ISO or lower the shutter speed as needed.
-
Exposure for the top-side portion of the photo.
-
Since the virtual image that the camera focuses on is further away with a large dome port, larger dome ports will make it easier to acheive focus in the areas underwater and above water. With a smaller dome port, you’ll need a smaller aperture to get above and below water in focus.
-
Focus on the subject that is underwater, don’t focus on the above-water subject.
-
Shoot in calm, clear water. Shoot on a sunny day, and use your strobes to light up the underwater subject if necessary. Try to shoot with the sun behind you to minimize the exposure difference between the over and under sections. Strobes like an Ikelite strobe or a Retra pro strobe work well.
-
If you only have an acrylic dome port, use the advice below to help your port shed water. Glass dome ports shed water easier.
Water on the Dome Port – Removing Droplets
One issue with over-under shots is water droplets on the dome port. Glass dome ports usually shed water better than acrylic dome ports, and larger dome ports also work better. However, there are tricks that can be used on acrylic dome ports. In the shots below, Kelly rubbed baby shamboo on the dome port, and let it dry for a minute in the sun. This had to be repeated every hour or so, but worked very well.
My friend Keri likes to use the spit, dunk and shoot method. He spits on the dome and rubs it around, then proceeds to “dunk and shoot”. When you dunk the dome in water and quickly raise it, you have a few seconds to take a shot that will usually not have any water drops in the photo.
Favorite Locations for Split-Shots
Over-Under Photography Examples
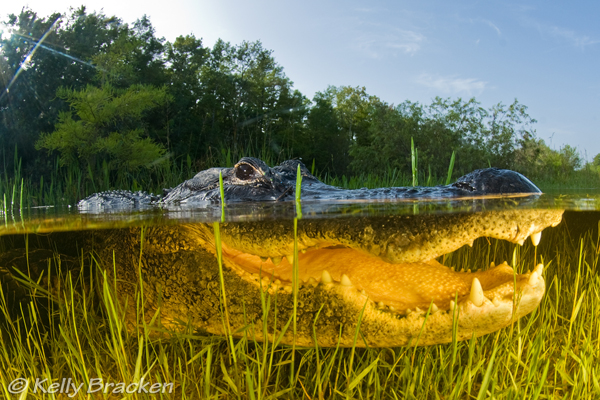
Alligator, photo by Kelly Bracken. Nikon D200, F11, 1/125th, ISO 200. tokina 10-17mm lens at 11mm, inside a Sea & Sea 9 inch acrylic dome port. The mouth of the gator was only an inch from the dome port. Strobes were underwater, pulled far back and turned down low to avoid blowing out the subject. Subject was only in a few inches of water. This was shot “blind” meaning the viewfinder wasn’t used. This shot was taken earlier in the morning, before the sky got too bright and the water got silted up. Clearly she had some chemistry with this alligator. Care had to be taken to shoot a “level” shot, not to overexpose the gator, and not to get the sun into the photo too much. One person also tried rigging up a pole-cam but it was decided it was better just to squat down with the camera. Nowadays I’d use a Nikon D850 for this shot.
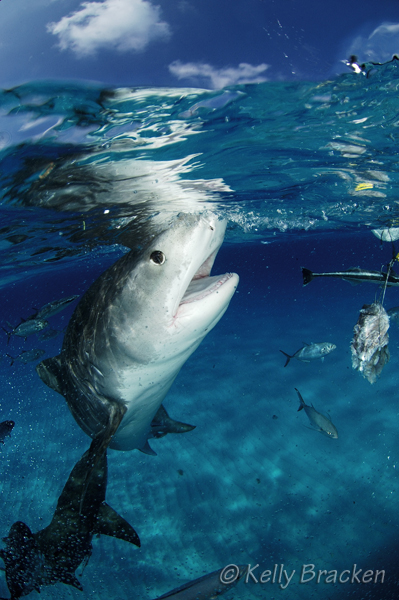
Tiger shark in the bahamas, photo by Kelly Bracken. D100, nikon 10.5mm fisheye, F16, 1/125th. Strobes were pulled back far and turned down to avoid overexposing the shark. Time of the shot was around 10AM. This shot was taken from the swimstep of the boat. The shot was taken “blind” meaning the viewfinder was not used.
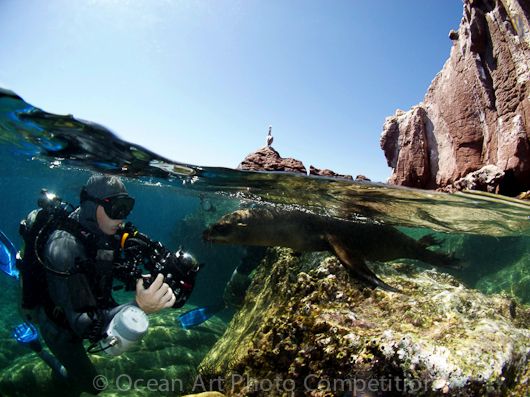
Taken with a Canon G12 and a small Dyron fisheye lens while diving in La Paz, Mexico. The key to this photo was having very calm surface conditions, almost lake-like, and also being in very shallow water just a few feet from the island. This allowed a small 4-inch fisheye lens to take a great underwater over/under shot. Photo by Pietro Biondo.
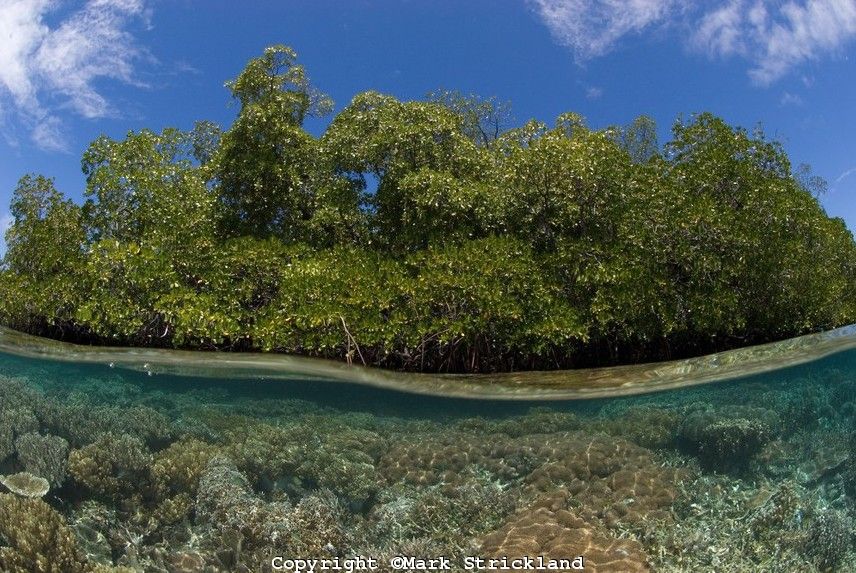
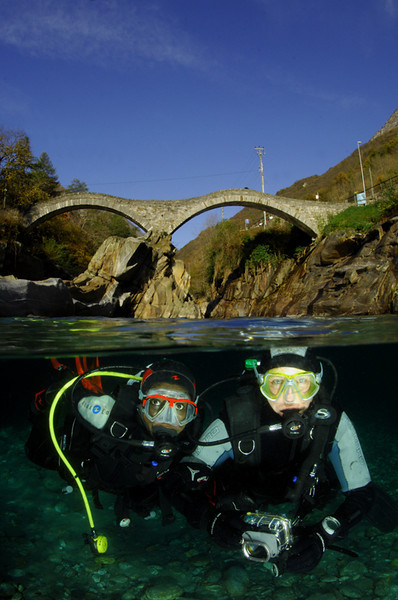
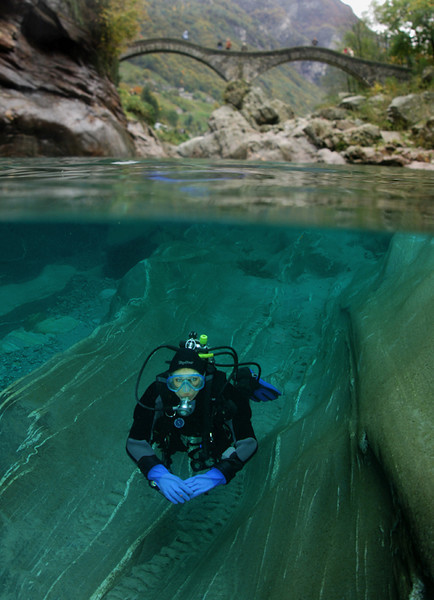
Photo by Bluewater Photo’s Mark Strickland, taken in Raja Ampat, Indonesia.
Mark Strickland’s Over Under tips
According to Mark, to acheive a great over-under photo, it is important to have overhead sunshine, little or no wind for a glassy surface, and a light colored substrate underwater. This photo was taken with only ambient light, but if necessary strobes can be used to light up the underwater area.
Having a shallow or physically close foreground subject underwater will also help, along with having a large diameter dome, preferably glass to enhance sheeting action and minimize water droplets on the dome. For glass or plastic domes, another great tip is to use a sponge saturated with liquid dish soap, and wipe the dome & dunk as needed.
When shooting with a dSLR, small apertures are preferred, F11 or smaller – in order to get the necessary depth of field.
Over-Under Photography by Michel Lonfat
Michel is an experienced underwater photographer living in Switzerland. He takes many types of underwater photos, but here we are going to focus on his excellent over-unders. Location is important, and Michel has been known to hike an hour with his underwater photo equipment to get to a good spot at a lake. Here’s some information on Michel’s approach to split-level shots.
Michel shoots with a Seacam housing and a 240mm glass seacam superdome. Most of the time he uses a Sigma 15mm fisheye lens for over-unders, but has also used the sigma 12-24mm and Nikon 18-55mm lenses. He always shoots in manual mode, at a shutter speed of 1/100th -1/200th. Some shots are with strobes, and some are with only ambient light, depending on the difference in light levels underwater and on the surface.
Here’s some over-under split-shot tips from Michel, re-written in my own words:
-
I try to shoot at F16, so that my depth of field can capture the underwater subject and the background. don’t forget that you are really focusing on the virtual image, which is very close to the dome port.
-
I try only to shoot in nice, sunny weather so I can get a blue sky, and good light penetration underwater so the model shows up well.
-
The best light as at mid-day, close to noon when the sun is directly overhead
-
When the sky is not so sunny, I shoot at F5.6-F11, but the cost is depth of field, so the background will be slightly out of focus.
-
To keep water off my dome port, I usually dive with a small sponge that I keep in my BCD pocket. When I need it – I squeeze it really strong and I wipe off the water off my dome – and then slowly put back my dome in the water making sure the upper part doesn’t get wet, but it is not always perfect. The most efficient technique is to dry the dome with the sun. It gets dry quickly.
-
It is hard to get every drop of water off, and you can use photoshop to clean up your image.
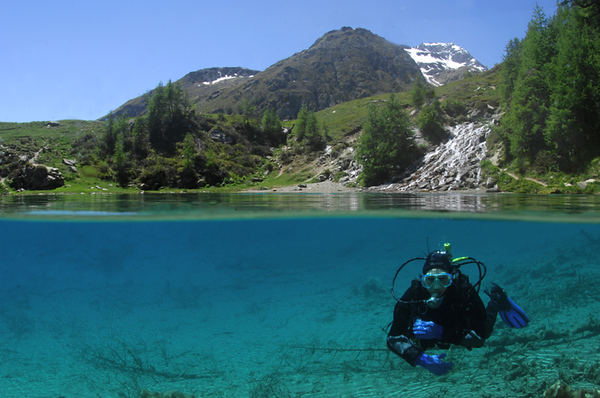
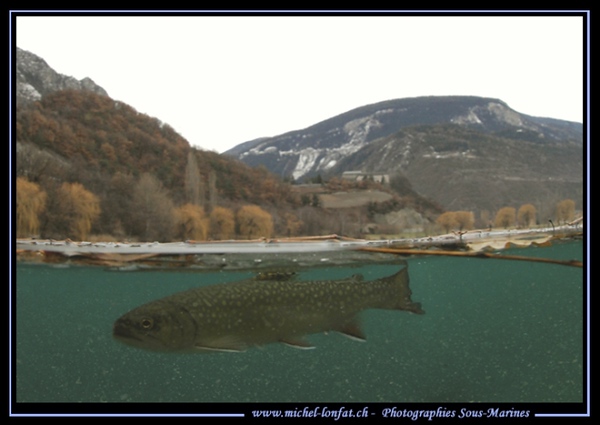
Diver in a lake in Switzerland. Photo by Michel Lonfat. F16, 1/50th, ISO 100, Nikon d2x, Sigma 15mm lens, Glass seacam dome port. Shooting in calm, clear fresh water with a beautiful background makes for wonderful over-under shots. Shooting at F16 allowed both the top and bottom of the photo to be in focus. Large glass ports shed water easy for shots like these.
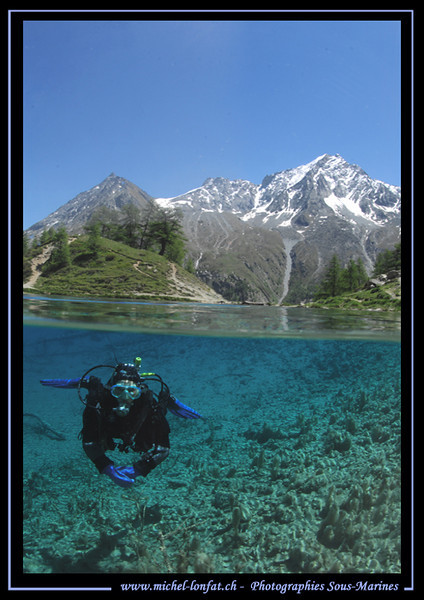
Divers in a lake in Switzerland. F16, 1/125th, ISO 320. Photo by Michel Lonfat. Again, shooting at F16 allowed the over and under portions both to be in focus. The closer the subject is to the camera, the smaller the aperture needed to accomplish that. Michel bumped his ISO up to 320 to allow him to shoot at the required F-stop, and maintain a fast shutter speed. A nice sunny day allowed the sky to be blue at F16. Because he used the flash, and a fast shutter speed, the water behind the divers is black.
Diver in a lake. Photo by Michel Lonfat. F4.5, 1/60th, ISO 160, Nikon D2x. Due to the lower light conditions, this was shot at a larger aperture of F4.5. Because of this, the background is sligthly blurry, but underwater is sharp. No flash, and no blue sky due to bad weather.
Example of a shot with no flash and a blue sky.
An example of a shot in bad weather (no blue sky).

This shot is with no flash, and a little bit of a blue sky, but still there isn’t enough light to use a small aperture, so the background is out of focus.
Scott Gietler’s Guide to Dome Port Difficulty
I’m often asked by people if they can take an over-under or split shot with a smaller dome port. Here are my thoughts on the subject, for various dome port sizes.
- Wet wide-angle lens: Only the most dedicated underwater photographers will be able to pull off a split shot. First you need to tape up your wet lens to keep the water between the wet lens and your underwater housing. Second, you need the water to be calmer than a still pond. Good luck! But I have seen it done.
- Small 4-inch glass dome port: I’m taken some split shots with my Zen underwater 4-inch glass dome port and Nikon DSLR underwater housing. They didn’t turn out well. It best to stick to close-focus wide-angle photography with this dome port.
- 6 inch dome port: In a pinch, you can get some passable split shots, if the water is calm. The water line will be larger than you probably hoped it would be, and more wavy, but you can still pull off shareable photos if needed. Worth trying if the water is very calm, especially if you are diving in French Polynesia.
- 8 inch dome port: Now we are talking – you can get some high-quality split shots, although it is best if you have time to be patient, and the water is not too rough. With some practise, you may even get some photos published.
- 9 inch glass dome port: This is what the pros use. The water line now appears much smaller, and even small waves won’t necessarily ruin a shot with the right subjects. You may have to sell a small car to purchase one, bu t people who have this dome port rarely regret it. Use good underwater strobes for the best results.
More Split-Shot Tutorials


