Ice Diving Greenland: A Story of Icebergs, Frozen Critters, and Unique Lingo
Note: I have provided some key ice-diving definitions for non-ice-divers, in Italics.
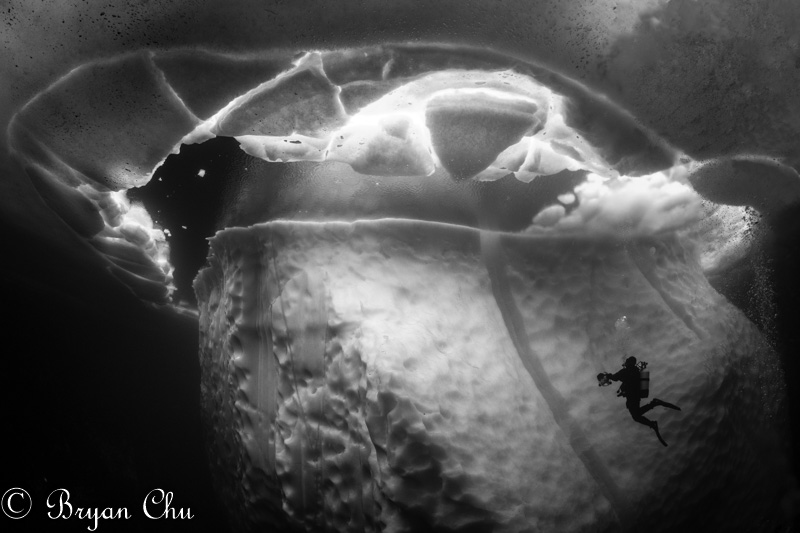
Cold and dark were the first two words that came to my mind as I dropped beneath the Tasiilaq Harbor sea ice for my first under-the-ice dive on an iceberg. This quickly turned into the Ice Diver’s Litany, on high-speed repeat.
Ice Diver’s Litany – It’s cold. It’s dark. My drysuit with all these undergarments is so restrictive. My hands are cold. My face is cold. Why am I doing this? Why aren’t I on a Liveaboard in Raja Ampat, where I could be wearing 5 lbs instead of 35 lbs? Is it just me or is it hard to breathe? Why am I doing this?
I had done ice diving before, and iceberg diving, but never together. I was breathing hard and dealing with nerves, as it was my first ice dive in over a year. It didn’t help that the water was about as cold as it gets; -2 C (~28 F). As I got my bearings sorted out, got my safety rope untangled and took a real look at the iceberg, I realized I had just entered a breathtakingly beautiful world. Or maybe it was just the cold, pressing in from all sides, that was taking my breath away. Probably a bit of both.

What was I Doing?
I was on a two-week April iceberg diving trip in Tasiilaq, East Greenland, run by Sven and Anja of Northern Explorers. This was very remote diving; I got there via an international flight to Reykjavik, a small plane to Kulusuk, and a helicopter to Tasiilaq. The dive site was a short ride by snowmobile from the edge of town out onto the sea ice.
Why dive icebergs in April, instead of the summer? Amazing visibility. I had been on a previous trip in the summer, which was a fantastic experience. However, due to all of the plankton in the water, visibility was not good enough to really take in or photograph the full scale of the icebergs. In April, the surface water is still covered in a layer of sea-ice from the winter, which cuts off most of the light. This, combined with the frigid water temperatures, limits most of the plankton and algae growth.
The trip itinerary included a mix of dives in the harbor and in a neighboring fjord, but due to poor snow, ice and visibility conditions, the group decided it was not worth leaving the harbor. Instead, I spent the two weeks I was there diving on one iceberg trapped in the sea ice in Tasiilaq harbor, and it sure was amazing.
Trip itinerary: The “ideal plan” for the trip, made months in advance, before seeing the actual ice conditions and iceberg locations, and assuming lovely springtime weather in Greenland. Similar to what you get on a tropical liveaboard trip, except that it’s nearly impossible to stick to.

Equipment Issues
So, back to my first dive. I was breathing a bit raggedly, was over-weighted and unbalanced, and after a jaunt back to the surface to adjust some of my equipment, about 10 minutes later my regulator started free-flowing and I finished the dive.
Free-flow: when too much of a good thing turns out to be a bad thing.

I was using a 12L steel tank with two valves, allowing use of two separate 1st stage regulators. On one 1st stage I had my main 2nd stage and pressure transmitter, while on the other 1st stage I had my octo, my BCD inflator, drysuit inflator and backup pressure gauge. That way if one 1st stage went, I could breathe well off the other 1st stage until I could get back to the icehole.
Icehole: a hole cut into the ice to allow people whose survival instincts are seriously compromised to jump into frigid water wearing dive gear. The more prolonged the time spent under the ice, the crazier and more addicted they become, unless they stay under too long and run out of air.


My second dive, I took out some weights and rearranged things for better trim. I tried going on my octo instead of my main reg, as a professional photographer in the group had suggested it based on his experience. The octo lasted for a bit, and I got to start exploring the iceberg. Then it started to free-flow just a little bit.
Octo: the cheaper 2nd stage regulator that you use for a backup from your more expensive main 2nd stage. Since its cheapness makes it harder to breathe on, it actually works better for ice diving than your main since it is more resistant to free flows.
Then I heard a hissing that sounded like a real free-flow, and found myself going up towards the ice. I realized my low pressure inflator hose for my BCD was frozen open and was making the hissing noise, The hissing was joined by what sounded like a squealing oink. I checked to make sure there were no angry pigs in the vicinity and then figured out that my BCD was fully inflated and releasing excess air through the pressure relief valve, and that was making the noise. I tried dumping and disconnecting my BCD as I bounced against the ice above me, and after a bit of flailing about, the hissing stopped.
Ice-bouncing: an undesirable condition where air is being continually added to your drysuit or BCD. Before you know it, you find yourself in a cloud of bubbles with your head bouncing against the ice.
I went back to the surface, got the hot water treatment for my octo, and the free-flow stopped.
Hot water treatment: fixing a free-flowing regulator by turning off the air and pouring hot water onto it, before resuming the dive. Sometimes you may find yourself half-hoping the treatment fails so that you can just end your dive and warm up, but half-disappointingly, it always seems to work.

More Issues
OK. Back we go. I went back into the icehole and around the side of the iceberg, with my regulator beginning to free-flow again. It was not a bad free-flow, so I decided I would stay shallow and within sight of the icehole, and keep going. I even managed to take a few photos. Then the octo got worse, blowing lots of bubbles in my face, so I decided to switch regulators to go back to the surface. As soon as it was out of my mouth it really started free-flowing in earnest, so I booked it back to the hole on my main reg. I had lots of air to spare, but at the rate it was going there was no point in hanging around under the ice.
By the time I hauled out on the ice, I was cold and exhausted, and that was that for day 1.
Hauling out on the ice: When an ice diver with frozen hands in an advanced stage of pain or post-pain numbness feebly claws and flops their way onto the edge of the icehole, using any technique their numbed mind can think of to get all their gear and 30+ lbs of weight out of the water. Except in cases of extreme physical strength, this action is always accompanied by assorted gasping, rasping, moaning and grunting noises of varying stridency, and sometimes choice use of expletives.
Day 2, we dove a second dive site that was up against some interesting ice formations. I was hoping to be done with regulator issues, but I never made it more than about 30 seconds under the ice without a free flow. I turned both of my second stages down, switched back and forth between regulators and gave them both the hot water treatment, but to no avail. Then, two fellows on snowmobiles came over and told us that a dogsled race was coming across the ice right next to our dive site. So, we had to move back to the iceberg dive site. Diving on the iceberg, I went on my octo again, and managed the free-flow for as long as I could. I was actually able to get decently comfortable with my buoyancy and trim, and check out the iceberg in closer detail. Once the free-flow got bad enough, I ended the dive.

Problem Fixed!
Day 3, we had a storm and were snowed out, so we had a rest day. Sven suggested I take the hoses off my 1st stages and open all the plugs, to see if there was any water inside. Lo and behold, the 1st stage I was running my octo, BCD and dry suit inflator from had some drops of water in it. A-ha! Found the culprit! I must have gotten some water in there on the first day, probably when switching between tanks, due to valve snow.
Valve snow: snow which accumulates in the tank valve, especially for DIN tanks, either from blowing snow, the tank being slung into a snowbank, or from snow kicked up while the tank is on a sled being towed out to the dive site by snowmobile.

Testing the Limits of my Undergarments
Day 4, I got to the iceberg dive site full of optimism. I was the first one to be dropped off, so I went about clearing the icehole of accumulated snow and ice from the last couple of days. I used a shovel to scrape snow away and could see the nice rectangular shape of the icehole. Then, I stepped forward to reach further into the middle of the icehole and had a sinking realization.
Sinking realization: when you step onto a patch of snow and ice that you think is solid, but that turns out to be a thin layer covering a recessed part of the icehole that you forgot about. Before you can even get in a good “uggggh” you find yourself half-submerged in -2 C seawater. You immediately flail your way out of the icehole as ungracefully as possible and lie gasping on the ice thinking “how could this have happened?” over and over again.
After coming to grips with my sinking realization, I realized I had a real gong show on my hands.
Gong show: A situation generally characterized as having gone off-the-rails. In this example, it involved standing on a tarp in the middle of the sea-ice, taking off your boots and all your undergarments, wringing them out as best you can, and then putting them back on so you can still do your diving for the day.
Now that my undergarments were wet, I needed to get them out of the wind, but my drysuit had not arrived on the snowmobile yet. I also could not go back to clearing out the icehole (though my sinking realization had cleared out a good portion of it) as one of my boots was full of water, and I did not want to get my wrung-out socks wet(ter). So I just stood on the tarp in my one dry boot and a semi-wet sock and waited for the snowmobile to return, feeling like a real Grade “A” Genius.
Grade “A” Genius: Someone who did something so inept and downright stupid that you can’t help but be somewhat impressed by what they managed to pull off.
Once everything arrived and I explained my situation, I got into my drysuit and prepared for diving. I was very careful when setting up my regs to remove all valve snow, and even toweled everything off before installing. I got in the water, running on my octo.
The dive was magic! Well, magic with one foot slightly colder than the other. The octo was solid with no free-flowing, and I made a 33 minute dive without any issues. And I got some great photos, especially once I got my breathing under control and stopped getting big clouds of bubbles in my upwards-facing photos. This is what I came out here for!

While I waited for the second dive, I suffered a strong case of iceblock foot on my wet foot.
Iceblock foot: when your foot feels like a block of ice, but still has just enough feeling that you can very sluggishly wiggle your toes around and feel a bit of pain. Due to the oncoming numbness, walking around feels like what you’d imagine if would feel like to walk around with a block of ice for a foot.
I swapped to a dry sock for the second dive, and it was even better. More comfort, better buoyancy, better breathing, better photos! 45 minutes – more than long enough to thoroughly freeze my fingers. And even more exciting was finishing up for the day, getting back to the house and thawing out my iceblock foot in the shower.

Hunting for Bugs and Jellies
I spent the next couple of dive days focused on macro shooting. First up was going for little amphipods which live in the iceberg, and then cool comb jellies floating around. I had issues with mask fogging, autofocus hunting, my BCD slowly inflating itself, and a leaking wrist seal, but managed to sort everything out and get some fun shots! We also dealt with the worst day of the trip, a very wet mushy day, and then a day with some pretty heavy horizontal snow.
Mushy day: when the temperature is a couple of degrees above freezing, and the weather alternates between giant, wet snowflakes that melt on contact, and big rain drops that get driven at a 45 degree angle by the wind. Soon enough, everything becomes wet and waterlogged, and everyone can’t stop smiling about how awesome it is.
Horizontal snow: a wonderful weather condition in which a howling wind blows small, sharp flakes of snow horizontally across the ice, so that you need to cover your eyes if you’re facing into the wind. If you are good at seeing the positives, you will enjoy this more than a mushy day, because although everything gets pelted and covered with snow, things don’t get miserably wet in the same way.


There were also lots of really cool nudibranchs in the area, which other people saw while I was hunting around for macro subjects, and which I saw when I was using my wide-angle gear. Of course. So, unfortunately no photos, but you’ll have to trust me that they were really cool.
Changing Conditions
The ice was melting and the visibility dropping as we got into the second week. Each day there seemed to be more particulates in the water, a thicker murky layer of freshwater sitting at the surface, and more jellyfish around the iceberg. But with new conditions come new opportunities as well, and the opening up of clear water between the iceberg and the sea ice created new amazing photo opportunities.
We had some new divers join the group, and they got to go through some of the same equipment issues as we had. Now, with lots of free-flow and equipment issue experience under my belt, I dealt with new occurrences without breaking a sweat (and yes, you are right, it is very hard to break a sweat in -1 C water). New free-flows were just a minor nuisance; once a reg started to hiss, I just switched regs for a bit, being sure to face the offending reg down and hold it there until it thawed. A second bout of ice-bouncing was taken with aplomb, though it was hard to get used to that oinking squeal my BCD emits.

One of the new divers was a professional photographer who I got to do some fun dive modeling for (so we now had 2 professionals in the group). He took some phenomenal photos, which gave me some new ideas. And I also had my first experience of tea hands.
Tea hands: a situation wherein your wet gloves become filled with tea and you warm your hands up in said tea. This happens because in your dazed post-dive state you thought the thermos of tea was the thermos of hot water, excitedly poured it into your wet gloves and then shoved your hands in to get them thawed.
With all of the jellyfish, I took a very large amount of photos, trying to get a cool shot of a jelly next to the iceberg. It was more difficult than you would expect, because the particulates made lighting difficult, and any movements in the water near the jellyfish caused them to become misshapen (and who wants a photo of a misshapen jellyfish?). After many hand-numbing attempts, I was finally able to line up a really nice one.
, Olympus 8mm F1.8 Fisheye, Nauticam housing. F/8.0, 1/100 s, ISO 200.")
Fun with Kelp
I was talking with both of the professional photographers, and getting lots of great tips. One of them, Franco, took some great photos of the iceberg with kelp in front of it, so I spent a couple of dives trying to line that up. It was tough, as I was having difficulty lighting from the sides in a way that was even and also avoided too much backscatter. Compounding the issue was a creeping visibility problem.
Creeping visibility problem: when you have to lie down in the kelp to take a photo, and doing so stirs up sediment sitting on and under the kelp. What seems to be a barely noticeable current then pushes the sediment forward and, conveniently, into your photo.
I combatted the problem by using my best kelp crawling and kelp hopping techniques.
Kelp crawling: slowly edging yourself forward through the kelp, trying not to touch or disturb anything while staying ahead of the creeping visibility problem.
Kelp hopping: using proper buoyancy techniques with frog and helicopter kicks to lift off of one bed of kelp and move forward into one closer to the iceberg, with minimal sediment disturbance, to begin anew the kelp crawling process in a fresh zone.
, Olympus 8mm F1.8 Fisheye lens, Nauticam housing. F/5.0, 1/100 s, ISO 640.")
Split Shot Experimentation
As we got towards the end of the trip and the surface water cleared up more and more, we decided to take a shot at a split shot. The freshwater layer at the surface made it quite difficult, as any time it got disturbed it made things quite blurry. But I was still able to get something decent.

Challenges
This was a very challenging trip in a number of ways. Here are some of the top challenges for underwater photographers.
- Cold hands and loss of dexterity – 7mm 3-finger gloves cut down dexterity a lot compared to warm water gear. But they still worked fine with everything on my housing. The problem was when my hands started getting cold, then my dexterity really took a hit, significantly slowing down my ability to make adjustments
- Remoteness – if something broke or was not working, or if I forgot to bring something, I could not buy my way out of my problem. Instead, improvisation was required (for example, rolled up toilet paper instead of desiccant)
- Cold drains battery life – I had to open my housing and change my battery after every dive. That was hard when it was snowing. But it made me very thankful for my Nauticam vacuum leak protection system! Keeping my rig in my AO cooler bag at least kept it off the ice and a bit insulated, which I think also helped.
- Mask fogging – mask fogging seemed worse than normal. A couple of times I defogged and rinsed my mask only to have my mask freeze over with ice. Once in the water the ice melted but I had some fogging issues.
- Regulator free-flows – I had to get used to dealing with them and swapping regs on the go, even after turning my regs down all the way (so they were harder to breathe). I also dried out each tank valve with my microfiber towel before installing my regs, to be sure I kept water out of my first stages.
- BCD inflator getting stuck open – this happened to me twice. I found it safer and better to just use my drysuit for buoyancy control, and have my BCD only as a backup in case of a dry suit flood. This is why Sven tells us not to go too deep – you never know what could happen with gear in really cold conditions.
- Weather was very unpredictable so I had to get used to adjusting to changing conditions and changing plans
- We only had a couple of dives per day, and I didn’t last longer than about 45 minutes for any one (though our crazy professional photographer Alex did 90 minute dives)
- Don’t expect luxury! The food was great, but that was due to Anja’s excellent cooking, not what was available in the grocery store. Lots of frozen veggies, some local meats, and some simple pastas and other things.
Key Tips for Arctic Underwater Photography
I could write a lot about what I have learned through all of my ice diving adventures leading up to this, but that’s not the focus of this article. So I will leave you with a couple of key tips.
The most important thing for underwater photography in arctic waters is keeping your hands warm for as long as possible. Here is what I have learned about that:
- 3-finger 7mm neoprene wet gloves are warmer than dry gloves with liners, and they give you enough dexterity to easily use your housing. This holds true in my own experience, as well as with other experienced divers and with Sven (Alex was using 3-finger wet gloves on his 90 minute dives).
- You need a really warm undergarment to keep your core temp up, which will help keep your hands warm. For me (and a few others on the trip) the 4th Element Halo was amazing. I use it on top of a layer of 200 g/m2 Merino wool and Xerotherm top and bottom
- Fill your wet gloves with hot water in between dives and right before you get in the water. Magic
- Don’t get wet gloves which are too tight (or wear too many layers of socks). If your hands (or feet) are getting squeezed by your gear, your body will reduce blood flow to them, making them even colder.
Another very important topic is weather and travel planning.
- Especially for any trips in spring, fall and winter, you never know what the weather is going to be like
- Arctic weather can change week to week, but it also changes year to year. Sven observed very different April weather a few years ago when running trips. Now conditions are less predictable and more likely to change from year to year.
- Try to avoid making too tight of a travel schedule. Give yourself lots of time for airport transfers in case your flights are delayed, and it’s a good idea to have a buffer of a day at the start and a day at the end. Try not to have something important you have to get back to right away, so that if you are delayed you won’t miss it.
- If you really want to get great photos and can afford the time and money, book yourself for two weeks instead of one. All it takes is one storm to knock out a few days of your week-long trip. Two weeks gives you a lot more time to get comfortable in the water, plan your shots and get some nice weather.
- All of the above might not apply; you may be able to book a very tight travel schedule for one week, get amazing conditions and never have any problems. But you never know!
Conclusion
This was one of the best trips I have ever done. The numerous gear malfunctions and two episodes of ice-bouncing, although not the most fun at the time, are great experience to have under my belt if something really serious does occur underwater. Although I would not have thought I would enjoy doing 17 dives in a row at the same dive site, that is exactly what we did here, and it was awesome. I actually left wanting to do still more. Why? Because it meant that we could take the time to scout and plan out shots, organize things with a dive model, and really explore all kinds of fun angles and perspectives. We could take shots, look at them on the computer and then plan out how to improve the next day. It also allowed time to check out interesting macro life and to take advantage of changing water and light conditions.
But the most important reason for spending two weeks in a place like Greenland was the highly unpredictable weather conditions. When diving in the arctic, you never know if you are going to have a week of almost perfect weather, a good run of decent days, or a bad stretch of snow and poor weather. I had a total of 9 diving days of mixed conditions and 2 snow days where we didn’t leave the house we were staying at. Some people were delayed getting their helicopter ride out of Tasiilaq, but all of my flights and connections went flawlessly. So keep in mind that the only sure thing about weather during an arctic trip is that it will be unpredictable.
Finally, as I left Greenland I got one final reminder of the unspoiled beauty of this place, out the window of the helicopter.

Thanks for reading and I hope this gives you some ideas. If you have any comments or questions about cold water diving, gear, arctic trip planning or anything else then drop me a line at [email protected]. Or even if you are thinking about doing something like this in the future – I would be happy to share my experiences with building up my coldwater skills, choosing the right gear and choosing the right trip.
Also check out Northern Explorers if you want to learn more about the Greenland trips offered, as well as other awesome arctic expeditions.
Composition, Post-Processing and the Stories Behind the Photos
I wrote a follow-up article about some of the thought that went into these photos, as well as many lessons I learned about technique, composition and post-processing. Check it out here: Frozen Perspectives: Behind the Scenes on Greenland Iceberg Photo Composition and Post-Processing.
Gear Links
- Olympus OM-D E-M1 Mark II camera
- Olympus F1.8 8mm fisheye lens
- Olympus F2.8 60mm macro lens
- Nauticam E-M1 Mark II housing
- Sea & Sea YS-D2J strobes
- Light & Motion Sola 1200 photo light
- Nauticam glass 140mm dome port
- Nauticam 17mm extension ring
Shoot me an email ([email protected]) if you plan on trying out any of these items or have any questions about the gear I used. My OM-D E-M1 rig is what I learned underwater photography on and I would love to chat about my experience and what you might be looking for!
Additional Reading


