Diving Komodo, Indonesia
Komodo. The word evokes in me an immediate feeling of longing and nostalgia. I want to go back, badly…even though it’s only been 4 months since I was there. There’s something about the place that has jammed itself into my memory and won’t let go. Or maybe it was more so the entire experience, not just the park itself. Yes, it is spectacular above-water and below. Yes, the dive sites have the healthiest and most fish-crammed reefs I have ever seen. Yes, we had big animals swim right up to us multiple times. But there was also a people part that cannot be overstated.
The dive guides were the best I have dove with, and the dive organization itself (Dragon Dive Komodo) had one of the best blends of expertise and high morale out there. Diving Komodo from Labuan Bajo can be tiring. Every day, the boat left before 8, we did 3 dives in Komodo, and then the boat didn’t get back until around 5 pm. It was a bit of a slog. But despite this, every day the guides were laughing, joking, and genuinely really excited to just get in the water. Once we got in and saw what they see every day, we understood. This place is special – the kind of place you could dive 20, 30, 50 times, and still want to dive more. And now that is where I am stuck – wanting to go back – to dive Komodo again, and again, and again.
Planning the Visit
When my partner Lisa and I decided to go to Komodo, our first concern was the cost. That was before Lisa started reading about dive conditions there, at which point her first concern became safety. Yes, Komodo is known for having sometimes very strong currents. Yes, there have been a number of dive accidents in Komodo. And of course every one of those accidents was written about on the internet, so it seemed like Lisa found every single one to worry about. But the vast majority of people, across a wide range of skill levels, dive in Komodo without incident; the key, it seemed, was to go with a good dive operator, and make sure you are honest with yourself about your skill levels and limitations.
Lisa also read some advice on a website that best time to dive Komodo was at the halfway point between the full moon and the new moon. The full moon and the new moon typically cause the craziest currents, so this seemed like sound advice, though it did miss one very important point (more about that in the How to Dive Komodo Safely section).
So, we planned our Komodo trip for right between the new moon and full moon. The next thing was to pick a dive operator. We didn’t have the budget for an expensive liveaboard, and we found some not-so-good reviews about some of the cheaper liveaboards, so we looked at staying in Labuan Bajo and diving Komodo National Park via day trips. Although it involved long days going to and from the park, we weren’t planning on doing much else while we were there.
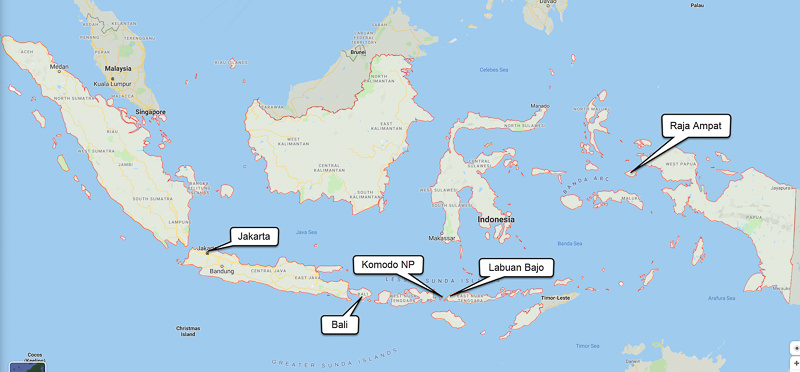
Dragon Dive Komodo had stood out for us as being an affordable operator (they also run a hostel) with very good reviews about their dive safety. We decided to dive with their land-based option and stay at their hostel.
Dive Sites
The time we were there was prime time for diving North and Central Komodo, but not so good for diving South Komodo. Each day trip we went to either the North or Central dive sites, spending two days doing the North and 2 days doing Central.
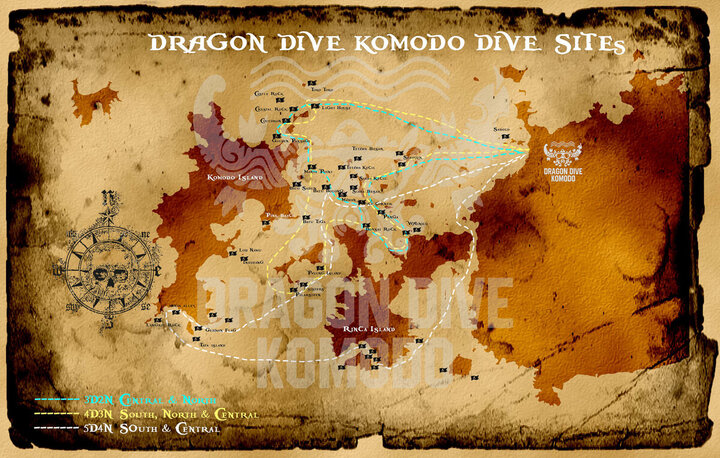
Central Komodo
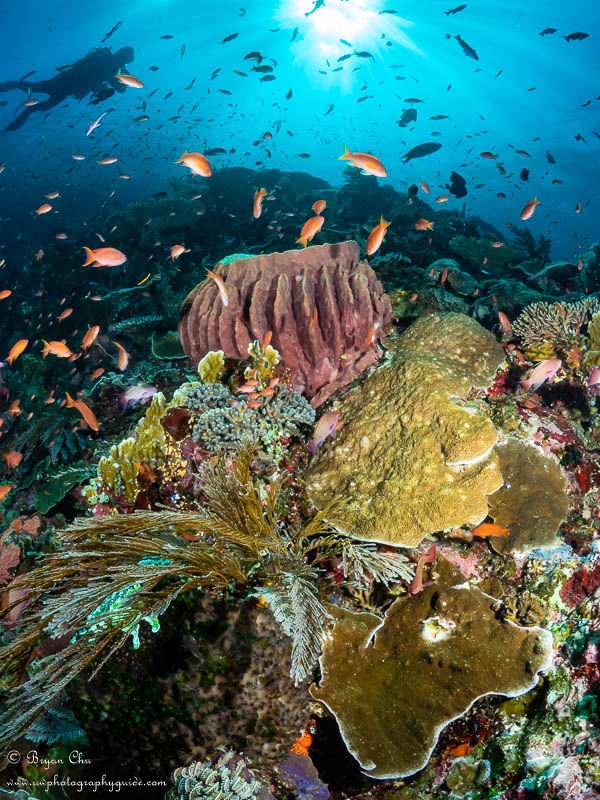
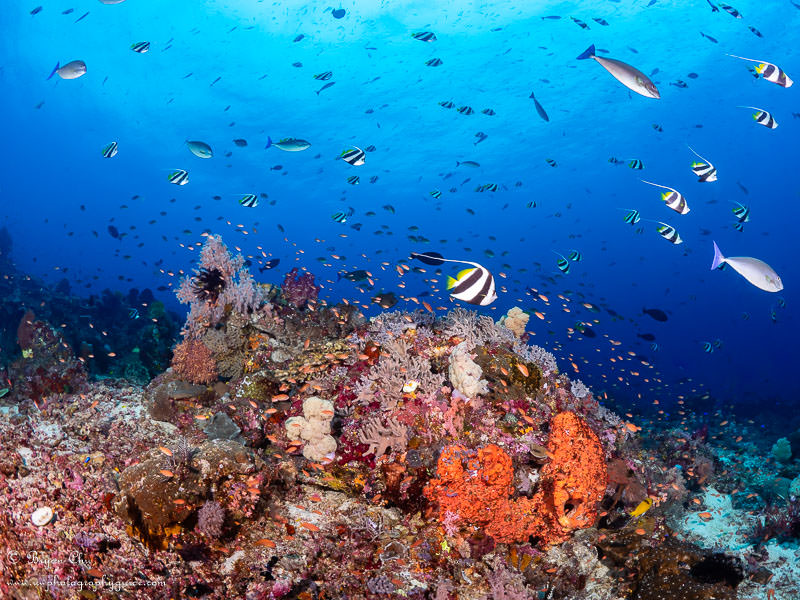
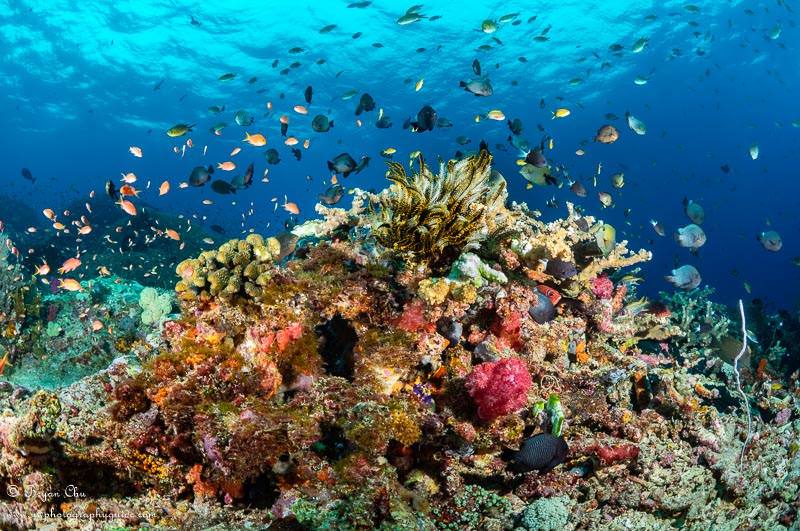
Central Komodo had some fantastic dive sites, with a number of pretty easy dives, but no shortage of fish, healthy corals, and turtles. Although the North is more “flashy”, we enjoyed the dives in Central just as much!
Batu Bolong
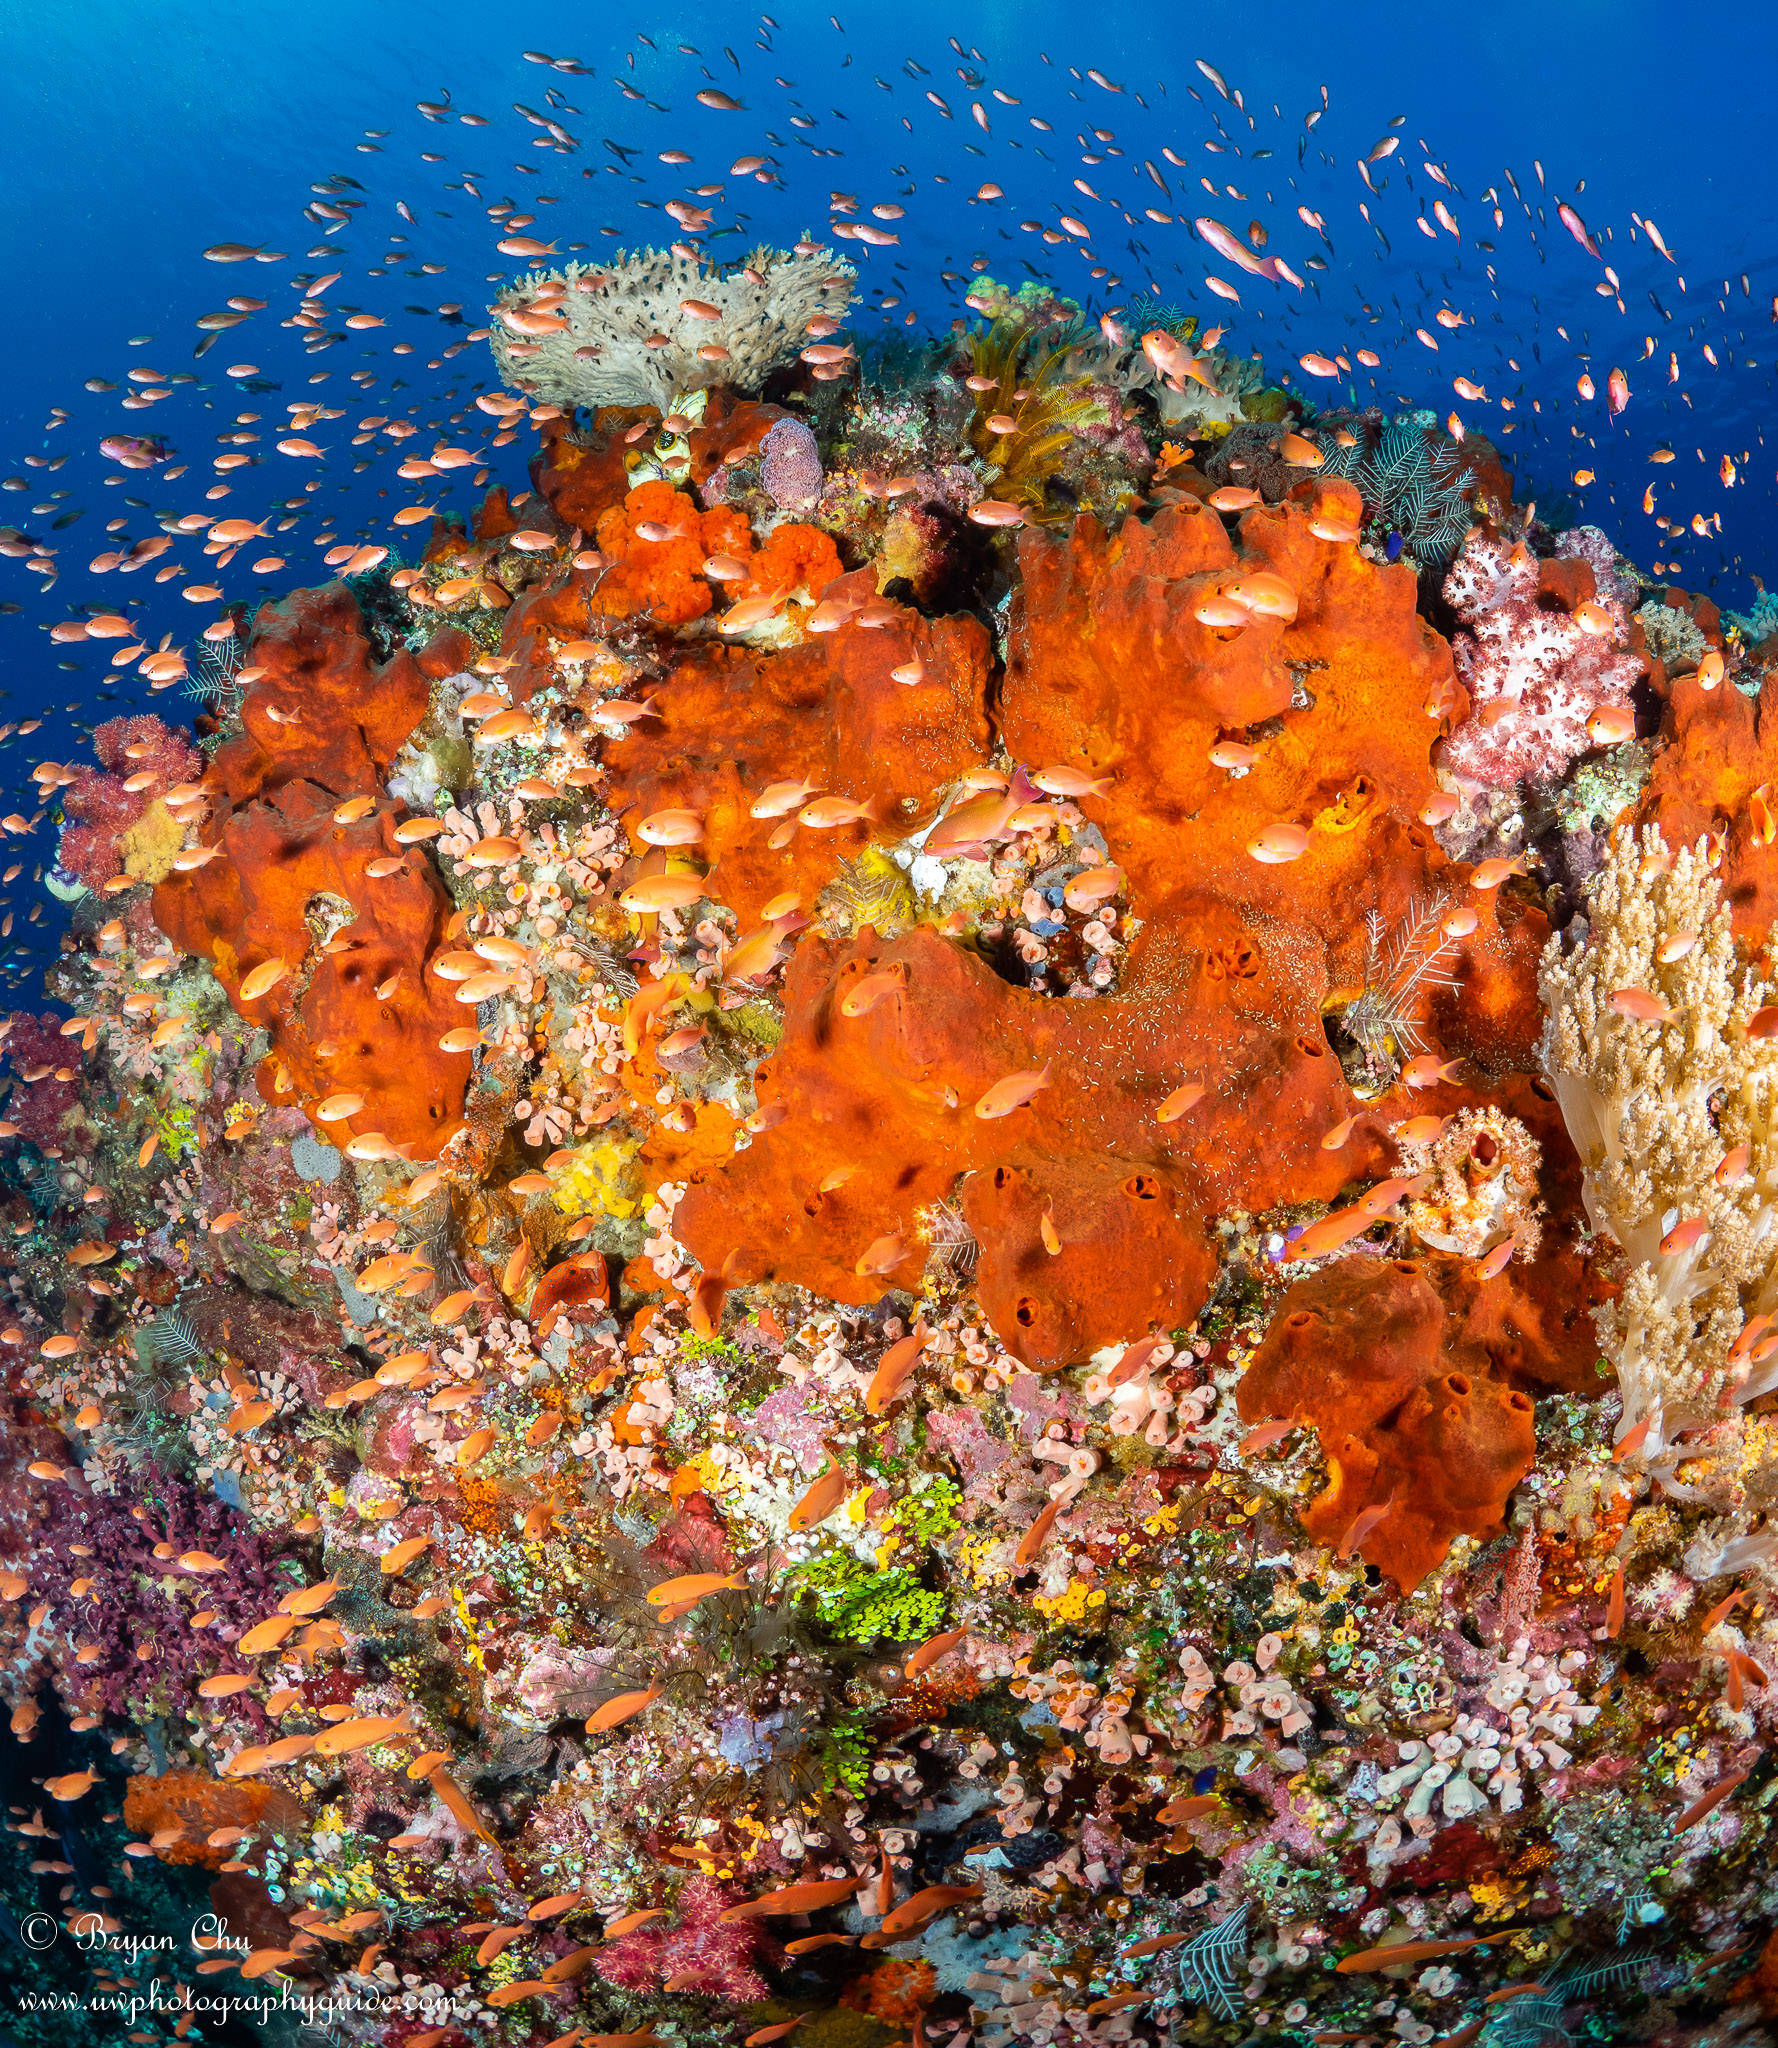
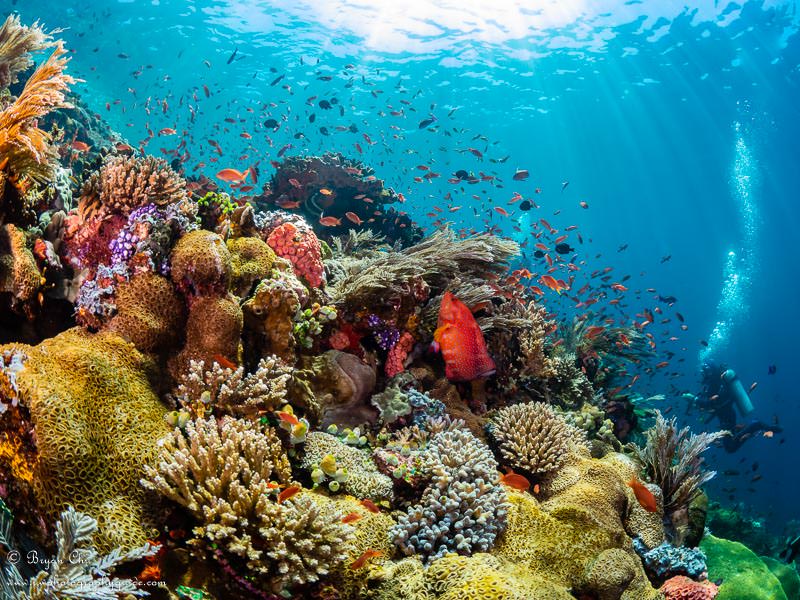
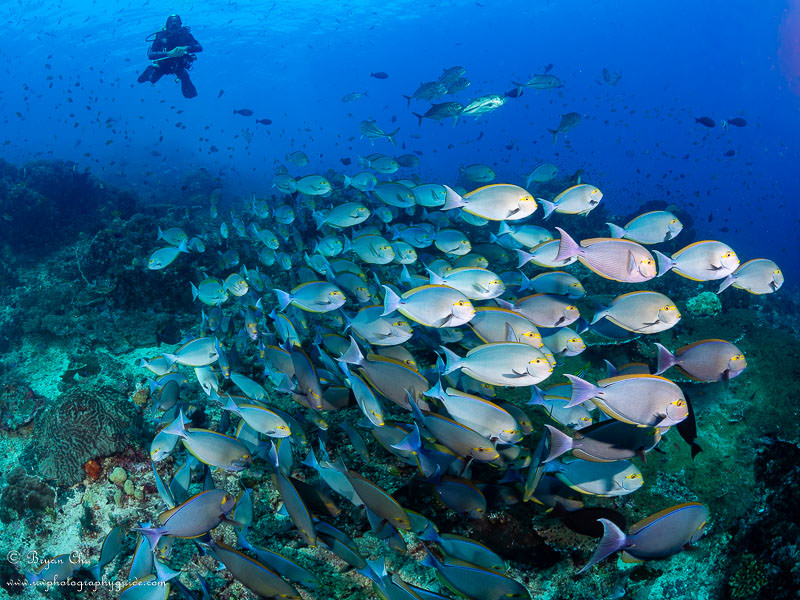
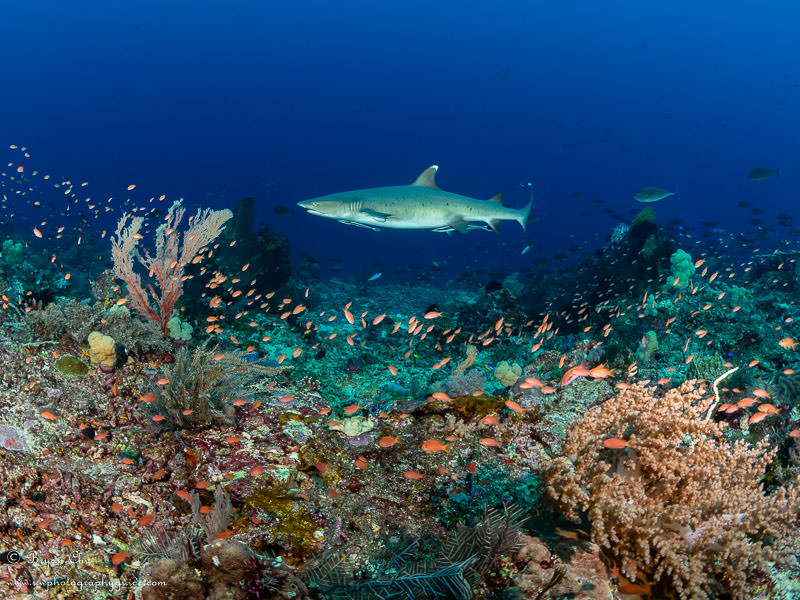
The highlight of Komodo, Central and North, was a current- and surf-pounded pinnacle just teeming with life: the legendary Batu Bolong. As with most dive sites in Komodo, our guide Philippe instructed us to always stay behind him, so he could test out for currents and make sure things were safe before proceeding around corners (which might have currents on the other side).
Although all of the instructors raved about Batu Bolong, we were still not prepared for how amazing it was. The density of fish, especially colorful anthias, was like nothing we had ever seen before. The reef was absolutely bursting with life and color, with every inch of the pinnacle covered in beautifully healthy coral. Atop the reef was a dense layer of fish, emerging out from the coral cover in squadrons, and darting back into the reef when threatened (mostly by diver’s bubbles or quick movements).

I could have spent hours at Batu Bolong, but alas, we only had one hour. Philippe had to pretty much drag us out of the water, the way a parent might have to do to an enamored kid exploring the wonders of Disneyland for the first time. It was just such a phenomenal dive. I can honestly say that this was the best dive I have ever done, just edging out seeing multiple mola mola at a cleaning station at Punte Vicente Roca, in the Galapagos.
Batu Pengah
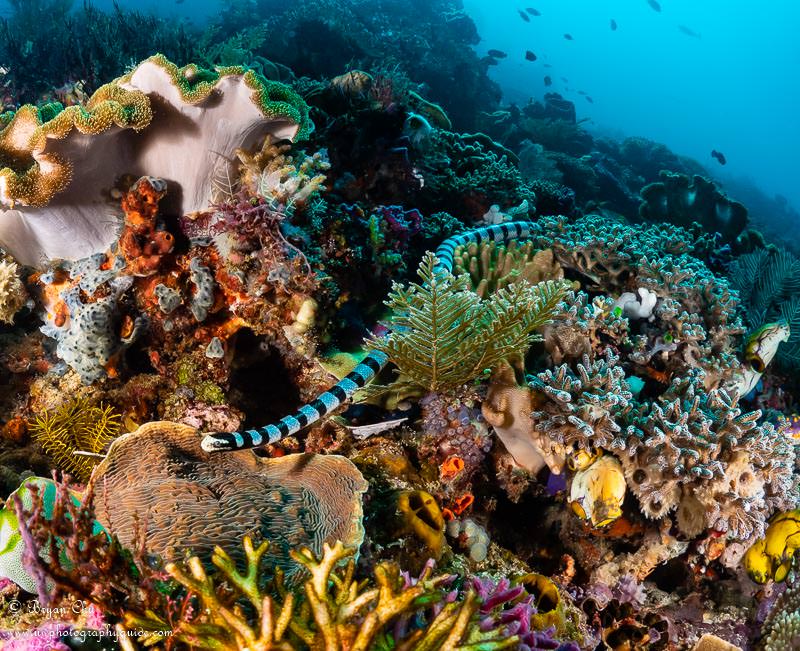
Although the other dive sites of Central Komodo were not as spectacular as Batu Bolong, they were still excellent. Batu Pengah was another current-lashed pinnacle, and another very easy dive where we just stayed on the sheltered side, protected from the currents.
Along with the myriad of fish, we also had a couple of sea snake sightings. This was my first real sea snake encounter, and it was very difficult because this snake wasn’t stopping or slowing down for anything (not even a diver with a big camera rig stuck right in its path).
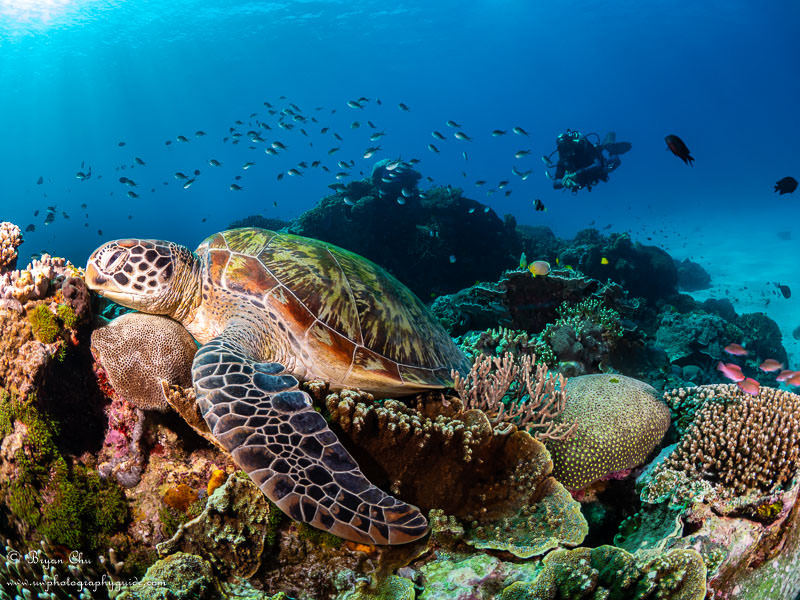
Siaba Besar
Siaba Besar was a very easy, warm, shallow tropical dive, and everywhere we looked were green sea turtles hanging out in the coral. It was one of those wonderful relaxing dives where you can really take your time to meander around and explore, yet it was still chock full of great photo opportunities.
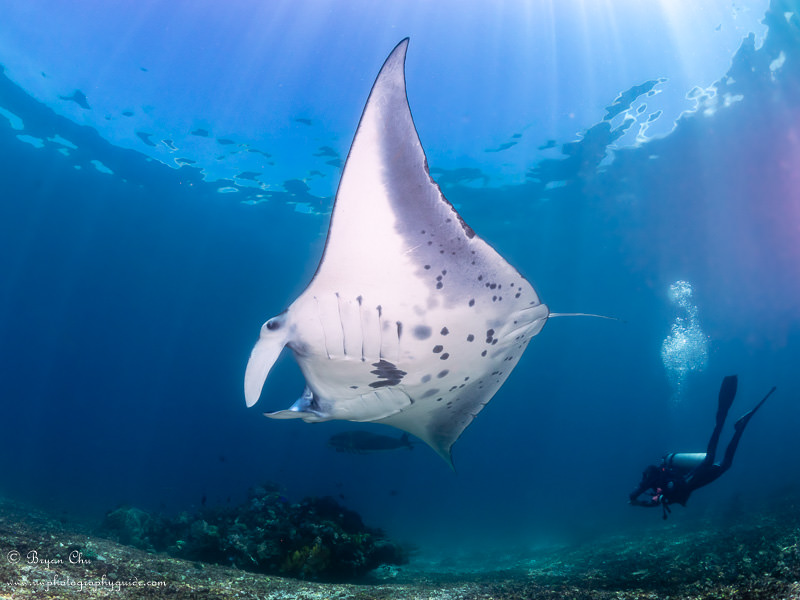
Manta Point
Manta Point is not really a point, but more of a very large underwater plateau. It typically has a decent amount of current, which is good for bringing in the mantas, but there’s no one place to find them. This is the kind of place where you might just see a few mantas, or you might see something really cool, like a big school or mobula rays, or over 80 cow-nosed rays (as were seen the week before we were there).
We had a bunch of manta sightings, some quite close, and others further away, as well as a spotted eagle ray which stayed just beyond range of a nice photo. It was a great dive site which would be worth a few visits to really maximize the encounters, but even just one dive was nice and productive.
North Komodo
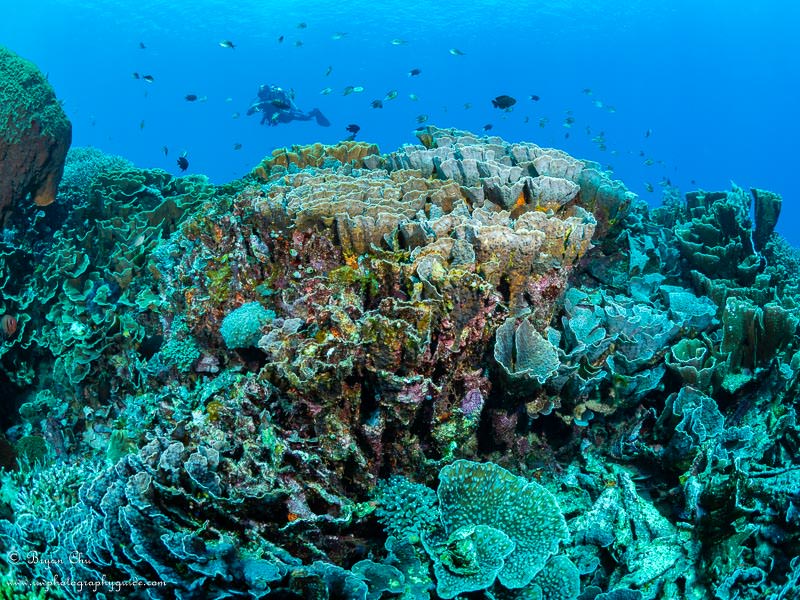
Central Komodo was mostly quite tame, with one relatively fast drift dive. When it came time to dive North Komodo though, we were warned to expect lots of current. This is where we learned that current is not just something that makes dives more difficult. It is also something that can bring more marine life to dive sites, and this is especially true in North Komodo. So although the currents were very low when we dove the North, making the dives easier than normal, there were also just less cool subjects to see, and smaller schools of fish. There were also more divers around.
That being said, North Komodo diving was still phenomenal…just not as mind-blowing as it could have been, had the currents been stronger.
The Cauldron/Shotgun
This site is well-known for having very heavy currents, and indeed that is part of the fun here. I think the dive briefing pretty much says it all…
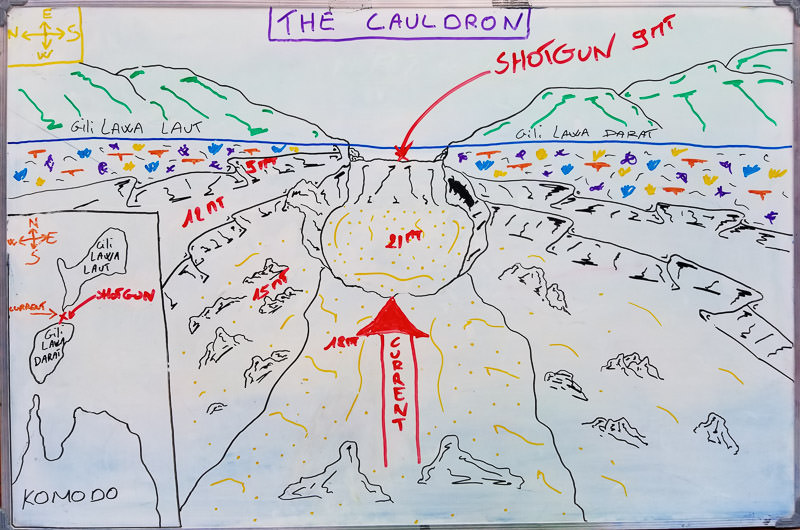
The first time we dove this site, Philippe recommended that I not take my camera, as he thought it would be good for me to experience the infamous Shotgun without risk of damaging anything. So I left my rig on the boat, and just took a GoPro I clipped in to my BCD pocket.
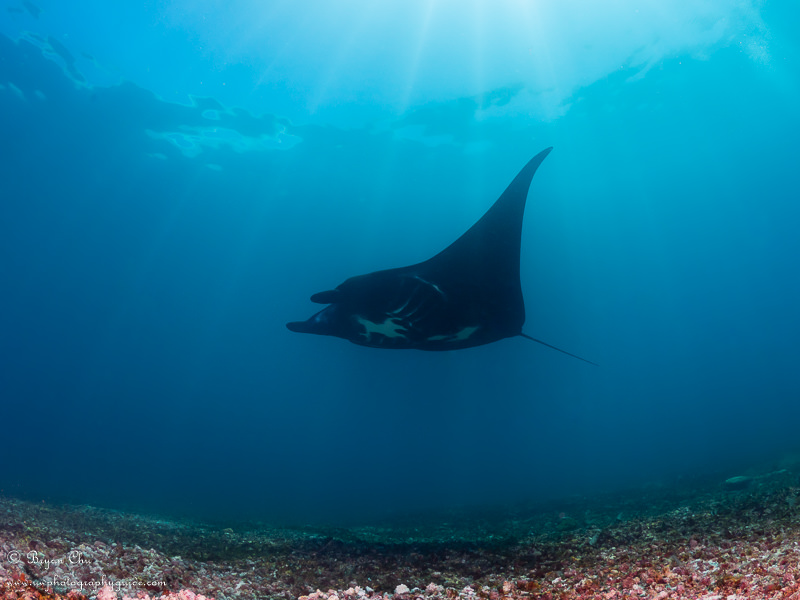
So, of course, pretty much as soon as we dropped into the water, a manta swam right up to us and passed overhead. If I had my camera, I should have had no problem getting a great belly photo, as the ~40+ ft of visibility would have given me ample time to prepare. But them’s the breaks, and I did get some nice video (see below).
After swimming up the channel and exploring the cauldron, it was time to ride the shotgun. After getting together at the wall at the edge of the cauldron, which goes up vertically from 21 m to 9 m (70 ft to 30 ft), he made the shotgun signal. At this, we let go at the same time and drifted up the wall with the current. As we rose we dumped our BCDs, and then when we reached the top of the wall, we swam down against the current and grabbed onto the rocks.
Holding on, the current buffeted us in the faces, straining our masks and pulling on our regulators. Apparently when the shotgun was really strong, it could activate the purge button on regulators, or dislodge masks, depending on orientation to the flow. It was cool to feel, but was not particularly strong – in fact, the weakest that Philippe had ever seen it. I certainly could have handled my camera without an issue…but better safe than sorry sometimes!
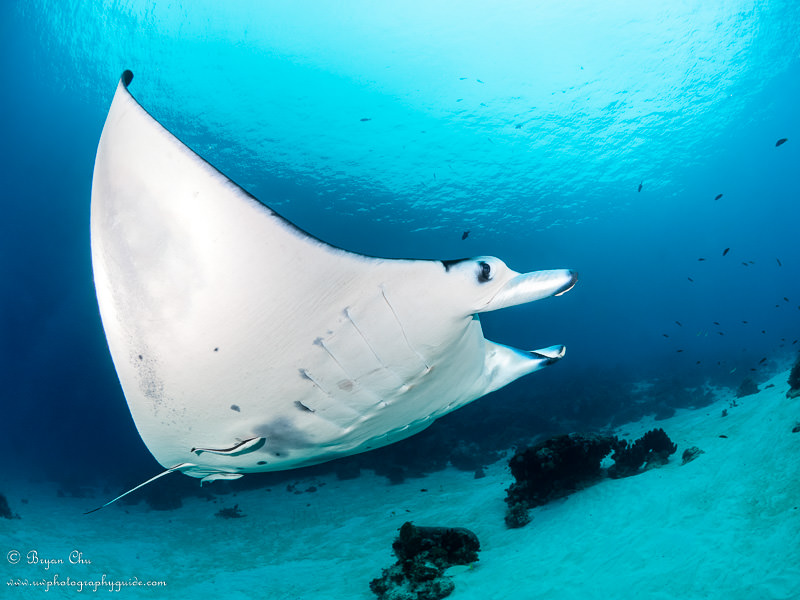
Manta in the Cauldron. Olympus OM-D E-M1, Nauticam housing, Oly 8mm fisheye lens, 2x Sea & Sea YS-D1 strobes. f/6.3, 1/125 sec, ISO 200.
The second time we dove the Cauldron, I took my camera. This time, we had a manta pass very close-by, right in the middle of the cauldron. It was a very nice encounter, one of those ones where the manta sees you and you see it, and then it swims right up to you for a closer look!
After riding the shotgun for a bit, and seeing nothing great (sometimes there can be mantas, mobulas or sharks), we rode the current a bit and then swam around to a sheltered reef behind Gili Lawa Laut, and got to hang out with a very friendly hawksbill turtle.
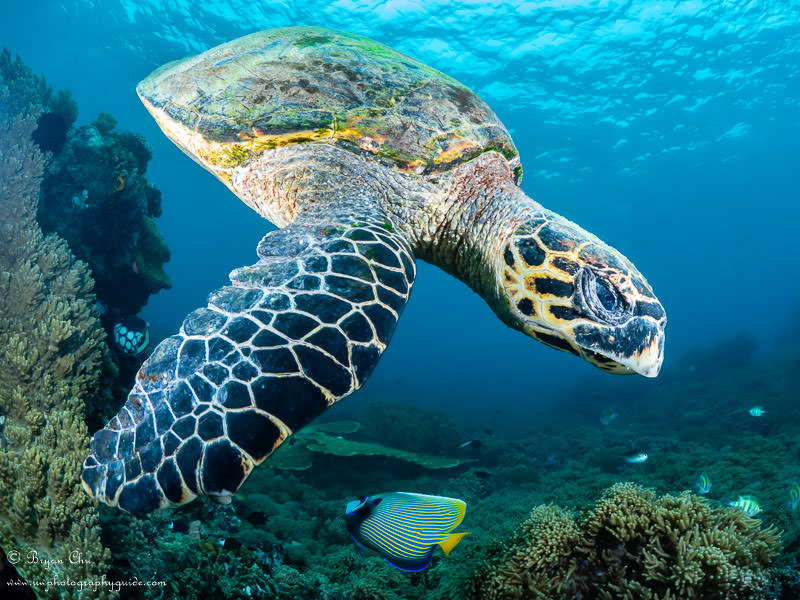
This turtle was so friendly that I really got absorbed taking photos of it…so much so that a manta swam right over my head without me noticing! Philippe saw the whole thing, but could not get out his pointer stick/noisemaker in time to get my attention. Argh!
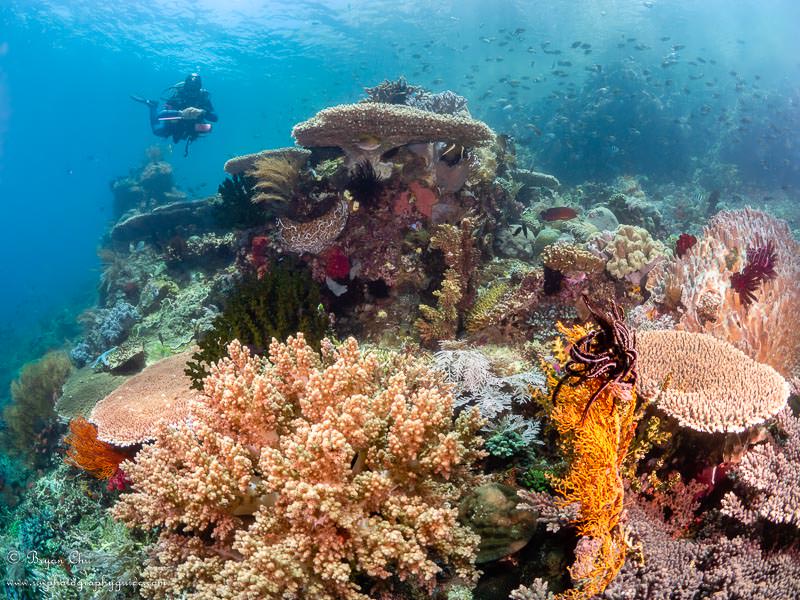
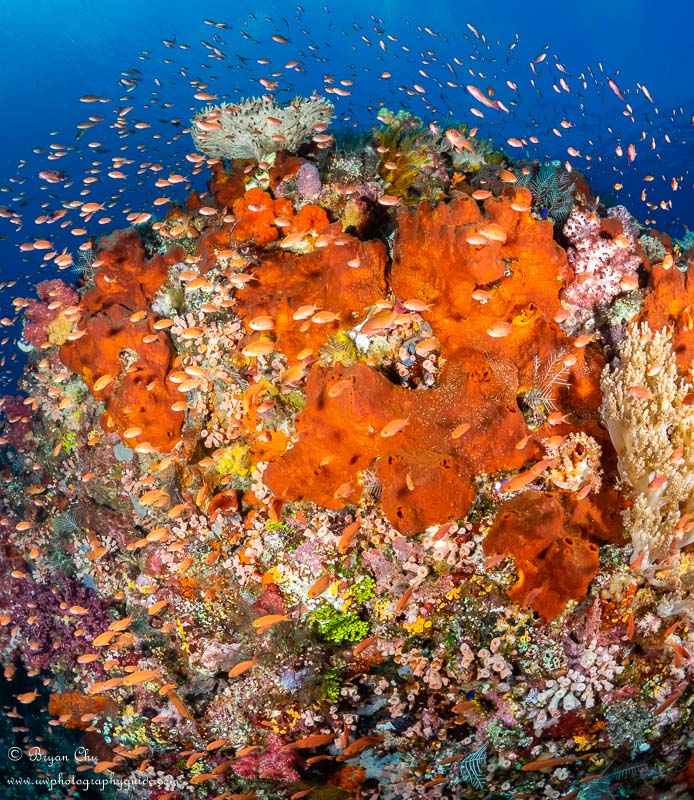
Crystal Rock
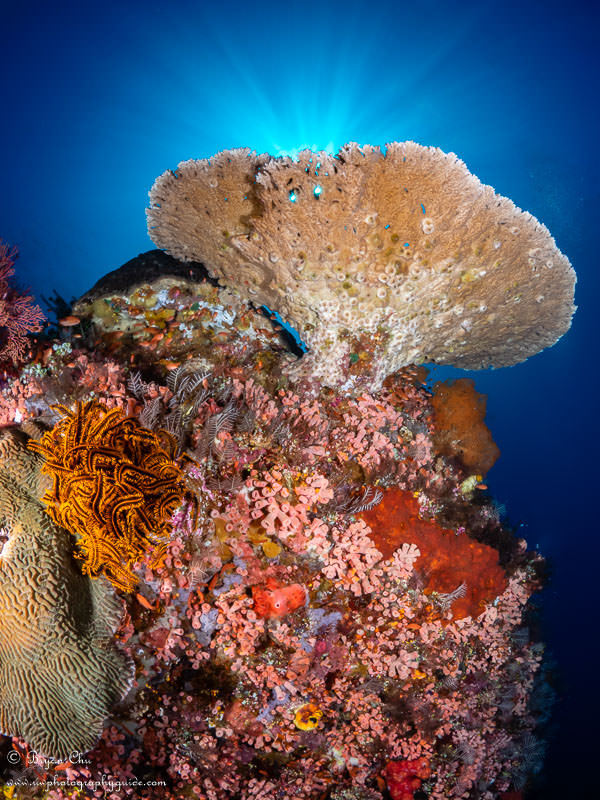
Crystal is a pinnacle rising out of the deep, and is dived with the current. The normal dive plan is to drop in up-current of the rock, drift down through the blue, and then stop at different depths to observe all of the crazy marine life along the way back up to the safety stop.
The current was gentle but insistent; fortunately, the topography provided a lot of shelters where we could drop in behind rocks and get out of the current altogether. Philippe took me right to an amazingly beautiful orange-encrusted rock covered in anthias, and I took my time making sure I at least tried to capture the beauty.
Then we found a very friendly, very large school of surgeonfish, and played around with shaping the school and trying out different dive modeling angles.
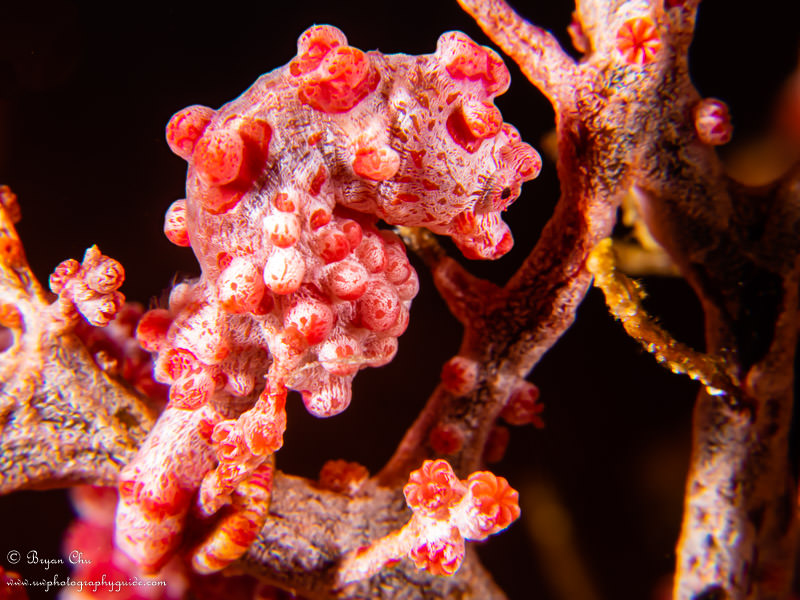
As I was playing around with all kinds of photo opportunities, Philippe inspected some sea fans, and spotted some pygmy seahorses! So the next time we dove Crystal Rock, I brought my macro setup. The seahorses were challenging, as they were at depth with a bunch of current. I did what I could with my no-deco time, but pygmy seahorses are very hard to photograph!
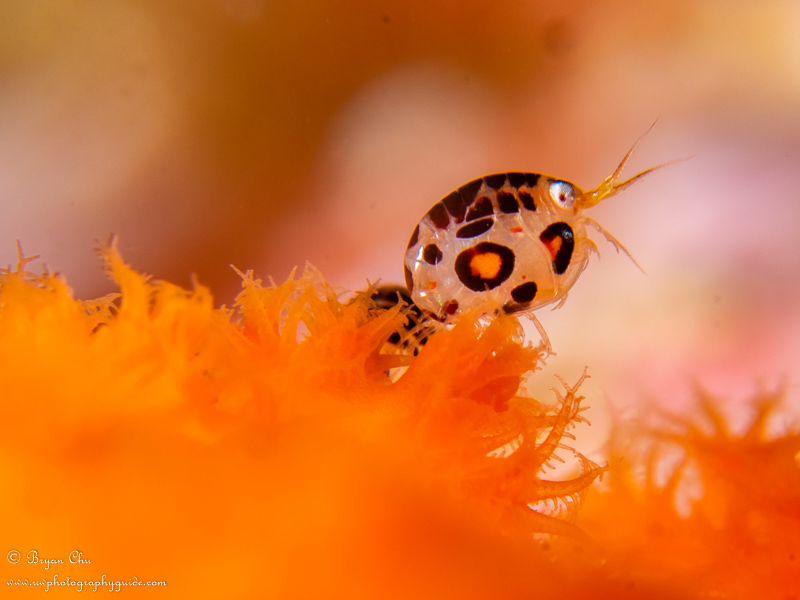
I also found some soft corals crawling with one of my favourite macro critters – ladybug amphipods! Again, difficult to shoot, but I was happy with what I took away.
Castle Rock
Castle Rock is another pinnacle rising out of the deep, and is dived in the same way as Crystal Rock.
We dropped in and did not have much current, which meant we had to do a fair amount of swimming in the blue. We were soon rewarded though, with a deep reef covered in fish.
Philippe, the shark whisperer, brought along a plastic bottle to twist and make noise. This attracted the interest of some white tip reef sharks, but they were pretty shy and did not come too close.
Burning through our air and no-deco time at depth, we ended up at the safety stop after about 40 minutes. What a great dive site.
Komodo Video
Lisa took a lot of footage with her GoPro 7 Black and 2x Sealife 2000 lumen video lights. I think the video does a bit better justice to Batu Bolong and some of our manta encounters than some of the photos do!
My Thoughts on Komodo
The diving here was the best I have ever done, period. Wide angle was phenomenal, with amazingly healthy reefs covered in huge schools of fish. As we only dove North and Central Komodo, we really want to return to dive the South. I have heard that during manta season, sites in the South like Manta Alley can actually have trains of mantas 20+ strong, which sounds unbelievably cool.
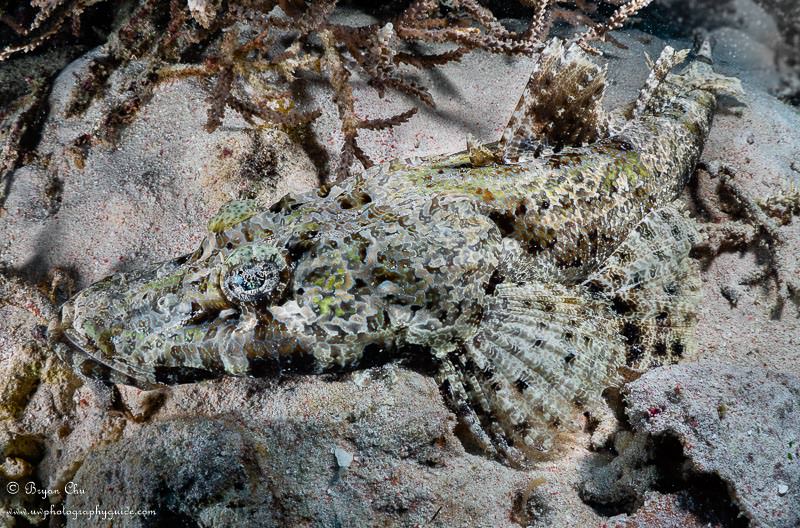
Macro diving is also great in Komodo, with lots of cool and unique critters, but I spent most of my time focused on the spectacular wide angle. I would love to do more macro diving, hopefully with some better conditions than we encountered on our one dedicated macro dive (which was at Waenilu, where we had uncharacteristically high current and poor visibility).
When is the Best Time to Dive Komodo?
The best time to visit Komodo depends on what part of the park you want to dive. North and Central Komodo is generally warm and tropical, with clear water and beautiful reefs. South Komodo is colder, with more plankton activity (and thus lower visibility), but this means tons and tons of mantas and other pelagics, as well as great macro!
Diving Both North and South
- March to mid-May
- September to mid-November
Diving North Komodo
- Best time is mid-May to early September
- Avoid mid-November to January
Diving South Komodo
- Best time is mid-November to February
- Avoid mid-May to early September
How to Dive Komodo
Although North and Central Komodo can be done by day boat, to see South Komodo it is best to go via liveaboard. However, even for North and Central Komodo, in terms of minimizing transportation time, a liveaboard will be significantly more efficient than going by day boat. There are a lot of liveaboard options out there suiting most budgets. (Just be sure to get a safe operator!)
Day boat operations involve significant time on the water going between Labuan Bajo and Komodo National Park (can be 2+ hrs each way, depending on the boat and destination). Some operators have a speed boat, while others use slower traditional Indonesian boats. The speedboat means less time in transit, but may cost more. Also note that although the slower boats are not particularly fast, this can mean that they are larger and more comfortable (for example, with a nice sun deck to relax on).
Diving Komodo Safely
It is best to be an advanced diver if diving Komodo. This does not mean someone with their Advanced Open Water and 15 dives under their belt, but rather someone who has done a decent amount of diving and has some experience with current. Though you should also have your Advanced Open Water, because Dragon Dive (and I assume other reputable operations) will only take you to some sites if you have AOW or higher certification.
Regardless of experience level though, a priority for diving Komodo should be using a knowledgeable, experienced and, above all, safe dive operator. Conditions can change quickly, and dives can start off normal but become dangerous, especially with the extra-large tidal swings that occur at the full moon and new moon. A safe dive operator will evaluate your dive level, match you up with other divers at a similar level, take you to the right dive sites for your experience, and make the call about whether you are able to safely complete a dive in the conditions encountered at the dive site. They will also keep their group size down; 4 divers to 1 guide is a great ratio and will allow the guide to pay attention to everyone in their group.
If you are not too experienced with current, then try to time your diving to coincide with the halfway point between the full moon and new moon, for the calmest tidal conditions. If, however, you are comfortable in current and want to see the best that Komodo has to offer (at least in the North), consider diving closer to the new moon or full moon, for more currents (and more life) at the sites. But make sure this is with a reputable operator!
We chose Dragon Dive Komodo based on the number of good reviews relating to their focus on safety, and we were very impressed by how they managed their dives. Their diver-to-guide ratio varied form 2 to 5, and was usually 4 or less, which is great. When looking at dive operators, be sure to carefully check the reviews; it’s really not worth saving a few dollars at the expense of your safety.
Book Your Trip to Komodo!
Our sister company Bluewater Dive Travel has lots of experience booking dive trips to Komodo. So if you want help planning your trip, drop them a line at [email protected]!
- Learn more about Dragon Dive Komodo Hostel
- Learn more about Dragon Dive Komodo Liveaboards (budget-friendly)
- Check out the Bluewater Komodo Diving Guide for more trip planning resources
Thanks for reading and I hope you found this useful! As always, if you have any questions about the destination, gear or techniques, feel free to drop me a line at [email protected].


