Wide-Angle Strobe Exposures
In Vol. 1 we talked about the basics of ambient light photography, as the first step in mastering wide-angle underwater photography. We discussed how we let light into the camera body with our shutter speed and aperture controls, and how we use our ISO control to set how sensitive the camera’s sensor is to light. Basically your cameras main function is to keep light out, and you as a photographer have the job of letting light in using those three controls.
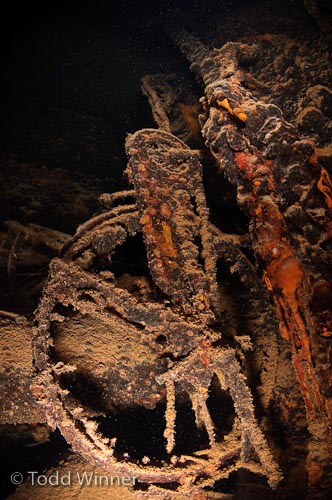
Bicycle at Truk Lagoon, Nikon D2X, Tokina 10-17mm fisheye lens @10mm 1/125 f/11 ISO 100, strobe exposure only, 2 strobes, manual strobe power.
Adding artificial light, typically one strobe or multiple strobes, can give you much more creative control over your images, filling in shadows and adding back color that has been absorbed by the water. When we combine both ambient and strobe light together we have a balanced light image. This is how the majority of wide angle underwater images are produced. But before we start with balanced light photography lets work on strobe lit only images.
Many of you may already be shooting images using only strobe light. Most macro images are just that, but we also need to be able to light wide angle images with just our strobes. There are times when no other light source is available such as in a cave or a shipwreck. When you learn what can and can’t be lit properly with your strobes, you will have a much better understanding when it comes to balancing different light sources.
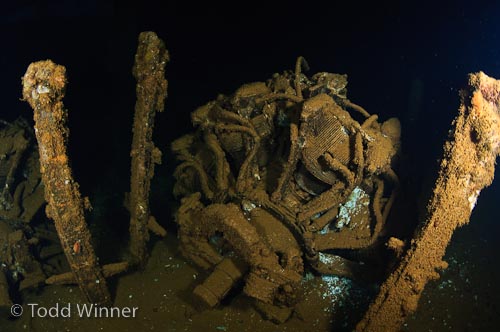
Airplane engine at Truk, Nkon D2X 10-17@12mm 1/200 f/8.0 ISO 100
Camera and Strobe Controls Underwater:
So what camera controls are available to us when we are lighting with just our strobes? Well we learned there are only three in vol. 1. Your ISO and aperture controls work exactly the same way but our shutter speed has no effect on our strobe exposure. That is because our strobes go off in a nano second! Actually I have no idea how fast a nano second is but like our strobes, it’s fast. Our strobes turn on and turn off much faster than the fastest sync speed. In addition to the two camera controls we also have multiple power settings on most strobes and one other item that is not really a control at all, distance. A strobe can only expose one particular distance correctly at a time. In other words if you take a perfectly lit image and take the same image a foot closer without changing any other settings it will be over-exposed. Move further away and it will be under-exposed. The same is true for subject distance. If you are trying to light a sea fan with a diver next to it, the diver needs to be the same distance from the camera as the fan. If the diver is a few feet behind the fan, the diver will be under- exposed. It’s true that different subjects will reflect light differently but this should give you the basic concept. So let’s recap: we have ISO, aperture, strobe power, and distance to worry about. Only 4 controls, that shouldn’t be too hard!
To review – we have 4 controls to worry about:
-
Aperture
-
Strobe Power
-
ISO
-
Distance from our strobe to the subject
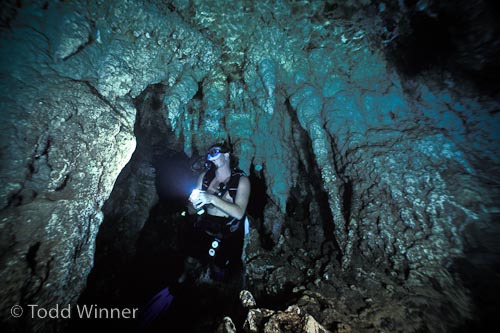
Inside a Cave while diving Palau, Nikon N90 / film. The other diver is holding a slave strobe that my strobes set off. We had pre-arranged this before hand.
To TTL or not to TTL, that is the question:
In the days of film there was a sensor that calculated how much light was being reflected off the film itself. When the sensor received enough light it would shut off your strobe before it completed a full power dump. Most digital cameras calculate TTL in a different way often using pre flashes but the results are essentially the same. TTL works well in many normal lighting situations. But for many dramatic and balanced lighting situations, I would suggest using manual strobe settings. You can further tweak your TTL settings by adjusting the flash compensation control on your camera. Some strobe manufactures have TTL converters with compensation controls on them like the ones from Sea-n-Sea or the ones ikelite installs in their housings. Learning to shoot with manual strobe settings can only help you with your TTL shooting in the future. You will have a better understanding of what is and what is not possible.
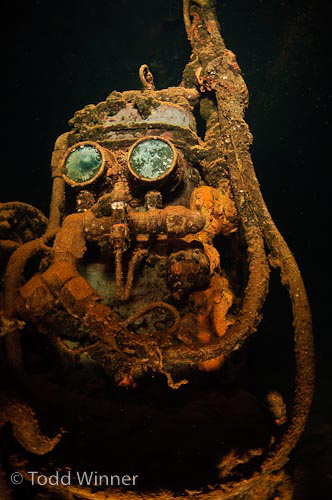
Compressor, known as “R2D2” Nikon D2X, Tokina 10-17@13mm 1/125 f/4.0 ISO 100
Shooting Manual Strobes:
Using a hand held flash meter is great in a studio but not very practical underwater. So how do we decide on an f-stop, power setting and distance combination? We guesstimate. We used to use guide numbers back in the days when we used film and shot the same ISO all the time. Back then most strobes only had a few power settings. The guide number was provided by the manufacturer and represented how powerful the strobe output would be. The problem was not all guide numbers were created equal so many people set up test to come up with their own. Once you had a guide number you could divide that number by either the f-stop or the distance and get the corresponding figure. For example if I had a strobe with a guide number of 40 at ISO 100 and I was 5 feet away from my subject, I should shoot at f8. 40/5=8 The problem is that a guide number is for a given ISO and power setting. With multiple power settings and the ability to change ISO between shots, guide numbers just are not practical any more. It’s much easier to get familiar with your strobe’s power settings and check your LCD screen or histogram for exposure.
Strobe Exposure Exercise:
Here’s a useful exercise that will help you get familiar with your strobe and camera settings:
Set up for wide angle photograpy, and set your ISO to 100 or 200. Set your shutter speed at the fastest sync speed (probably 1/250th on most dSLRs). Set your strobe on ½ power. I would start with one strobe and add a second when your comfortable with your results. Set your f-stop to f/8. Go down and find a nice big non-swimming subject like a sea fan. Start at about 3 to 4 feet away move forward or back until you get the perfect exposure. Once you do, go to the lowest and highest power settings and repeat the process. Then repeat the entire process at different f-stops. If you spend a couple of dives on this, you will be very familiar with your camera and strobe settings.
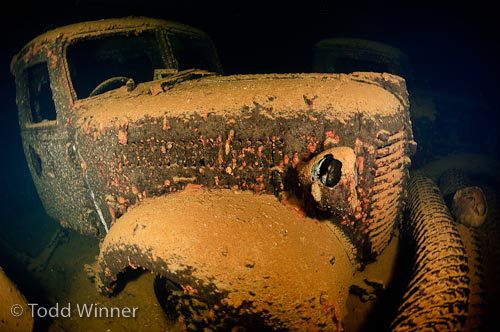
Truck, lying in deep water, well below 100ft.. Tokina 10-17@12mm 1/160 f/4.5 ISO 100
Aiming your Strobes:
There are a number of creative techniques such as backlighting, side-lighting, top-lighting, etc.
We will be covering those in later volumes of the “Shooters Toolbox”, but for now we are concerned about learning exposure, so we will start with forward edge lighting. The light comes out of our strobes in the shape of a cone. The exact shape and angle is going to depend on the brand and model. Most strobes suitable for wide angle have around a 90 degree or greater coverage. That’s a pretty wide beam of light coming out of your strobe. It’s been very popular to position the two strobes in the 10 and 2 position, aimed straight ahead or even slightly out. This technique works well in preventing backscatter but it often produces somewhat flat looking images. You need shadows to help create depth to your images. That being said, this is probably a good place to start when working on just exposure. Just know that when your shooting very close to your subject you will need to move the strobes in closer to the camera. As you back away from your subject you can spread your strobes out a bit.
Diffusers, Snoots and Gels:
There are a number of items that we can add to the front of our strobes. The most popular being diffusers. Just as the name implies they diffuse the light, spreading it out to a wider beam and softening the light creating less shadows. They also typically reduce the power by up to a full stop. Snoots do just the opposite. They narrow the beam and produce a very direct point of light. The exact shape and size of the light will very on the design of your snoot. Gels are used to change the color temperature of your strobes or for special effects. They also will cut the power output of your strobes.
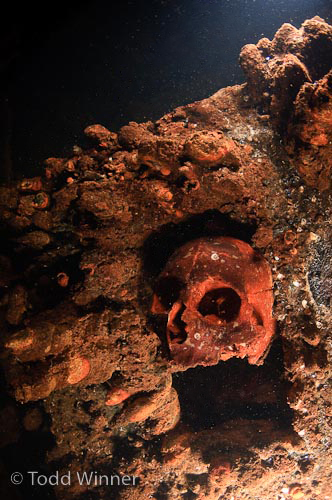
Skull deep inside a wreck, 10-17@10mm 1/160 f/8.0 ISO 100. This skull was on the ceiling.
Coming soon in the next article:
In the third volume of “Shooters Toolbox”, we will be combining the techniques we talked about in both ambient and strobe lit photography. We will be creating balanced lit images and you should have a good understanding of basic lighting techniques. With that small set of skills you can go out and shoot just about anything. It works for macro, wide angle and everything in between. It’s the basic knowledge you need to move on to other creative underwater photography techniques such as splits, motion blurs, and creative lighting. We will be covering those techniques and more in upcoming volumes. Feel free to contact me if there is anything in particular you would like covered.
Continue to part III: Balanced Light Exposures
Further Reading
Shooter’s Toolbox Volume 1, Ambient light underwater photography,
By Todd Winner


