Learning Super Macro in Papua New Guinea
I have always been fascinated by the super macro images that I have seen online, in magazines and in underwater photo competitions. As I prepared for my trip to Papua New Guinea (the “PNG” as many call it), I decided to take the plunge, invest in some new equipment and give super macro shooting a try.
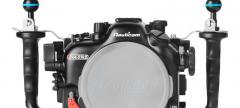
I was unsure where to begin or exactly what equipment I would need, so I consulted several online resources, including Scott Geitler’s article on "Underwater Super Macro Photography." I use a Nikon D300 dSLR with a 105mm VR lens in a Sea & Sea housing, and was looking for an economical way to get started. After doing my research and talking with people at Bluewater Photo, I decided that the SubSee +5 Wet Diopter and adapter was my best option. I choose the +5 diopter instead of the +10 to start because of the larger depth of field (DOF), making it easier to focus. I wanted to increase my chances of success and minimize the frustration that I had heard comes with shooting super macro.
The S&S macro port requires a custom-made adapter from ReefNet that took about one week to be manufactured and delivered. Scott has written two very informative articles on this diopter set-up and adapter, so I won’t repeat the details of the equipment here. I read both “Super Macro with the New SubSee Wet Diopter” and “SubSee Adapter and Diopter Review” as a way to familiarize myself with the new equipment and learn about technique.

Testing the Equipment
Before my trip, to become familiar with my new equipment I tried to duplicate above water the same results that I saw and read about online. This proved to be a great investment of time because it takes a lot of practice and patience to learn how to shoot super macro. I didn’t want to be fumbling around with my new equipment for the first time while underwater in PNG! I quickly realized that the narrow depth of field and difficulty getting your desired subject in focus is truly a challenge. I first took photos at 1:1 magnification without the diopter, at a distance of about 5 inches from my subject. I used autofocus to find the minimal focusing distance, but then switched to manual focus and flipped the diopter on. I was then able to get within about 3-4 inches of my subject for about a 50% magnification.
Another tricky task is getting the strobes positioned closely for proper lighting. I heeded the advice to go small on the aperture and wasn’t afraid to try up to F45 with fairly good results. Here are test shots with the 105mm lens with and without the +5 diopter!
(Note: None of the super macro images in this article were cropped and are shown full frame as composed in the camera.)


Turtle Pirate at minimum focal distance of about 3” (with +5 diopter): Nikon 105mm VR, F36 at 1/250th and dual S&S YS250 strobes. Notice that the left eye is just a little out of focus because it is not exactly inline with the focal plane.
The Journey Begins
After a long journey of over two days in the air and roaming through airports, I arrived at the docks of Walindi Resort on Kimbe Bay in New Britain, PNG, where the boutique liveaboard MV Febrina was waiting for me. My bags were loaded on the boat and before I had my shoes off, then we were untied and pulling away from the dock. After a quick briefing I dumped my clothes in my cabin and set my camera gear up. For this article, I have focused on super macro, but look for my trip report about the MV Febrina (coming soon!) with details of the boat, itinerary, diving conditions, photography tips and many more images.

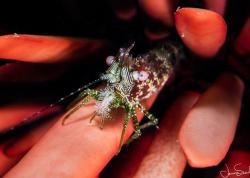
The third dive of the voyage was at South Emma, where I decided that it was time to get my diopter wet. I started off with some nice easy macro subjects of nudibranchs and coral, then my keen-eyed dive master Digger motioned that he had found something small for me. It was a tiny cowrie on a large red soft coral at about 80 feet deep on the side of the pinnacle. I flipped on the diopter, carefully positioned myself and looked through the viewfinder. All I could see was fuzzy red and orange anemone and no sign of the cowrie. I looked all over the place, peeked out over the camera for reference and then tried again to no avail. The narrow quarter-inch DOF makes it difficult to locate a subject. Digger, sensing my frustration, stuck his finger right next to the cowrie. I was able to find his finger, follow it down to the nail and there it was. I tightly pressed my mask against the viewfinder to see and focused in on the tip of his finger with autofocus. Then I switched to manual focus, slowly moved in and out about an inch and when the cowrie looked crisp, I gently pressed off a few shots.
Upon review in the LCD, the images were completely under-exposed because my strobes were not close enough, not turned up enough and I was shooting at F32. I repositioned the strobes in tight, changed the aperture to F22 and took about 30 seconds finding the little cowrie again and fired off some more shots with much better results. We ended up doing three dives at South Emma, and Digger found me all kinds of great super macro subjects like transparent shrimp, blennies, soft coral crabs and a crinoid shrimp.


Super Macro Tips & Tricks
-
Safety first! You will get absorbed in the task of taking super macro shots and be concentrating on your subject, but make sure to check your gage periodically and do not get distracted while trying to get the perfect shot. Your subject can stay down longer than you can, and it is your responsibility to monitor your remaining bottom time.
-
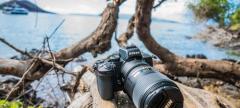
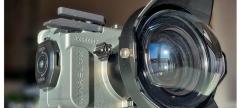
The custom fit adapter with the flip-out diopter is a great design. It allows for shooting both macro and super macro on the same dive. When folded back, it does not get in the way. I preferred to position it so that I could flip it back to the side in a slightly upward direction (refer to the camera set-up picture). It is also more compact than the other models I have seen.
-
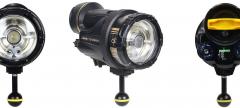
A good focus light is a must! I upgraded my focus light for this trip to the Light and Motion Sola 800 and immediately appreciated the adjustable bright and even beam. It is easy to turn on/off with the magnetic switch and change between the three white and three red intensity settings. I observed that the red definitely helped on the night dives with skittish subjects.
-
A viewfinder with magnification is helpful and I don’t believe I would have been able to see focal points without it.
-
It is very difficult to focus while diving off of a wall in a current of any kind. No shot is worth damaging the reefs, so try to find a bare part of the reef and use a pointer to balance yourself to minimize your impact on the reef. Practice on a sand or rubble bottom where you can easily steady yourself and the camera.
-
I tried autofocus and it is difficult to lock in on the subject even with a good focus light. I preferred to lock down the focus at the minimal focal distance and use manual focus. I mostly just slowly rocked back and forth with my camera until the subject was in focus. When using autofocus with the Nikon 105mm VR lens, it spends a lot of time zooming in and out and will focus on anything floating in the water.
-
Try to find 2-3 points you want to focus on for your composition (fish eyes and mouth, rhinophores and mantle of a nudibranch or shrimp eyes and claws). Position yourself parallel to the focal plane and move back and forth until they are all in focus. I focus in on the two points that are easiest to see and fire away when they are in focus to maintain that plane to get the other points crisp. It is easier said than done with mild surge and a moving subject, so start by shooting stationary items. When you do finally nail a shot, it is very rewarding and the results will be quite dramatic with the right subject, camera settings and lighting.
Super Macro Opportunities in PNG
The Witu Islands and Father’s Reef North of New Britain, PNG, are world famous for healthy reefs full of corals, large schools of fish, sharks, and unlimited wide-angle opportunities. It seemed that I was always changing back and forth between the macro and wide-angle setup, but managed to do 1-2 macro dives per day. The MV Febrina’s Northern itinerary does not have a lot of muck diving, but Dickey’s Place is a great volcanic black sand muck dive featuring rare and unusual macro subjects. We found a tiny green oxynoe sea slug that contrasted well with the black sand. There must have been a recent hatching of baby squid because we found several swimming about and clinging to blades of grass. Digger even found one attached to the tail of a robust ghost pipefish that it probably had mistaken for a blade of grass. We also had fantastic macro dives later in our trip at Kirsty Jane’s Reef, Fu Man Chu, Elaine’s Reef and Norman’s Wall, finding unnamed soft coral crabs, flatworms, arrow crabs, saron shrimp, and boxer crabs.


After this trip, I am hooked on shooting super macro. Once I got over the initial frustration of focusing, it became addictive. I was excited every time an even smaller subject was found, and I enjoyed the challenge of trying to create new compositions with this very artistic form of photography. I heard the dive master on several occasions laughing at me trying to take super macro pictures while I was struggling with the current and my uncooperative subjects and having difficulty focusing. But after relaxing, finding a safe way to get close enough to the subject, and attempting to get the elusive ‘perfect shot,' I had a fantastic time. I can’t give enough credit to the crew of the MV Febrina and my incredible dive master, Digger, because if you can’t find the subjects you can’t shoot them. Hopefully this article has eliminated some of the mystery about shooting super macro and maybe even inspired you to get started! The next time you get wet, give super macro a try and discover the fun of learning underwater photography all over again.
About the Author
Ron Watkins is an international award winning photographer and writer. He has been passionate about underwater photography since 1996 and his photography has appeared in magazines, websites, juried art displays, national aquariums, libraries and private collections. More of Ron’s photography may be viewed at www.scubarews.com and www.allwetportraits.com, which features his unique underwater portraits of children.
Further Reading
RECOMMENDED ARTICLES
SUPPORT THE UNDERWATER PHOTOGRAPHY GUIDE:
The Best Service & Prices on u/w Photo Gear
 Visit Bluewater Photo & Video for all your underwater photography and video gear. Click, or call the team at (310) 633-5052 for expert advice!
The Best Pricing, Service & Expert Advice to Book your Dive Trips
 Bluewater Travel is your full-service scuba travel agency. Let our expert advisers plan and book your next dive vacation. Run by divers, for divers.


