Panasonic LX100 Settings for Underwater Video
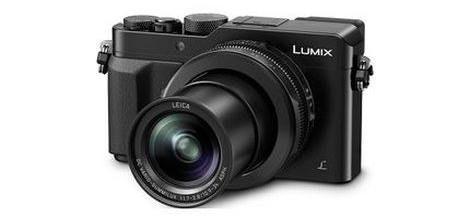
The Panasonic LX100 is a very capable camera for underwater photography and videography, as well as a small but advanced compact camera that is great to carry around.
The image sensor is a 16MP micro four-thirds sensor that Panasonic has used in a number of its interchangeable lens cameras. It is a multi-aspect design (see aspect ratios below) with an effective resolution of 12.8MP.
The lens, designed for Panasonic by Leica, is fast with a maximum aperture of F1.7 – 2.8 depending on the focal length, which is handy in low-light or when you want to isolate your subject with a shallower depth-of-field. The lens also has optical image stabilization, which is useful but not as powerful as the in-body image stabilization in Panasonic’s most recent cameras.
The color and image quality produced by the LX100 are really pleasing, and there is a lot of detail because of the larger sensor (for a compact camera) and the very high quality lens. The camera shoots 4K video, using the same software engine as the well-regarded Panasonic GH4, and the video quality is superb.

Key Video Features
Video Formats
The LX100 records in 4K: UHD (3840×2160) at either 24p (cinema frame rate) or 30p (TV standard) recording at a bitrate of up to 100MBs. It also records full HD at up to 60p. Even if you only intend to view your video in HD, you should capture in 4K because the resulting HD video will be more detailed, and because recording in 4K gives you some great video editing options. The color and resolution really pop compared to regular HD footage shot in HD. The noise also gets compressed, resulting in cleaner footage.
Video File Formats
MPEG-4 or AVCHD (just choose MPEG-4)
Lens
The LX100 has a fixed lens, with maximum aperture of F1.7 – 2.8 over the zoom range. The lens can close focus, particularly at the wide end, where the minimum focus distance is just 1.18 inches. (very useful for close focus wide angle shots)
Autofocus
The side of the lens has a switch for manual focus (MF), autofocus (AF), and macro autofocus (AF with a flower) – for close focus situations. I generally use autofocus with video, except when shooting macro shots, where I would try out manual focus. I generally find manual focus underwater to be very challenging, particularly with current and surge. That said, it is worth experimenting to see what works best for you in various shooting situations.
The LX100 has a contrast detect autofocus, using Panasonic’s proprietary DFD (depth-from-defocus) technology. Single autofocus (AFS) is very quick and accurate, but the continuous autofocus (AFC) can sometimes focus hunt in low light situations.
Other Features:
The camera offers focus peaking for manual focus, and/or magnified (Picture-in-Picture) view (also available in pinpoint autofocus, something I found useful). The LX100 also has available zebra patterns to warn of over-exposure, although I don’t generally use them.
Key Physical Camera Settings
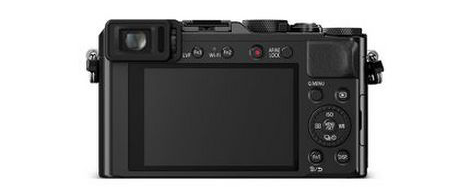
Although the LX100 is a very capable video camera, its body design is biased towards still photography, with a somewhat retro feel. Despite its small size, the LX100 has several buttons (including 3 function buttons (Fn1, Fn2, Fn3) on the back of the camera) and dials as physical controls that make it easy to manipulate your exposure variables, setting them as you wish.
The camera menus are pretty clear and easy to navigate, and you can reconfigure most of the physical controls on the camera in myriad ways. It is worth spending a bit of time before the dive to customize your settings, because it will enable a much faster response underwater to photo & video opportunities.
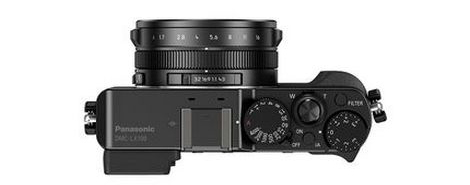
1. Shutter Speed
The LX100 has a retro-style dial on the top, making it simple to set the shutter speed. The general rule for video shutter speed is to double the frame rate in order to have a more natural motion cadence in your video. If you are shooting 4K at 30fps, then set your shutter speed to 1/60. If you are shooting 4K at 24fps, then set your shutter speed to 1/50 (since there is no 1/48 shutter speed). Keep in mind that those are relatively slow shutter speeds, so you will find that in many lighting situations (even underwater), that you need to close down your aperture and/or lower your ISO in order to keep your shot from being overexposed.
2. Aperture
The LX100 has a very bright lens for a compact camera, with a maximum aperture of F1.7 to F2.8 (depending upon the focal length). A ring around the lens controls the aperture and is very intuitive to use. Shooting at a wider aperture provides more light, allowing you to shoot clips at a lower ISO with less noise (grain) in your video.
Aperture also controls depth-of-field, and the LX100 lens has a bright enough aperture to shoot a fairly shallow depth of field, particularly in close focus situations. However, LX100 uses a micro four-thirds sensor, with a crop factor of 2.2x in comparison with a full-frame camera. Shoot at F2 will give you a depth of field equal to about F4.5 on a full-frame camera. The advantage of a crop sensor for shooting video is that the greater depth of field (relative to a full frame camera) is actually useful as it makes it easier to maintain focus and sharpness (particularly on moving subjects). The LX100’s lens is exceptionally sharp throughout its focal range, even with the aperture wide open, so I never hesitate to shoot with a wide aperture, to keep my ISO low (for less noise), stopping to achieve my desired depth of field.
3. ISO
The ISO button on the LX100 is the top control button on the back control dial. Sometimes I set the ISO to Auto ISO, but underwater I generally pick an ISO manually and leave it there to help control noise. The LX100 has a large sensor for a compact camera, but in comparison with a full frame camera the noise performance suffers. I generally don’t shoot beyond ISO 800 if I am shooting scenes with a lot of blue water in the background, and ISO 1600 if I am shooting scenes with a coral reef or rock in the background (however, I am a bit zealous when it comes to trying to control noise in my video).
Panasonic has configured the sensor with a multi-aspect ratio sensor, with a switch at the top of the lens for setting the desired aspect ratio. This arrangement gives more flexibility in terms of composition of your image at a small cost in maximum resolution (though this allowed Panasonic to design a more compact lens for LX100). The camera can shoot images with a 4:3 ratio (using 12.8MP of the 16MP in the sensor), a 3:2 ratio (more common to SLRs, using 12.2MP of the 16MP), a 16:9 aspect ratio (wider ratio, common in video, using 11.3MP out of the 16MP in the sensor), or even 1:1 aspect ratio (for those Instagram photos, using 9.5MP out of 16MP). It is ultimately a matter of preference, but I generally shoot still photos with the 4:3 ratio (for maximum resolution), and video with the 16:9 ratio (for the wide cinematic look).
5. Custom White Balance
The white balance (WB) is set using the right button on the back control dial. It is important to set a good custom white balance, particularly when shooting video in ambient light, and to adjust the setting at every 10-20 feet change in depth. Fortunately, the LX100 can reliably set a custom white balance. I carry a white plastic card and was able to get a good white balance at pretty much any depth (at least down to 60 feet – I don’t tend to shoot video at depths beyond that as there too little light). The camera can bank up to 4 custom white balance settings, which speeds up changing your white balance. The ease with which you can change and adjust white balance is particularly helpful.
6. Reconfiguring the Function Buttons
The Panasonic LX100 has 5 sets of menus that are accessed through the “menu/set” button on the back control dial. These menus are:
a) “Rec” – the small camera symbol
b) “Motion Picture” – the video camera symbol
c) “Custom” – the wrench with the “C” next to it
d) “Setup” – the wrench symbol
e) “Playback” – which has the (triangular) play button symbol next to it.
Select the Custom Menu, which has 9 screens of options, and go to screen 7 to “Fn Button Set” where you can reassign options for the 3 function buttons. I strongly recommend reassigning “Utilize Custom Set Feature” to one of the Fn buttons.
7. Utilizing Custom Settings
The LX100 allows you to store 3 separate sets of custom camera profiles (C1, C2, C3). Once you establish your desired settings on the camera, you can save them by going to the first page of the Custom Menu and then saving those settings as “C1”, “C2” or “C3”. These can then be recalled at an instant as long as you have reassigned the “Utilize Custom Set Feature” to one of your function buttons. (You can also turn off the custom setting, effectively giving you a fourth custom profile.)
I set my Fn1 button “Utilize Custom Set Feature” so that when I press it I see my custom profiles as follows:
- C1 settings for Still Photos
- C2 settings for 4K Video
- C3 for 4K photo (allows you to use the shutter button to shoot video)
Specific Custom Video Settings
These settings can be saved into one of your custom profiles (#7 above) as a quick starting or reference point when setting up the camera or reconfiguring for a different shot.
1. Photo Style
Located on page 1 of the Motion Picture Menu.
The LX100 does not have a log profile or other flat video profile (like the Sony RX100 V). The LX100 only has various “photo styles” which apply to both still images as well as video. The best you can do is to shoot with a “Natural” or “Standard” photo style, modified as follows to lower the contrast and flatten the picture:
- -3 on Contrast
- -5 on Sharpness
- 0 (unchanged) on Noise Reduction
- 0 (unchanged) on Saturation
You can experiment with the photo styles to see what yields the most pleasing results for your eye.
2. I-Dynamic
Located on page 2 of the Motion Picture Menu.
I turn this off for shooting video because it introduces a bit more noise in the shadows, though the difference is probably marginal (so it’s worth experimenting).
3. Using Contrast Curves
Located on page 2 of the Rec Menu.
In the Rec Menu, look for the “Highlight Shadow” setting. There are different default options, plus 3 different custom settings that you can create (using the back control dial to scroll). The LX100 does not have a log or flat profile, but you can compensate to a degree with a custom curve. I recommend turning down the highlights (-5), but leaving the shadows unchanged, since raising the shadows can introduce more noise in the video. But with that said, you can experiment and revise your settings.
4. Video Autofocus
Located on page 1 and page 2 of the Motion Picture Menu.
On page 1, under “AFS/AFF/AFC”, you might want to set this to AFF or AFC for continuous autofocus. On page 2, set “continuous autofocus” to “on”. The LX100, like other Panasonic cameras, uses a contrast detect autofocus system. It uses Panasonic’s proprietary DFD technology, which is very snappy for single autofocus. I usually used AFS, but found that my better video clips were when the camera was set to AFC. However, like other contrast detect autofocus systems, it can hunt in low light.
5. Live View vs. EVF
Located on page 9 of the Custom Menu.
I usually use the camera’s EVF, as the image is brighter and more detailed than the live view monitor on the back of the camera. There is a small sensor next to the EVF that automatically moves the image display to the EVF when you hold the camera up to your eye. In underwater situations, it is nearly impossible to use the EVF through the camera housing and my scuba mask; you must rely upon the live view monitor on the back, which is of decent quality. To keep the camera set on live view, open the Custom Menu, go to the 9th page of options, select “Eye Sensor” and set the “LVF/Monitor Switch” to “MON”, to force the camera to stay on live view. Otherwise the camera housing will usually trip the sensor, moving the display to the EVF.
6. AF/AE Lock
Located on page 1 of the Custom Menu.
Set the AE/AF button to AF in order to enable back button autofocus. It is handy for both video and still photos.
7. iA Button Switch (Intelligent Auto (iA)
Located on page 8 of the Custom menu.
The LX100 has an “intelligent auto” button on the top of the camera (marked “iA”), I would recommend taking manual control of your exposure variables. Unfortunately, the iA button cannot be reprogrammed to a more useful function. However, you can go into the custom menu and set the iA button to “press and hold” in order to invoke intelligent auto (as opposed to single press, which increases the likelihood of using it accidently).
Once you are done with the above settings, go ahead and save them as one of your Custom profiles.
Sample Panasonic LX100 Underwater Video
Caribbean Blues Interlude by Basil Kiwan. Originally filmed at 4K in the Turks & Caicos. Be sure to increase the playback resolution by clicking the HD button.
Diving the Red Sea by Basil Kiwan. Originally filmed at 4K in the Red Sea. Be sure to increase the playback resolution by clicking the HD button.
Conclusion
The LX100 is a small but very capable compact camera, pairing a comparatively large sensor with a really nice Panasonic-Leica lens. The 4K video quality is excellent, with great color and resolution, and is a lot of fun to work with. The above settings will help you get started on shooting some incredible video. As always, you can contact the team at Bluewater Photo for full details on shooting with Panasonic cameras.