Ambient Light

Todays cameras seem more complicated than ever. With an overwhelming number of menu items and dozens of shooting and metering modes it’s easy to forget that the basic principals of photography have changed very little. A camera is still just a light tight box that contains some light sensitive material. We still allow light to enter the box through an aperture in the lens and we control how long light is allowed to enter by opening and closing a shutter.
So even though your camera may have hundreds of menu options, it all comes back to the basics. We have 3 controls that affect ambient light exposure – ISO, aperture and shutter speed. No matter how sophisticated your camera or what metering mode you use, in the end you (or your camera) will make adjustments to these 3 controls and that will give you your final ambient exposure.
So what can we do with three controls? Create amazing images! Ambient light photography is the key to most wide angle images and can be used in your macro shots as well. Ambient light gives us those amazing blue backgrounds, silhouettes and the ability to capture scenes that are far too large to be lit only by your strobes.
So where to start? In my opinion, there are only two ways to meter for an ambient exposure, either for the desired color of your blue water background or for details in your main subject. If you are having trouble with wide angle balanced light images, it is best to start with blue water backgrounds. We will be covering strobe and balanced light exposures in a future column.
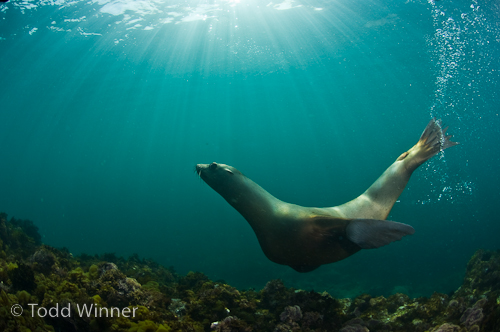
Shallow ambient lit image. F8, 1/250th, ISO 400, Nikon 10.5m fisheye lens
Camera settings underwater:
White balance: I prefer to use a daylight or a slightly cooler white balance most of the time. We are going for a consistent color from shot to shot so I would stay away from auto. Metering mode; I prefer to use a spot meter or a small center weighted meter. Matrix metering; although it works well with auto and priority modes, looks at too many areas of your scene to give you the precise control we are after.
Exposure mode: set it to manual. You only have 3 controls to think about and even if you normally shoot in one of the priority modes this is a great exercise for taking full control of your images. ISO; this depends on both your camera and the ambient light conditions but for most of your images this can be set at or near your base ISO (usually ISO 100 or 200). So now that your ISO is set, we only have 2 controls to worry about shutter speed and aperture. Even I can remember that much underwater.
For a starting point set your shutter to 1/125 and your aperture between f5.6-f8.
Now it’s just a matter of pointing your camera and setting the 2 controls. But where to point? Part of this is up to you and what color blue you prefer. I keep saying blue but if your diving in green water you can just exchange blue for green. So are you the kind of person that likes dark or light blue? I like dark and have two simple methods to achieve it. If the sun is included in my image, I meter about 15 to 20 degrees off from the center of the sun and set my 2 controls to zero out the light meter. Remember your light meter is looking for neutral gray and this area off to the side of the sun ball is close to that shade. If the sun is not included I will meter on an area of blue water near the center of my image and set my two controls to under expose by 1 to 2 stops. Since you will probably be adding fill light into your future shots, its best to stay within max sync speeds with your shutter control. Usually not faster than 1/250 sec. Just shoot nothing but blue water for one dive till you can achieve the same consistent color over and over.
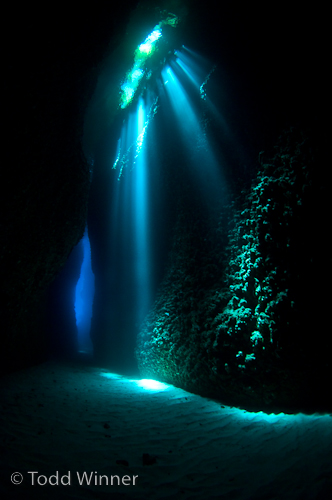
Metered on the detail of the crevice wall. F6.3, 1/8th, ISO 800, Tokina 10-17mm fisheye lens, Nexus Housing (as are the rest of the photos), taken while diving the Solomon islands
Shooting Silhouettes Underwater
Once you can consistently get the color you are after, it’s time to start shooting silhouettes. Typically, silhouettes are shot with the sun in back of the subject, but as long as you have enough contrast between the darker subject and the lighter blue water background they will still work. The subject just needs to have a strong recognizable shape like a diver or a shark and be isolated away from the reef out in the blue water. If the sun is at your back then the subject needs to be far enough away so you are not capturing color off of it. A silhouette should be black or near black.
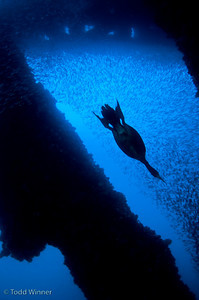
Cormorant diving under an oil rig. F5, 1/60th, ISO 100, 17mm
Underwater Photography Tips
When it comes to metering for detail in your subject there are a few tips that can help. Stay shallow and you will retain more color in your final image. Keep the sun to your back so the natural light is falling on your subject. Use color enhancing filters to add color back into the image. This is great information but not always possible in the real world. The reality is, most of us dive where the boat drops us off. If the subject of interest happens to be a shipwreck at 100′ with the sun in my face I still want to shoot it.
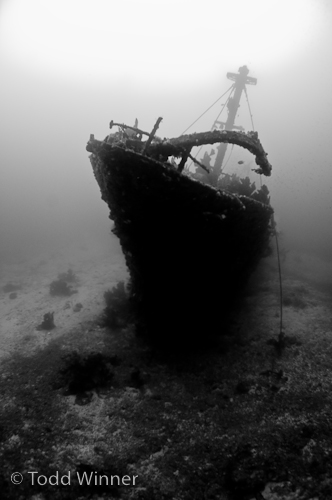
Metered for detail in the sand. F3.5, 1/60th, ISO 400, Solomon Islands.
So instead of metering on the blue water I meter on a neutral area on my subject. The result is usually a much lighter water color than I prefer but you can often find a suitable setting that still gives you detail without sacrificing too much color in the water. You can also try converting these images to black and white. It depends on the subject matter but I find ambient light images often make the best black and white underwater photographs.
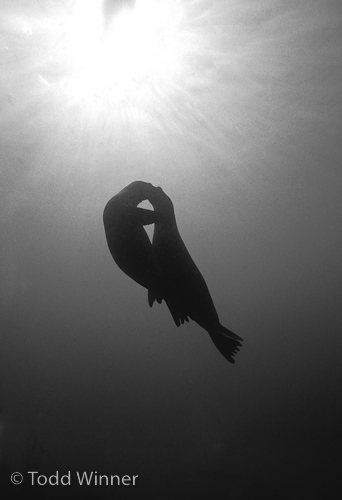
Originally shot on black and white film. Metered 15 degrees to the right of the sun burst
I hope you give ambient light underwater photography a try. Not only can you create stunning images without a strobe but it’s the first step in mastering your balanced light photographs.
Continue on to part II: Strobe Exposures
Further Reading
Diving adventure column: “Lost inside the Caves” – Lessons learned
by Randy Harwood
Underwater Photography Travel column: “Two of the best shark dives”
by Ridlon Kiphard


