Optimizing Your Lightroom Workflow
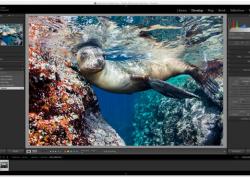
Adobe Lightroom has become the standard for editing and organizing underwater photos, at least for those who consider themselves serious photographers. Adobe has worked hard to earn this position, building more robust tools and features into each new release. Lightroom is designed to streamline photo workflows for working pros shooting thousands of images while remaining simple and intuitive for photographers of all levels. No matter what our level of u/w photography, we can always benefit from more optimized workflows.
If you're new to Lightroom, be sure to read our intro tutorial 5 Easy Steps to Process your Underwater Photos.
This tutorial will build upon the intro tutorial by discussing a few timesaving tips for editing photos and cataloguing them for future use ("findability").
1. Delete the Undesirables
There will always be different points of view on deleting images and how to do it, but I believe in 1) never deleting images on camera, and 2) deleting the undesirables instead of keeping every single photo. Lightroom is designed to help you trash the junk and select your keepers, so take advantage of that.
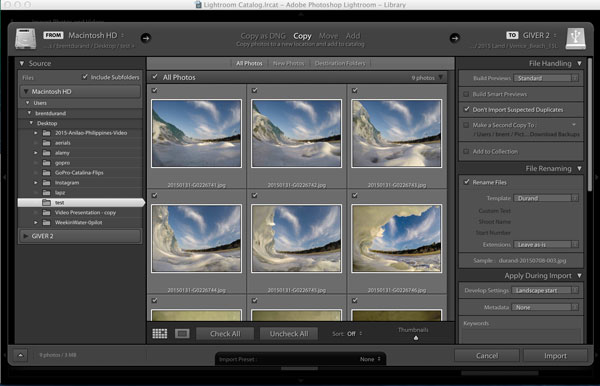
The best way to get rid of the junk is in the Import dialog box, before your photos are imported into Lightroom. You can uncheck the photos that are obviously garbage, or uncheck everything and just check the photos you anticipate keeping. Which method you choose will depend on your shooting style, how unique the shots are and how well you know exactly what you want to keep.
While this is my preferred method, my dive trips are not about photos and I often don’t have time to look at any shots until I’m back home. So for dive trips I do my deletion round weeks later (obviously post-import) scrolling through the photos and quickly rejecting the bad ones by pressing the X key. This flags all the photos in that folder as rejects, which can then be deleted in a batch by pressing Command + Delete (MacOS) or Ctrl + Backspace (Windows).
One important note is that if you're unsure of whether to delete an image or not - keep it.

Depending on whether you keep or delete more images pre-import, you can check all and just uncheck the undesirables, or uncheck all and just check the desirables.

The import dialog box allows you to view photos in grid or single image format.
2. Apply Import Settings
The Import dialog box also is where you can quickly apply titles, develop presets, metadata and other actions to many photos at once. By quickly adding all of this broad information at once, all you’ll need to do is work on the individual details of the images later, saving time.
File Renaming
This section is where you title your images, being sure that there will never be any title overlap. For example, I use my name to ensure anyone I send the photo to knows it is mine, the date since the date will never repeat and helps me match photos to dive sites and locations in my dive log, and a photo number to differentiate that photo from any others shot on the same date.
Titling your images here is helpful, as you should never need to change image title again (LR virtual copies being the exception). If you do change image titles after the fact (using LR), you may run into problems matching your Lightroom previews to the actual RAW files, especially when moving your library to newer hard drives over the years.

This is the preset I use for naming files.
Apply During Import
The next section in the Import dialog box says ‘Apply During Import’. This is where we apply general info to our photos.
Develop Settings allows you to select a user preset for developing your image. For example, I have a preset for wide-angle underwater that adds my default formula of clarity, sharpening, saturation, vibrance and contrast to RAW files as a starting point for further editing (which often isn’t needed). If you produce consistent images, this is a huge time saver - literally one-click editing.
I don’t use any metadata presents since the terms are almost always different, however I do input Keywords for the group of photos soon to be imported. Keywords are metadata that can be used to search for photos within Lightroom at a later date. Let’s say I want to find all the wave photos I’ve shot in Malibu over the last few years. Instead of digging through several folders looking for wave pics, I can search “wave, malibu” and see every image in my catalog containing those keywords. In the Keywords box I will add the general terms like “Malibu, Wave, GoPro HERO4 Silver”, since they apply to all the photos in this import. Later I will add the individual words, marine life names, etc.

Applying a develop preset setting and adding keywords in the import dialog box.
3. Improving Findability
We are all striving to shoot great images, and if they truly are great, we’re going to want to find them later. Cataloging your photos to make them easy to find later is one of the main functions of Adobe Lightroom.
Ranking your images and adding metadata is not fun and it takes time. But when you have many thousands of images spanning many years, it would be nearly impossible to find a specific photo buried in a catalog folder…. unless you have added all the criteria to conduct a detailed search. Here are the two most useful criteria.
Keywords
These are the key to your searches. You’ve already added the general keywords during the import, so all you need to do is add the specific keywords (marine life, specific behavior, etc).
Stars
Everyone uses the star rankings differently. For example, 5 stars could be a portfolio image, 4 stars a great image, 3 stars an image you might still show or print, and so on. When you combine keywords with star rankings you can search for not only your “Malibu Wave” images, but the different quality tiers of those shots.

In Conclusion
Adobe Lightroom is powerful enough to be your sole post-processing tool. This tutorial barely scratched the surface of Lightroom’s functionality and usefulness, however there are only so many words to include in one article. Stay tuned for our next Lightroom tutorial in the coming weeks.
Want to Learn Lightroom?
UWPG Publisher Scott Gietler teaches Lightroom tutorials via Bluewater Photo. Check out Scott’s article Lightroom for the Rest of Us and book your lesson!
Bluewater Photo : +1 (310) 633-5052 – sales@bluewaterphotostore.com
Further Reading
RECOMMENDED ARTICLES
SUPPORT THE UNDERWATER PHOTOGRAPHY GUIDE:
The Best Service & Prices on u/w Photo Gear
 Visit Bluewater Photo & Video for all your underwater photography and video gear. Click, or call the team at (310) 633-5052 for expert advice!
The Best Pricing, Service & Expert Advice to Book your Dive Trips
 Bluewater Travel is your full-service scuba travel agency. Let our expert advisers plan and book your next dive vacation. Run by divers, for divers.


